---
title: Gradle Multi-Project Builds for Maven Users
url: https://blog.octoperf.com/gradle-multi-project-builds-for-maven-users/
date: '2019-07-25'
authors:
- gpereira
categories:
- Development
tags:
- Maven
- Tutorial
- Code Quality
description: How to create a multi-modules Maven project in the Gradle world?
---
# Gradle Multi-Project Builds for Maven Users
This blog is the opportunity to check on new technologies:
> I wanted to try another **build solution for my Java backends**.
> I used [Maven](https://maven.apache.org/) for several years, both on OctoPerf and in my previous work experiences.
> **Moving from Maven to [Gradle](https://gradle.org/) is not necessarily easy**, as the concepts involved are different.
This blog post is a guide for every developer with a Maven background that would like to give a try to Gradle (version 5.x),
especially for **authoring multi-module/multi-project builds**.
It lists the differences between the two build solutions, step by step.
You will learn what pitfalls to avoid, and how to setup code quality tools.
> This is not a [beginner guide on Gradle](https://docs.gradle.org/current/userguide/building_java_projects.html),
> it aims at describing the build setup of a complex project.
> However, be warned that my experience with Gradle is limited to this single project.
## Maven VS Gradle
[Apache Maven](https://en.wikipedia.org/wiki/Apache_Maven) was first released in 2004 and holds the majority of the build tool market today.
**Maven is a dependency management and a build automation tool, that relies on conventions (over configuration) to allow you to focus on what your build should do** (only exceptions need to be written down).
By convention, Maven's configuration files are named `pom.xml`.
They contain, amongst other things:
* Its dependencies on other external modules and components,
* The build order,
* The used directories,
* and the required plugins.
[Gradle](https://en.wikipedia.org/wiki/Gradle) is a dependency management and a build automation tool, first released in 2007, that was built upon the concepts of Ant and Maven.
Gradle's configuration files are by convention called `build.gradle`.
**Unlike Ant or Maven, Gradle does not use XML files but instead its own DSL (Domain Specific Language)** based on Groovy.
This leads to smaller configuration files, XML being more verbose than a specifically designed language.
IMHO, Gradle's configuration tends to be a bit more difficult than Maven.
But that is probably only because I have much more experience with Maven than Gradle.
That being said, the thing that made me **try Gradle is its build speed**.
Thanks to incremental tasks outputs, incremental compilation, and build caches, [Gradle claims to be up to 100 times faster than Maven](https://gradle.org/gradle-vs-maven-performance/).
And that's no joke!
Are you tired of waiting after your builds?
So instead of buying a new laptop or building on [expensive Cloud instances](https://blog.octoperf.com/elasticsearch-optimization-guide/#virtualization-vs-bare-metal), why don't you give a try to Gradle?
## From Maven Multi-module Project to Gradle Multi-project Build
For a start, searching on Google for the terms `Gradle multi-module project` will lead you nowhere,
simply because this notion of splitting an application in sub-parts has a different name in the Gradle world:
It's called a [multi-project build](https://guides.gradle.org/creating-multi-project-builds/).

This naming gap between the two build solutions highlights **how different they are from a conceptual point of view**.
### Maven Multi-module Project
In Maven you use XML to describe your build, more precisely `pom.xml` files.
In a multi-module project, you define a root _pom_ that lists all its sub-modules.
For example, here is an extract of the root `pom.xml` file for the open-source [Elastic CRUD](https://github.com/jloisel/elastic-crud/blob/master/pom.xml) project:
```xml
4.0.0
com.jeromeloisel
elasticsearch-crud
5.6.4-SNAPSHOT
pom
[...]
db-repository-api
db-entity
db-conversion-api
db-conversion-jackson
db-repository-elasticsearch
db-spring-elasticsearch-starter
db-integration-test
db-scroll-api
db-scroll-elastic
```
**You may want to have several layers of modules: a sub-module can in turn declare sub-modules of its own.**
For example, the following root module (`pom.xml` at the root of the project) declares two sub-modules `sub-module` and `impl-module`:
```xml
4.0.0
com.test
root-project
0.0.1-SNAPSHOT
pom
sub-module
impl-module
```
In the folder `sub-module`, you can create the following `pom.xml`:
```xml
4.0.0
com.test
root-project
0.0.1-SNAPSHOT
sub-module
pom
sub-module-api
sub-module-impl
```
It declares two sub-modules of its own: `sub-module-api` and `sub-module-iml`.
Finally, in the folder `sub-module/sub-module-api` you would typically write the following `pom.xml` file to declare a _leaf_ module.
```xml
4.0.0
com.test
sub-module
0.0.1-SNAPSHOT
sub-module-api
[...]
```
So, Maven `pom.xml` files work as some kind of bi-directional tree structure:
* Each parent module lists all its children,
* Each child module declares its **unique parent**.
It took me a while to figure out that **Gradle does not work like Maven at all!!!**
### Gradle Multi-project Build
Indeed, Gradle uses a flat structure to declare its sub-projects:
All information about the multi-project is written in the root `settings.gradle` file!
**Even with several layers of sub-projects, you only write one and only one `settings.gradle` file at the root of the global project.**
For example, in one of our Java backend we have several sub-projects (trimmed here for the sake of simplicity):
* backend
* applications
* command
* `build.gradle`
* storage
* `build.gradle`
* `build.gradle`
* commons
* command
* command-entity
* command-zt
* `build.gradle`
* command-client
* `build.gradle`
* storage
* storage-entity
* storage-file
* `build.gradle`
* storage-client
* `build.gradle`
* configuration
* `build.gradle`
* test-utils
* `build.gradle`
* `build.gradle`
* `settings.gradle`
> A first `applications` project is used to generate executable Jars with the task `bootJar` of [Spring Boot Gradle plugin](https://docs.spring.io/spring-boot/docs/current/gradle-plugin/reference/html/).
> Its two sub-projects `applications/storage` and `applications/command` only contain dependencies and configurations required to start `storage` and `command` applications.
>
> The second `commons` project contains libraries used by the applications.
> Some libraries are regrouped in their own sub-project like `command` and `storage`.
> A standalone library, `configuration` is used to read properties from environment variables of from the [String `application.yml` file](https://www.baeldung.com/spring-yaml).
>
> There is also a `test-utils` [sub-project that is only used as a test dependency](#cross-project-dependencies).
Here is an extract of the corresponding Gradle settings:
```
rootProject.name = 'backend'
include ':commons:command:command-entity'
include ':commons:command:command-zt'
include ':commons:command:command-client'
include ':commons:storage:storage-entity'
include ':commons:storage:storage-file'
include ':commons:storage:storage-client'
include ':commons:configuration'
include ':test-utils'
include ':applications:command'
include ':applications:storage'
project(':commons:command:command-entity').projectDir = file('commons/command/command-entity')
project(':commons:command:command-zt').projectDir = file('commons/command/command-zt')
project(':commons:command:command-client').projectDir = file('commons/command/command-client')
project(':commons:storage:storage-entity').projectDir = file('commons/storage/storage-entity')
project(':commons:storage:storage-file').projectDir = file('commons/storage/storage-file')
project(':commons:storage:storage-client').projectDir = file('commons/storage/storage-client')
project(':commons:configuration').projectDir = file('commons/configuration')
project(':test-utils').projectDir = file('test-utils')
project(':applications:command').projectDir = file('applications/command')
project(':applications:storage').projectDir = file('applications/storage')
```
Keep in mind that only one `settings.gradle` must be used, it defines all the hierarchy of sub-projects, no matter their depth.
**In these settings, only _leaf_ projects have to be declared.**
For example, there is no need to declare `applications` and `commons` sub-projects.
The syntax to declare a sub-project is `include ':path:to:sub-project'`.
You may also add a line like `project(':path:to:sub-project').projectDir = file('path/to/sub-project')` for each sub-project.
But it seems to work without it (the [IDE Idea](https://www.jetbrains.com/help/idea/gradle.html) automatically generate it this way though ...).
Also, **`build.gradle` files are optional for sub-projects**.
You only need them to [declare dependencies](#dependencies-management) for [all projects or sub-projects](#allprojects-and-subprojects).
## allprojects and subprojects
Sub-projects without shared behaviors would be completely useless.
Even if the `settings.gradle` file lets you defining sub-projects, it does not allow you to declare shared dependencies or tasks.
This can be done in the build definition (`build.gradle` files) of each project, thanks to the `allprojects` and `subprojects` keywords:
* `allprojects` defines behaviors common to the current project and all its sub-projects,
* `subprojects` defines behaviors common only to its sub-projects.
**Note:** they not only apply to direct sub-projects, but also to their respective children, if any.
For instance, the root `backend` project declares both:
```
allprojects {
repositories {
[...]
}
jacoco {
[...]
}
}
subprojects {
apply plugin: 'java'
dependencies {
[...]
}
}
```
`allprojects` is used to [declare external repositories](#declaring-external-repositories) for every project as well as [code quality related tasks such as Jacoco and SpotBugs](#code-quality).
`subprojects` mark all sub-projects as Java projects thanks to the Java plugin, and declares dependencies that are shared by all sub-projects.
## Build Plugins
[Plugins](https://en.wikipedia.org/wiki/Plug-in_(computing)) are a good way to add features to your build with minimum efforts.
For instance, the [Spring Boot plugin](https://spring.io/guides/gs/spring-boot/) provides many convenient features (for both Maven and Gradle versions):
* It generates a runnable über-jar, that we use in Docker images,
* It searches for the `public static void main()` method to flag as a runnable class,
* It provides a built-in dependency resolver that sets the version number [to match Spring Boot dependencies](#dependencies-management).
With Maven the configuration is straightforward, please check out the [Spring multi-module guide](https://spring.io/guides/gs/multi-module/) and the resulting [code sample](https://github.com/spring-guides/gs-multi-module/tree/master/complete).
**The configuration is a bit more complicated as one single Gradle build is used to:**
1. Build `commons` libraries that rely on Spring boot managed dependencies and Spring WebFlux dependencies,
2. Build `applications` and their executable _bootJars_.
So, the root `gradle.build` of our backend has the following configuration:
```
plugins {
id 'io.spring.dependency-management' version '1.0.8.RELEASE'
}
subprojects {
ext {
springBootVersion = '2.1.6.RELEASE'
springReactorVersion = '3.2.10.RELEASE'
}
apply plugin: 'io.spring.dependency-management'
dependencies {
implementation group: 'org.springframework.boot', name: 'spring-boot-starter-webflux', version: springBootVersion
testImplementation group: 'org.springframework.boot', name: 'spring-boot-starter-test', version: springBootVersion
testCompile group: 'io.projectreactor', name: 'reactor-test', version: springReactorVersion
testImplementation group: 'org.springframework.boot', name: 'spring-boot-devtools', version: springBootVersion
}
dependencyManagement {
imports { mavenBom("org.springframework.boot:spring-boot-dependencies:${springBootVersion}") }
}
}
```
For all sub-projects (_applications_ and _commons_ alike):
* It declares and applies the [Spring dependency management](#dependency-management) plugin to all projects,
* It also declares runtime and test dependencies to Spring Boot WebFlux.
This allows us to use [SpringBoot WebFlux](https://docs.spring.io/spring/docs/current/spring-framework-reference/web-reactive.html) in every class of our project.
To generate executable Jars, we must configure the Spring Boot plugin on the `applications` sub-project:
```
plugins {
id 'org.springframework.boot' version '2.1.6.RELEASE'
}
subprojects {
buildscript {
dependencies {
classpath("org.springframework.boot:spring-boot-gradle-plugin:${springBootVersion}")
}
}
apply plugin: 'org.springframework.boot'
}
```
This adds the `booJar` task on every child project of _applications:_
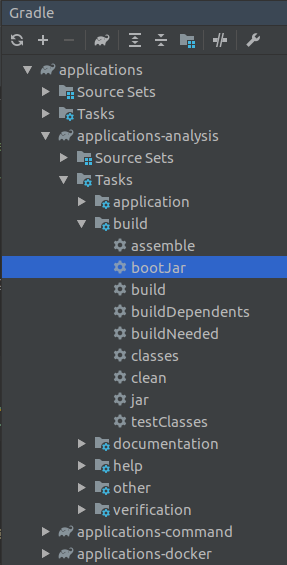
*Gradle task launcher in Idea*
## Dependencies Management
Dependencies management in Gradle can be relatively similar to Maven's, even though it is not as straightforward to setup (probably for the sake of flexibility).
### Declaring External Repositories
The first thing to be aware of when switching to Gradle is that it does not come with a central repository out of the box.
So, in order to declare dependencies to external libraries, you must first declare the Maven central repository with the syntax `mavenCentral()`.
We declare the Maven Central repository for all projects in the root `build.gradle` file:
```
allprojects {
repositories {
mavenCentral()
}
}
```
> **Note:** We use [the Jacoco plugin](#how-to-generate-jacoco-reports-with-gradle) for all projects (even the root one).
> This plugin has Maven dependencies. Otherwise we could have declared the `mavenCentral()` in the `subprojects` section.
With [Maven, some of your build plugin may have their own dependencies](https://maven.apache.org/guides/mini/guide-configuring-plugins.html).
In such case you can declare them with the following syntax:
```xml
[...]
org.apache.maven.plugins
maven-antrun-plugin
1.2
org.apache.ant
ant
1.7.1
[...]
```
The same principle applies to **Gradle: some of your build plugins may need access to external dependencies**.
Dependencies which are hosted, for example, on Maven central.
In such case you must declare the repository inside the `buildscript` tag:
```
subprojects {
buildscript {
repositories {
mavenCentral()
}
}
}
```
To summarize:
* The **repositories on the root level are used to fetch all dependencies you need to test, compile or build your project**,
* The **repositories in the `buildscript` block are used to fetch the dependencies used by your build**, for example by external plugins.
One last thing with external repositories, in Maven you can use the file `~/.m2/setting.xml` to **declare additional external repositories**:
```xml
[...]
repo.jenkins-cimvn.org
http://repo.jenkins-ci.org/public/
[...]
```
In Gradle, you can do the same in your root `build.gradle` file with the following syntax (here to add the [License4j repository](https://www.license4j.com/download/maven/)):
```
subprojects {
maven {
url "http://www.license4j.com/maven/"
}
}
```
### Simple Dependency Declaration
The syntax to declare a dependency in Maven is more verbose than in Gradle:
```xml
org.springframework.boot
spring-boot-starter-webflux
2.1.6.RELEASE
```
This could be a general statement: **Maven build script are more verbose that Gradle ones**, because of the XML.
That being said, a dependency declaration in Gradle contains exactly the same information:
```
dependencies {
// https://mvnrepository.com/artifact/org.springframework.boot/spring-boot-starter-webflux
compile group: 'org.springframework.boot', name: 'spring-boot-starter-webflux', version: '2.1.6.RELEASE'
}
```
The `compile` _scope_ for the dependency is discouraged: you may prefer to use [`implementation` with Gradle 5](https://docs.gradle.org/current/userguide/java_library_plugin.html#sec:java_library_separation).
### Centralizing Dependencies
When building a complex application with multiple Maven modules or Gradle projects, **it's important to centralize common dependencies in a single place**.
For instance, if you use Guava or Spring in all your Java projects, you should not declare them in each `pom.xml` file of a multi-module Maven project.
Instead, you write them once in your root `porm.xml`, and they will be available for all sub-modules:
```xml
[...]
23.2-jre
com.google.guava
guava
${guava.version}
db-repository-api
db-entity
[...]
```
Another good habit is to also **centralize dependency versions in a single place**.
In the example above we only use one Guava library.
But we could also use [Guava Testlib](https://mvnrepository.com/artifact/com.google.guava/guava-testlib/28.0-jre).
Having the version written is the `` section and used with the `${guava.version}` syntax avoid a duplication of information:
When you want to upgrade to a newer Guava version, you only have to do it in a single place.
**This prevents you from forgetting to update one of the two libraries!**
The syntax is quite similar in Gradle.
For example here is an extract of the root `build.gradle`:
```
subprojects {
ext {
springBootVersion = '2.1.6.RELEASE'
}
dependencies {
// https://mvnrepository.com/artifact/org.springframework.boot/spring-boot-starter-webflux
implementation group: 'org.springframework.boot', name: 'spring-boot-starter-webflux', version: springBootVersion
}
}
```
The variables are defined as [project extra properties](https://docs.gradle.org/current/userguide/writing_build_scripts.html#sec:extra_properties) in the `ext` tag.
In Gradle, you need to place your `dependencies` section inside the `subprojects` in order to make it apply to all sub-projects of the current build (defined in [your `settings.gradle` file](#gradle-multi-project-build)).
### Dependency Management
[The Maven dependency management section](https://maven.apache.org/guides/introduction/introduction-to-dependency-mechanism.html#Dependency_Management) is a mechanism for centralizing dependency information.
**Use the `` section of your parent `pom.xml` to declare dependencies version and scope** for all sub-modules.
For example, here we declare that the SLF4J version is _1.7.26_ in our root `prm.xml` file:
```xml
[...]
org.slf4j
slf4j-api
1.7.26
[...]
```
Then, in a child module, we can only declare the SLF4J api dependency without the version:
```xml
[...]
org.slf4j
slf4j-api
[...]
```
Thanks to the dependencyManagement tag in the parent pom, the version is automatically set to the same _1.7.26_ for all child modules.
As far as I know, **such mechanism is not present natively in Gradle**.
But you can use a Spring plugin to do it: [Dependency Management Plugin](https://docs.spring.io/dependency-management-plugin/docs/current/reference/html/).
```
dependencyManagement {
imports { mavenBom("org.springframework.boot:spring-boot-dependencies:${springBootVersion}") }
}
```
### Cross Project Dependencies
**In Maven, declaring a cross-modules dependency is done like any other dependency declaration.**
Lets take for example the [Elastic-CRUD project](https://github.com/jloisel/elastic-crud/).
A sub-module `db-repository-api` has a dependency towards `db-entity`.
The `pom.xml` for the [DB-Entity module](https://github.com/jloisel/elastic-crud/blob/master/db-entity/pom.xml) is quite simple:
```xml
4.0.0
com.jeromeloisel
elasticsearch-crud
5.6.4-SNAPSHOT
db-entity
```
Then in the [DB-Repository-API module](https://github.com/jloisel/elastic-crud/blob/master/db-repository-api/pom.xml) we declare the dependency like any other:
```xml
[...]
com.jeromeloisel
db-entity
${project.version}
[...]
```
**But in Gradle, just as [there is no default central repository for dependencies management](#declaring-external-repositories), there is no local repository**.
So we need to declare dependencies towards other sub-projects, not towards the generated JARs.
Let's come back to our sample application.
It's divided in two global sub-projects:
* `applications` that generates executable Jars,
* `commons` that contains libraries.
The `command` application uses the `command-zt` library (available in `commons/command/command-zt`).
So in order to declare the dependency, we must use the following syntax in the `build.gradle` of the _command_ application:
```
dependencies {
implementation project(':commons:command:command-zt')
}
```
Note that it differs from the syntax used to declare external dependencies: `implementation group: 'com.external', name: 'library', version: 42`
Also, you might want to read the next section about [test dependencies](#test-jar-test-dependencies) that covers cross-project test dependencies.
### Test Dependencies
This section describes how to:
* [Import simple test dependencies](#simple-test-dependencies) used to compile and run your unit tests (but not required to compile the `src/main` classes),
* [Import cross sub-modules/sub-projects test dependencies](#test-jar-test-dependencies), i.e. when you want to use `src/test` Classes of one module inside another one's tests.
#### Simple Test Dependencies
Importing a test dependency in Maven is easy.
You just need to [use the `test` scope](https://maven.apache.org/guides/introduction/introduction-to-dependency-mechanism.html#Dependency_Scope):
```xml
org.springframework.boot
spring-boot-starter-test
${spring.boot.version}
test
```
Similarly, Gradle has a simple syntax with [the `testImplementation` configuration](https://docs.gradle.org/current/userguide/java_library_plugin.html#sec:java_library_configurations_graph):
```
dependencies {
testImplementation group: 'org.springframework.boot', name: 'spring-boot-starter-test', version: springBootVersion
}
```
In both cases, these dependencies are only available during compilation and execution of the unit tests, not for the normal classes.
#### `test-jar` Test Dependencies
**It's a bit more complex, both with Maven and Gradle, when you want to use test Classes of one sub-module/sub-project inside another one's tests.**
> The use case is that you want to have common test classes used to compile and run unit tests in many of your sub-projects.
> For example, we have a test-utils library that contains two classes:
>
> * `TestUtils.java` to run [EqualsVerifier](https://jqno.nl/equalsverifier/) and [NullPointerTester](https://static.javadoc.io/com.google.guava/guava-testlib/19.0/com/google/common/testing/NullPointerTester.html) on a given class,
> * `ResourceUtils.java` to load files from the `test/resources` folder.
>
> These classes are placed inside the `test` folder of the project, as they are only used in unit tests.
> Otherwise, we would have to unit test them to keep a good test coverage.
With Maven, you must [configure the _maven-jar-plugin_](https://maven.apache.org/plugins/maven-jar-plugin/examples/create-test-jar.html) accordingly.
For instance with the [Elastic-CRUD root `pom.xml` file](https://github.com/jloisel/elastic-crud/blob/master/pom.xml):
```xml
[...]
org.apache.maven.plugins
maven-jar-plugin
3.0.2
test-jar
true
[...]
```
This sample configuration will generate `test-jar` for each sub-module that has test classes.
Then you can import these _test-jar_ jars like this:
```xml
[...]
com.test
my-test-sub-module
version
test
test-jar
[...]
```
To summarize:
* The `test` tells Maven that this dependency is only used for unit tests,
* The `test-jars` tells Maven to import the Jar of the dependency with the `src/test` classes instead of the classic `src/main`.
**In Gradle, you must add the following build configuration to your root `build.gradle` file:**
```
subprojects {
configurations {
testArtifacts.extendsFrom testRuntime
}
task testJar(type: Jar) {
archiveClassifier.set('test')
from sourceSets.test.output
}
artifacts {
testArtifacts testJar
}
}
```
In the Gradle world this generates a `testJar` artifact, just like the maven-jar-plugin `test-jar` goal does.
Then, to use the _test_ dependency, simply import it with the following syntax:
```
dependencies {
testCompile project(path: ':test-utils', configuration: 'testArtifacts')
}
```
* The `testCompile` tells Gradle that this dependency is only used for unit tests,
* The `configuration: 'testArtifacts'` tells Gradle to import the `src/test` artifact of the dependency instead of the classic `src/main`.
## Java Version

In a multi-module maven project, you need to define the Java version only once in your root `pom.xml` file:
```xml
org.apache.maven.plugins
maven-compiler-plugin
3.8.0
11
true
```
The configuration is done on the [maven-compiler-plugin](https://maven.apache.org/plugins/maven-compiler-plugin/examples/set-compiler-source-and-target.html).
Note that if your are have troubles compiling a Java 11 project with Maven 3.3.9, you may add the configuration `false` to this plugin.
**In Gradle, the Java compilation is handled by the [Java Plugin](https://docs.gradle.org/current/userguide/java_plugin.html#convention_properties).**
Here again, you can define the Java version only once for a multi-project build by setting the following configuration in your root `build.gradle`.
```
subprojects {
sourceCompatibility = 11
}
```
It adds the `sourceCompatibility` property to all sub-projects. This property is then used by the Gradle build Java Plugin:
> Java version compatibility to use when compiling Java source. Default value: version of the current JVM in use JavaVersion. Can also set using a String or a Number, e.g. '1.5' or 1.5.
## Code Quality
Since the beginning of OctoPerf we were always very considerate with [code quality](https://blog.octoperf.com/building-better-software/).
We extensively use [SonarQube for code coverage and bugs analysis](https://blog.octoperf.com/we-are-obsessed-with-quality/).
I won't come back on how to generate Sonar reports using Maven, as it would require a dedicated blog post.
So let's skip directly to an overview of two code quality tools that can be ran with Gradle, without the requirement of an external [SonarQube](https://www.sonarqube.org/) server.
### How To Generate JaCoCo Reports With Gradle
[JaCoCo](https://www.eclemma.org/jacoco/) is a free library that can generate test-coverage HTML reports.
**The following integration in a Gradle multi-projects build allows you to generate a single report that covers all projects at once.**
Every configuration is done in the root `build.gradle` configuration file.
First you need to apply the [Jacoco Gradle plugin](https://docs.gradle.org/current/userguide/jacoco_plugin.html) to all projects and set the version used to `0.8.2`.
This plugin needs access to the Maven repository, so you must also [add Maven in the external repositories section](#declaring-external-repositories):
```
allprojects {
apply plugin: 'jacoco'
repositories {
mavenCentral()
}
jacoco {
toolVersion = '0.8.2'
}
}
```
Then, you must configure JaCoCo to generate XML reports as well as HTML reports.
Also, the `check` task depends on the JaCoCo report one (`jacocoTestReport`): it generates test reports automatically when the `check` task is executed.
```
subprojects {
jacocoTestReport {
reports {
html.enabled = true
xml.enabled = true
csv.enabled = false
}
}
check.dependsOn jacocoTestReport
}
```
Finally, create a `jacocoRootReport` that aggregates all sub-project reports into one single big report:
```
task jacocoRootReport(type: JacocoReport) {
dependsOn = subprojects.test
getAdditionalSourceDirs().setFrom(files(subprojects.sourceSets.main.allSource.srcDirs))
getSourceDirectories().setFrom(files(subprojects.sourceSets.main.allSource.srcDirs))
getClassDirectories().setFrom(files(subprojects.sourceSets.main.output))
getExecutionData().setFrom(files(subprojects.jacocoTestReport.executionData))
reports {
html.enabled = true
xml.enabled = true
csv.enabled = false
}
onlyIf = {
true
}
doFirst {
getExecutionData().setFrom(files(executionData.findAll {
it.exists()
}))
}
}
```
To generate the test coverage report, simply run the command `./gradlew jacocoRootReport`.
Once the task is done, the report is available in the sub-folder `build/reports/jacoco/jacocoRootReport/html` of your root project directory.
### How To Spot Bugs With Gradle
[SpotBugs](https://spotbugs.github.io/), the spiritual successor of FindBugs, is a free program which uses static analysis to look for bugs in Java code.

Once again, **its usage with Gradle is eased thanks to a [plugin](#build-plugins): [SpotBugs Gradle Plugin](https://plugins.gradle.org/plugin/com.github.spotbugs)**.
In a multi-projects Gradle build, you can declare the plugin in the root `build.gradle` file to be applied on every sub-project:
```
plugins {
id 'com.github.spotbugs' version '2.0.0'
}
subprojects {
apply plugin: 'com.github.spotbugs'
dependencies {
implementation group: 'com.google.code.findbugs', name: 'annotations', version: '3.0.1'
}
spotbugsMain {
reports {
xml.enabled = false
html.enabled = true
}
}
spotbugsTest {
reports {
xml.enabled = false
html.enabled = true
}
}
check.dependsOn spotbugsMain
}
```
The `check` task depend on the `spotbugsMain` one: SpotBugs reports are automatically generated when the `check` task is executed.
So running `./gradlew check` will execute SpotBugs on each sub-project and generate a report.
Also, the build fails in case of any spotted bug.
> Unfortunately I did not manage to generate a global report for the whole project.
> So the information of potential bugs is split across all sub-project SpotBugs reports.
## Conclusion
I hope this blog post is helpful for anyone that would like to **give a try to Gradle for a complex multi-project build**.