---
title: REST API using Node.js
url: https://blog.octoperf.com/rest-api-using-nodejs/
date: '2015-09-10'
authors:
- gpereira
categories:
- Development
tags:
- Node.js
- Typescript
- REST
- JSON
- Code Quality
description: This post is a step by step guide to create a CRUD REST Endpoint using Node.js, Express and TypeScript.
---
# REST API using Node.js
I want to setup a simple REST server that allows to Create, Read, Update and Delete data (Users in this case) using **Node.js,
Express, and TypeScript**:
* I could do it using Java/Spring in a couple of minutes, but I want to learn more about [Node.js](https://nodejs.org/en/).
* [Express](https://expressjs.com/) seems to be a good choice to create REST APIs.
* And as I think that TypeScript may be the good compromise between Java and Javascript [I will keep on giving it a try](https://blog.octoperf.com/typescript-using-webstorm/).
Also, I would like to feel as comfortable as using Java. First I need [a debugger](#nodejs-debug). No need to spam `console.log()` using node-inspector.
**Then [unit tests are mandatory](#unit-testing-and-code-coverage) and cannot go without a code coverage tool.**
Finally, I make use of various tools to build, test, debug and run the TypeScript code. Grunt is convenient simplify these processes (plus it's a gain for productivity).
The only thing I bypassed is a code quality tool. We use [SonarQube on a daily basis for OctoPerf](https://blog.octoperf.com/building-better-software/),
and I might do the same for this sample someday.
Before reading this article further, you may check the result on [GitHub Rest-Crud](https://github.com/geraldpereira/rest-crud/).
### Prerequisites
**We need Node.js to get started** (`node` and `npm` available on command line). I started using WebStorm to transpile TypeScript to javascript.
But I quickly gave up as it comes with some bugs. So I ended installing [TypeScript and its Definition manager](https://github.com/DefinitelyTyped/tsd) (`tsc` and `tsd`):
```sh
sudo npm install typescript -g
sudo npm install tsd -g
```
Of course [Express should also be installed](https://expressjs.com/starter/installing.html):
```sh
#At the root of your project folder
npm init
npm install express --save
```
`npm init` initializes your node project. It creates a *package.json* file and installing *express* adds the following line to it:
```json
{
"dependencies": {
"express": "~4.13.3"
}
}
```
It also creates a *node_modules* that contains your project's dependencies.
### Definitely typed express.d.ts
To import external modules, not written in TypeScript but in JS, **we need to give the TS compiler type definition files.**
Doing so, it can do type checking when we use them in our project. A repository already contains many definitions: [definitelytyped.org](https://definitelytyped.org/tsd/).
Then we also need to install Express type definition:
```sh
tsd install express --save
```
A *tsd.json* file is created:
```json
{
"version": "v4",
"repo": "borisyankov/DefinitelyTyped",
"ref": "master",
"path": "typings",
"bundle": "typings/tsd.d.ts",
"installed": {
"mime/mime.d.ts": {
"commit": "7f07bd88d1083e995a0dae317a333c9641320cc8"
},
"express/express.d.ts": {
"commit": "7f07bd88d1083e995a0dae317a333c9641320cc8"
},
"serve-static/serve-static.d.ts": {
"commit": "7f07bd88d1083e995a0dae317a333c9641320cc8"
},
"node/node.d.ts": {
"commit": "7f07bd88d1083e995a0dae317a333c9641320cc8"
}
}
}
```
And a *typings* folder is created. It contains all the *.d.ts* files we need.
To import typed definitions we simply add the following line to our *.ts* files.
```javascript
///
```
The TypeScript compiler might display errors such as `Error:(1, 26) TS2307: Cannot find external module 'express'.` if we don't
reference external modules.
__Note:__
> The WebStorm embedded TypeScript compiler would not handle these references, even when using an external TypeScript installation.
## Starting with a 'Hello World'
We start simply with a 'Hello World' sample.
Create the file *hello.ts*:
```javascript
import express = require('express');
var app = express();
app.get('/', function (req, res) {
res.send('Hello World!');
});
var server = app.listen(3000, function () {
var host:string = server.address().address;
var port:number = server.address().port;
console.log('Example app listening at http://%s:%s', host, port);
});
```
**We can then transpile it using the command `tsc --sourcemap --watch -m commonjs -t es5 hello.ts --outDir dev`.**
It creates the file *hello.js* in the *dev* folder. I like to keep things clean, and don't mix *.ts* files with *.js* ones.
I would not mix *.java* and *.class* files in the same folder, would you?
```javascript
var express = require('express');
var app = express();
app.get('/', function (req, res) {
res.send('Hello World!');
});
var server = app.listen(3000, function () {
var host = server.address().address;
var port = server.address().port;
console.log('Example app listening at http://%s:%s', host, port);
});
//# sourceMappingURL=express-test.js.map
```
__Notes:__
> The `--sourcemap` option is used to generate a *.js.map* file. It is used by debuggers to map the generated JavaScript to the source TypeScript.
>
> The `--watch` tells TypeScript to keep on transpiling the file as it changes.
>
> Other options are available [here](https://github.com/Microsoft/TypeScript/wiki/Compiler-Options).
We can then run this sample using Node.js: `node dev/hello.js` and then browse http://127.0.0.1:3000 to see the result:
```sh
Hello World!
```
## A simple web Service
One step forward. **Let's create a simple web service that returns a JSON response.**
To do so we will need the [body-parser module](https://github.com/expressjs/body-parser):
```sh
npm install body-parser --save
tsd install body-parser --save
```
And then we create the *rest-test.ts* file:
```javascript
///
///
import * as express from 'express';
const app = express();
import * as bodyParser from 'body-parser';
// configure our app to use bodyParser(it let us get the json data from a POST)
app.use(bodyParser.urlencoded({extended: true}));
app.use(bodyParser.json());
const port:number = process.env.PORT || 8080;
const router = express.Router();
// test route
router.get('/', function (req, res) {
res.json({message: 'welcome'});
});
// prefixed all routes with /api
app.use('/api', router);
app.listen(port);
console.log('http://127.0.0.1:' + port + '/api');
```
Compile it with `tsc --sourcemap --watch -m commonjs -t es5 rest-test.ts --outDir dev` and run it with `node dev/rest-test.js`.
Browse to http://127.0.0.1:8080/api and you'll see the message:
```json
{"message":"welcome"}
```
## Nodejs debug
I want to customize the returned message depending on the request. Let's says we return `{"message":"welcome John"}`
when a call is made to `GET http://127.0.0.1:8888/api?name=John`. **So we have to parse the request, extract a query parameter
and return it in the JSON response.**
So we need to know what's inside the `req` parameters in the following chunk of code:
```javascript
[...]
router.get('/', function (req, res) {
res.json({message: 'welcome'});
});
[...]
```
I could read the Express manual, but I prefer to use a debugger and check what's happening.
[Node Inspector](https://github.com/node-inspector/node-inspector) is the tool for that:
```sh
sudo npm install -g node-inspector
```
Then instead of running `node` we run `node-debug dev/rest-test.js`. A Chrome console is started and paused at the first line of our TypeScript script:
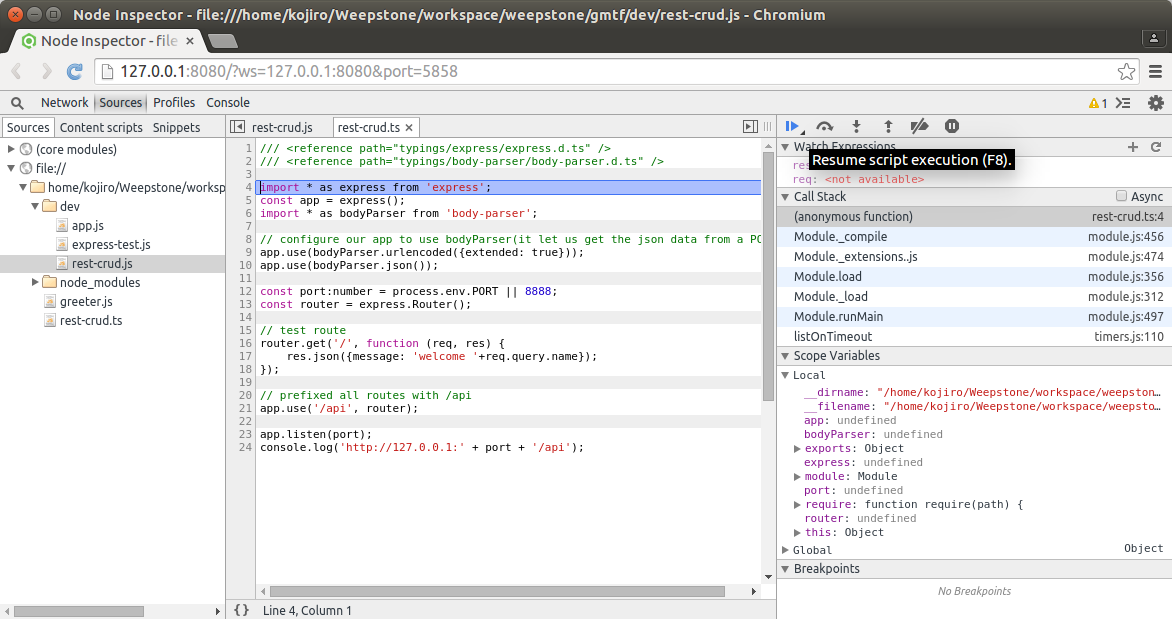
We can click on any line to add a breakpoint, or on play to resume the execution.
Once a breakpoint is placed on the above line, we can add a watcher on the `req` parameter. We go to `http://127.0.0.1:8888/api?name=John` and
the Chrome console displays its content:
```json
{
"query": {
"name": "John"
}
}
```
__Note:__
> Thanks to the `tsc --sourcemap` option, we can debug the TypeScript directly.
## A more complex example, introducing our CRUD
Until now, TypeScript wasn't really useful. Why not doing something more interesting with it?
* A *Model* module that contains a User object,
* a DAO interface that exposes CRUD operations,
* an in-memory implementation that offers CRUD operation for our User object.
### The model
The *Model* module is defined in its own file *model.ts*
```javascript
module Model {
export interface Identifiable {
id?: number;
}
export interface User extends Identifiable {
firstname: string;
lastname: string;
age: number;
}
}
```
**That's a TypeScript *internal* module, defined using `module Model`.** It contains the interface *Identifiable* (an object that
has an *id*) and *User* (a *firstname*, a *lastname* and an *age*).
We can create a *User* using the syntax: `const user:Model.User = {firstname: 'John', lastname: 'doe', age: 42};`. The compiler
displays an error if a field is missing. The *id* is followed by the '?' character in the *Identifiable* interface to make it optional.
Doing so is like creating a Java anonymous class that would implement the User interface. But as in TypeScript you can also add fields
to an interface, the structure of the created bean is typed and predefined.
__Note:__
> To stick with our Java habits, we could also write *User* as a class:
```javascript
class User {
private _firstname: string;
private _lastname: string;
private _age: number;
constructor(firstname: string, lastname: string, age: number) {
this._firstname = firstname;
this._lastname = lastname;
this._age = age;
}
public get firstname() {
return this._firstname;
}
public get lastname() {
return this._lastname;
}
public get age() {
return this._age;
}
}
var user = new User('John', 'Doe', 42);
```
> It's more cumbersome. I prefer the brevity and modularity of the JSON syntax for our quick TypeScript try.
> But this way allows us to create immutable beans for example. Using TypeScript, we can sail through the two worlds, depending on our needs.
### The DAO interface
Our *User* alone is pretty useless. **We need a Data Access Object to Create, Read, Update and Delete users.**
So we define it in a file named *dao.ts*:
```javascript
///
module DAO {
export interface DAO {
create(t: T):T;
read(id: number):T;
update(t: T):boolean;
delete(id: number):boolean;
}
}
```
The first line `/// ` imports our *Model* module into the *DAO* one.
We create a generically typed interface here: our DAO can do CRUD operation on anything that extends *Identifiable* : `DAO`.
### The in-memory implementation
An then we create a simple implementation that holds a list of users in memory (*in-memory-dao.ts*):
```javascript
///
export class InMemoryUserDAO implements DAO.DAO {
private id:number;
private users:{ [id:number]:Model.User; };
constructor() {
this.id = 1;
this.users = {
0: {id: 0, firstname: 'first', lastname: 'last', age: 42}
};
}
create(user:Model.User) {
user.id = this.id;
this.id++;
this.users[user.id] = user;
return user;
}
read(id:number) {
return this.users[id];
}
update(user:Model.User) {
if (this.users[user.id] === null) {
return false;
}
this.users[user.id] = user;
return true;
}
delete(id:number) {
if (this.users[id] === null) {
return false;
}
this.users[id] = null;
return true;
}
}
```
**Each CRUD method is implemented** and uses the `private users:{ [id:number]:Model.User; };` map to store users. This syntax
declares a JavaScript object (kind of behaves like a Java HashMap) whose keys must be numbers and values must be users.
We also use a simple number `private id:number;` to generate ids.
__Note:__
> **We did not create a TypeScript internal module here.** As the [documentation](https://www.typescriptlang.org/docs/tutorial.html)
> specifies, when using Node.js we need to create external modules. To create an external module we just have to use the *export* keyword on our class:
> `export class InMemoryUserDAO`.
### The REST endpoint
Finally we can update our REST endpoint to call the DAO modules:
```javascript
import DAO = require('./in-memory-dao');
const userDAO:DAO.InMemoryUserDAO = new DAO.InMemoryUserDAO();
router.get('/', function (req, res) {
res.json(userDAO.read(req.query.id));
});
router.post('/', function (req, res) {
res.json(userDAO.create(req.body));
});
router.put('/', function (req, res) {
res.json({result : userDAO.update(req.body)});
});
router.delete('/', function (req, res) {
res.json({result : userDAO.delete(req.query.id)});
});
```
The InMemoryDAO module is imported using the `import DAO = require('./in-memory-dao');`. No `/// ` here
as we use an external module.
## Testing with PostMan
**[PostMan](https://chrome.google.com/webstore/detail/postman/fhbjgbiflinjbdggehcddcbncdddomop?hl=en) is a Chrome Add-On that comes in handy
when testing a REST endpoint like the one we developed.**
We first have to transpile our TypeScript code `tsc --sourcemap --watch -m commonjs -t es5 rest-test.ts --outDir dev` and then
run it using Node.js: `node dev/rest-test.js`.
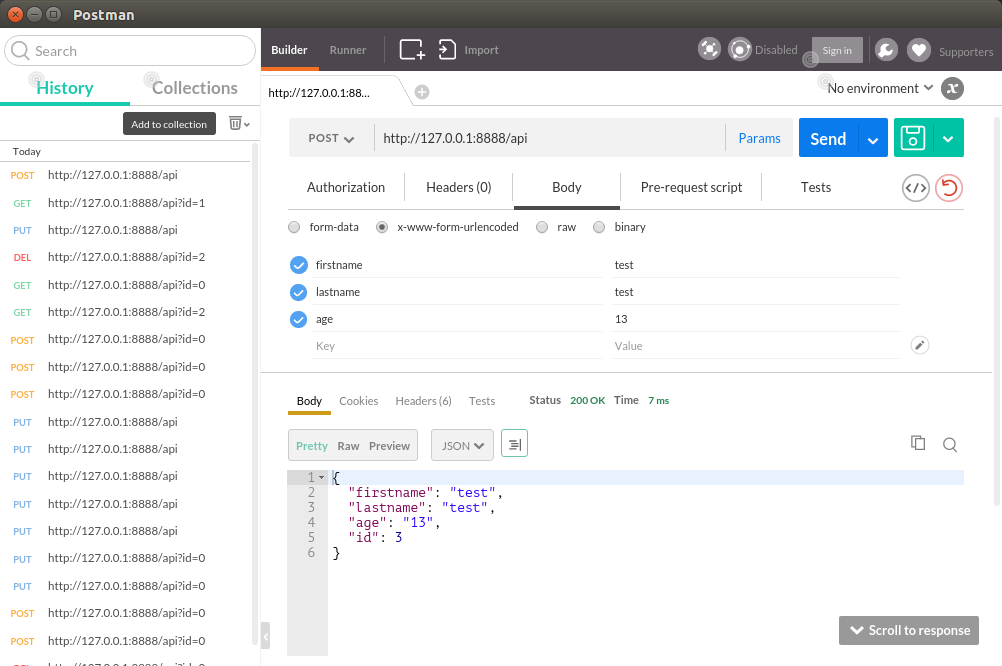
Then we can create a new user by **post**ing an URLEncoded form to http://127.0.0.1:4000:
Or **get** an existing one:
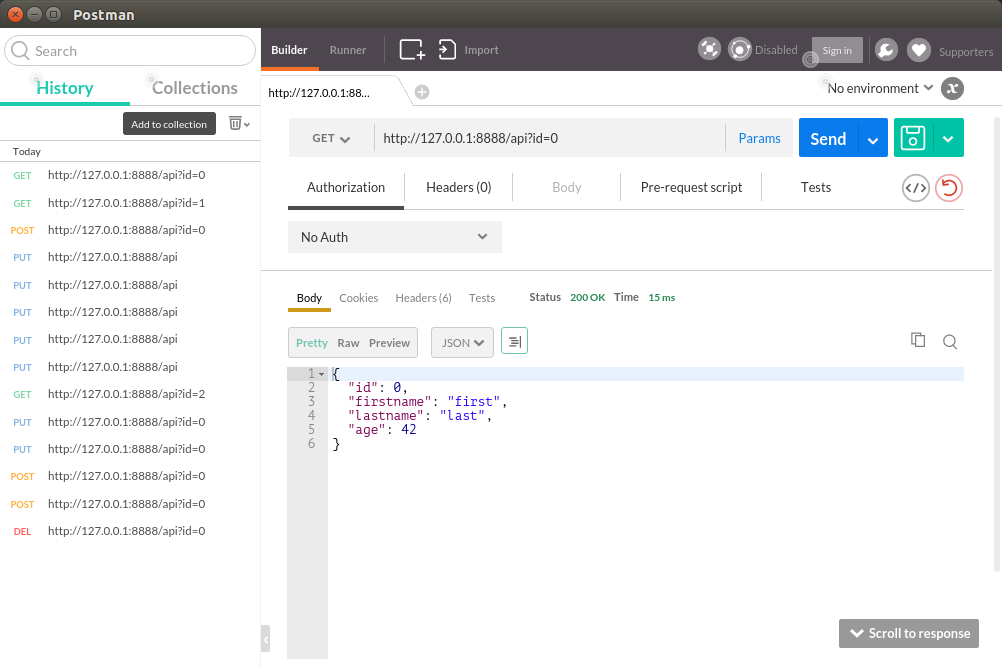
It can also be used to delete a user (i.e. `DELETE http://127.0.0.1:4000/api?id=0`) or to update it (same as the creation but with a PUT request, the id must be specified).
__Note:__
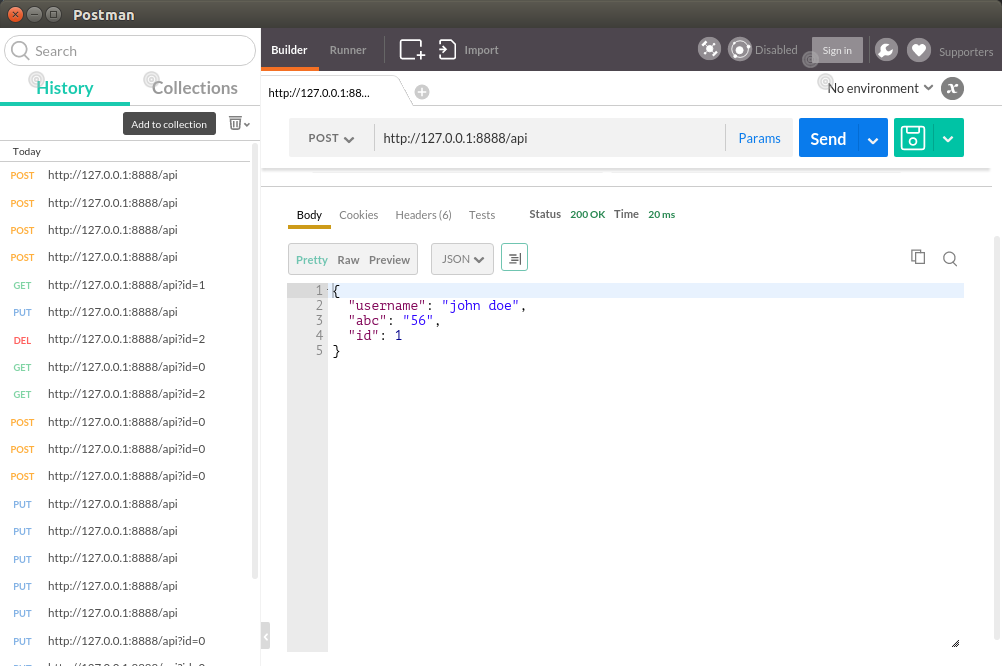
> **TypeScript only checks types during compilation. NOT AT RUNTIME!**
> So we can easily create a completely different user (See screenshot below). We would have to check the data sent manually, as runtime type checking is
> not part of [TypeScript goals](https://github.com/Microsoft/TypeScript/wiki/TypeScript-Design-Goals).
## Unit Testing and Code Coverage
No code should be left without unit tests. It would only have a small chance of working. **And the time spent writing unit tests
is saved twice on debugging.**
We use Karma and Jasmine to unit test the frontend of our [load testing tool](https://octoperf.com/), made with AngularJS.
For this sample I wanted to give a try to [Mocha](https://mochajs.org/) for tests running and [ChaiJs](https://chaijs.com/api/bdd/) for assertions.
To install them:
```sh
npm install mocha --save-dev
npm install chai --save-dev
```
As our unit tests are also written in TypeScript, we need the type definitions for both libs:
```sh
tsd install mocha --save
tsd install chai --save
```
Then we can write a first test that check the Read method of our DAO (*in-memory-dao.test.ts*):
```javascript
///
///
///
import DAO = require('../path/to/in-memory-dao');
import chai = require('chai');
const expect = chai.expect;
const userDAO:DAO.InMemoryUserDAO = new DAO.InMemoryUserDAO();
describe("In Memory User DAO", () => {
it("should return user", () => {
const user = userDAO.read(0);
console.log(user);
expect(user).to.eql({id: 0, firstname: 'first', lastname: 'last', age: 42});
});
});
```
We transpile it using the command `tsc --sourcemap --watch -m commonjs -t es5 path/to/in-memory-dao.test.ts --outDir dev-test` and then we can run mocha:
```sh
node_modules/mocha/bin/mocha dev-test/**/*.js
```
Mocha runs all tests and tells us where are the errors. But it does not show code coverage.
That's why we need Istanbul: `npm install istanbul --save`.
When ran, Istanbul displays code coverage information in the console and also creates a *Coverage* folder that contains an HTML report.
You can open the 'coverage/index.html' file to view the report:
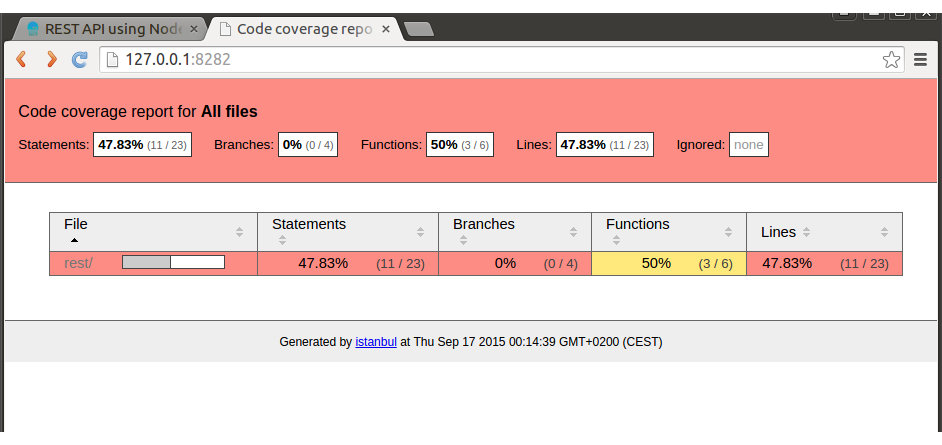
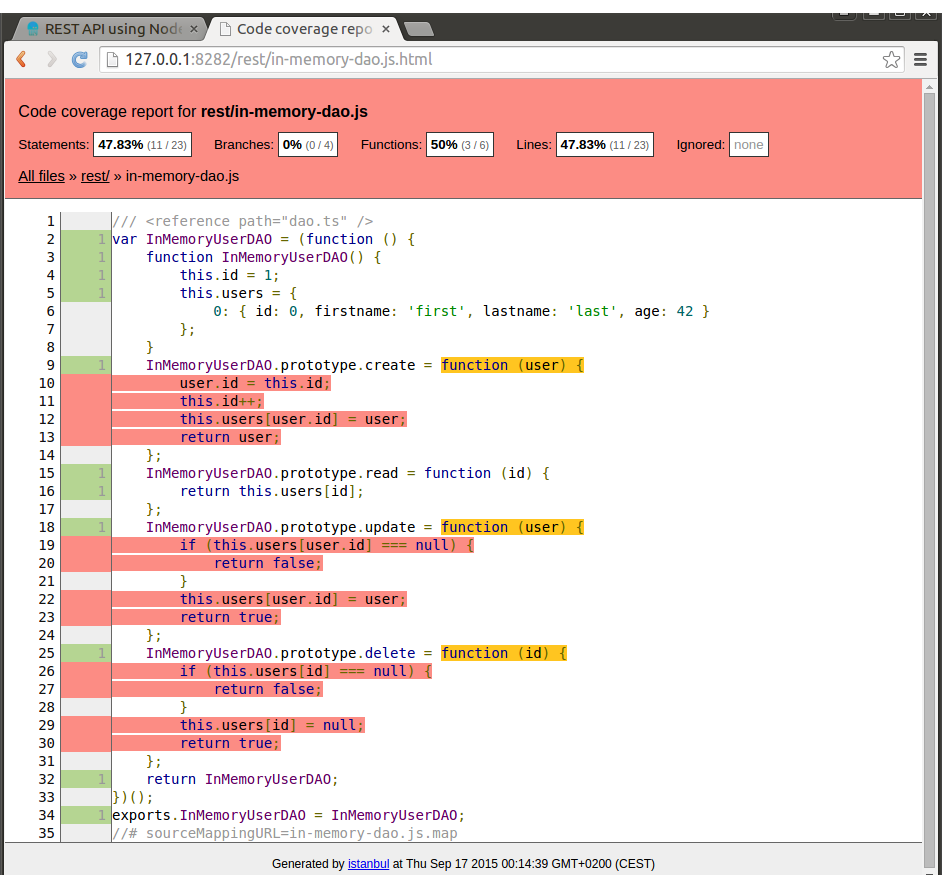
Running Istanbul is a bit tedious though:
```sh
./node_modules/istanbul/lib/cli.js cover ./node_modules/mocha/bin/_mocha -- --ui bdd -R spec -t 5000
```
## Building it with Grunt
There are many commands and various tools to memorize.
**That's why we need automation. Automation for transpiling, testing and running our sample.**
Let's start by creating a [*GruntFile.js* file](https://github.com/geraldpereira/rest-crud/blob/master/GruntFile.js):
```javascript
module.exports = function (grunt) {
// Project configuration.
grunt.initConfig({
pkg: grunt.file.readJSON('package.json'),
[...]
});
grunt.loadNpmTasks('grunt-typescript');
grunt.loadNpmTasks('grunt-node-mocha');
grunt.loadNpmTasks('grunt-http-server');
grunt.loadNpmTasks('grunt-shell');
grunt.loadNpmTasks('grunt-nodemon');
grunt.loadNpmTasks('grunt-tsd');
grunt.registerTask('build', ['tsd', 'typescript:src']);
grunt.registerTask('test', ['typescript:test', 'node_mocha:test']);
grunt.registerTask('coverage', ['typescript:test', 'node_mocha:coverage', 'http-server:coverage']);
grunt.registerTask('run', ['nodemon']);
// Must have installed node-inspector globally 'sudo npm install -g node-inspector'
grunt.registerTask('debug', ['shell:debug']);
};
```
Then we can install all the required Grunt modules:
```sh
npm install grunt --save-dev
npm install grunt-typescript --save-dev
npm install grunt-node-mocha --save-dev
npm install grunt-http-server --save-dev
npm install grunt-node-inspector --save-dev
npm install grunt-nodemon --save-dev
npm install grunt-tsd@next --save-dev
```
### Grunt build
**The `grunt build` command transpiles our TypeScript files into JavaScript** (the output folder is named *js*).
It starts by running *tsd*, the TS Definitions Manager to refresh our *typings* folder.
Then it runs *tsc* and watches for file modifications to update the compiled JS.
### Grunt test
The `grunt test` command transpiles our TypeScript test files into JavaScript (the output folder is named *js-test*).
Then **it runs Mocha to display unit tests results.**
### Grunt coverage
`grunt coverage` is the same as *grunt test* but it **runs Mocha to display code coverage.**
It then starts a HTTP server to display the generated report.
### Grunt run
The `grunt run` command simply runs *nodemon* to **run Node.js on the generated JS file**, and watch for changes to auto-restart.
### Grunt debug
The `grunt debug` is a simple alias for `node-debug js/rest/rest-crud.js`. So you need to install *node-inspector* globally
(`sudo npm install -g node-inspector`) prior to running it.
__Note:__
> A Grunt module ([grunt-node-inspector](https://www.npmjs.com/package/grunt-node-inspector)) exists. But I couldn't find
> how to tell it to run on my *rest-crud.js* file.
## Conclusion
The result of this blog post is available on [GitHub Rest-Crud](https://github.com/geraldpereira/rest-crud/).
It could be nice to compare the performance of our Node.js REST server to a Java implementation (lets say, done using Spring 4 controllers).
Also this sample lacks some code quality tools. [TSLint](https://github.com/palantir/tslint) is available and comes
with a [Grunt module](https://github.com/palantir/grunt-tslint). Even better, there is a [SonarQube plugin](https://github.com/Pablissimo/SonarTsPlugin).
That might be the subject to one of my next articles!