
The Complete Guide of JMeter Controllers
In this blog post we are going to look at several JMeter Controllers, specifically:
- Simple Controller
- Transaction Controller
- Loop Controller
- While Controller
- ForEach Controller
- If Controller
- Once Only Controller
- Throughput Controller
- Interleave Controller
- Random Controller
- Random Order Controller
This is not an exhaustive list of controllers that JMeter offers but these once will give you a clear insight into how controllers are integral in defining load testing scenarios and how without them you will struggle to build complex and indicative load tests.
Technically JMeter has two types of controllers and these are categorised as Samplers and Logical Controllers, the controllers we are looking at in this post are the Logical Controllers that allows you to customise how JMeter delivers requests to meet your load profiles.
Let’s look at the logical controllers with some examples of how they can be used, our tests will consist of Dummy Samplers as this is the simplest way to demonstrate how the various Controllers work. You can follow along each example by downloading the JMX here.
Simple Controller
As the name suggests this is the simplest of controllers and offers no functionality to the way your test runs outside of providing a storage container for samplers, pre and post processors etc.
Let’s have a look at the controller.

Consider this simple test

A straightforward test that: - Logs on - Searches - Updates Record - Logoff
If we add some Simple Controllers it makes the script easier to read as its split into functional areas but aside from this it makes no difference to the test execution.
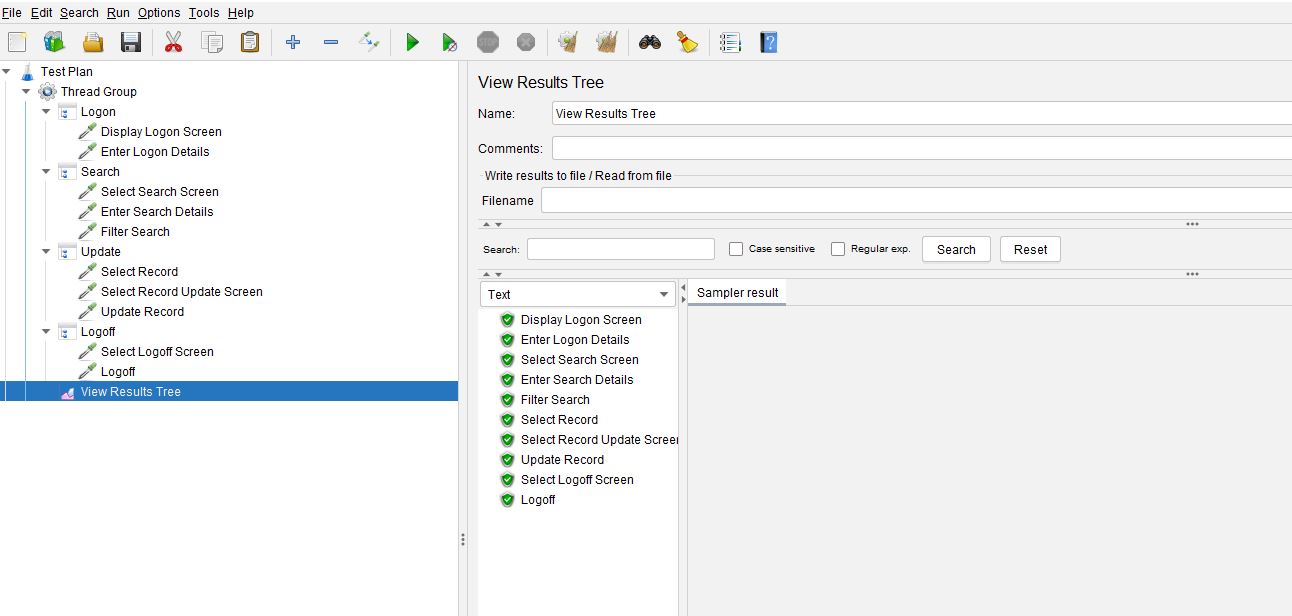
And that is about it for the Simple Controller.
Transaction Controller
This controller is again relatively straightforward and allows you to easily get the full duration of a series of samplers and determine if you want to include the time taken for timer and/or pre and post processors.
It is useful for if you only want to report performance against a high level business processes that consists of many samplers, your business users or product owners will find performance results and response times at this level much more meaningful than they might the individual samplers that make up the high level process.
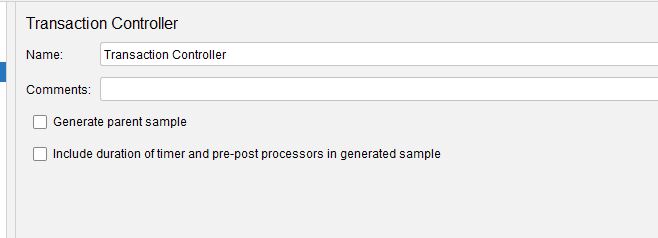
Let’s take our same set of samplers that we used in the Simple Controller and put them inside a Transaction Controller.
We are going to add a Summary Report to help visualise the data.
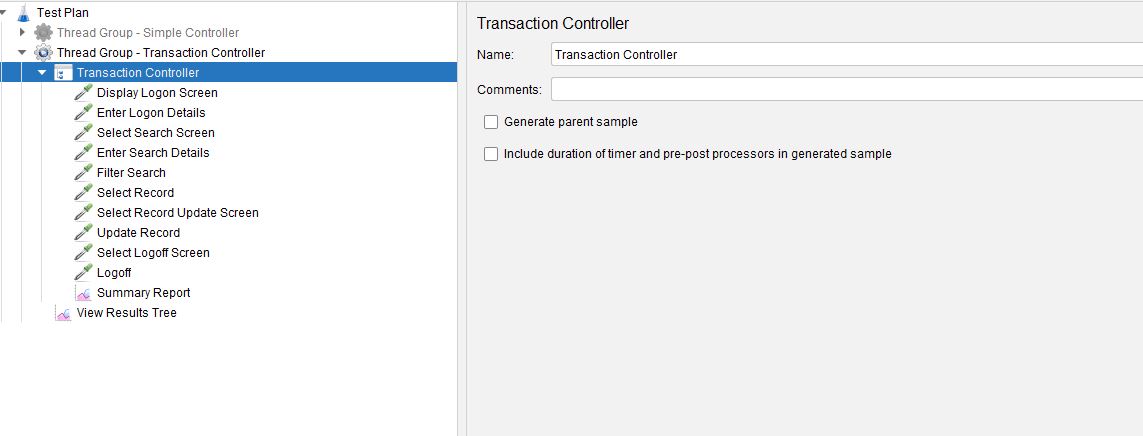
If we execute the test with none of the options selected, we get an additional result which is the Transaction Controller.
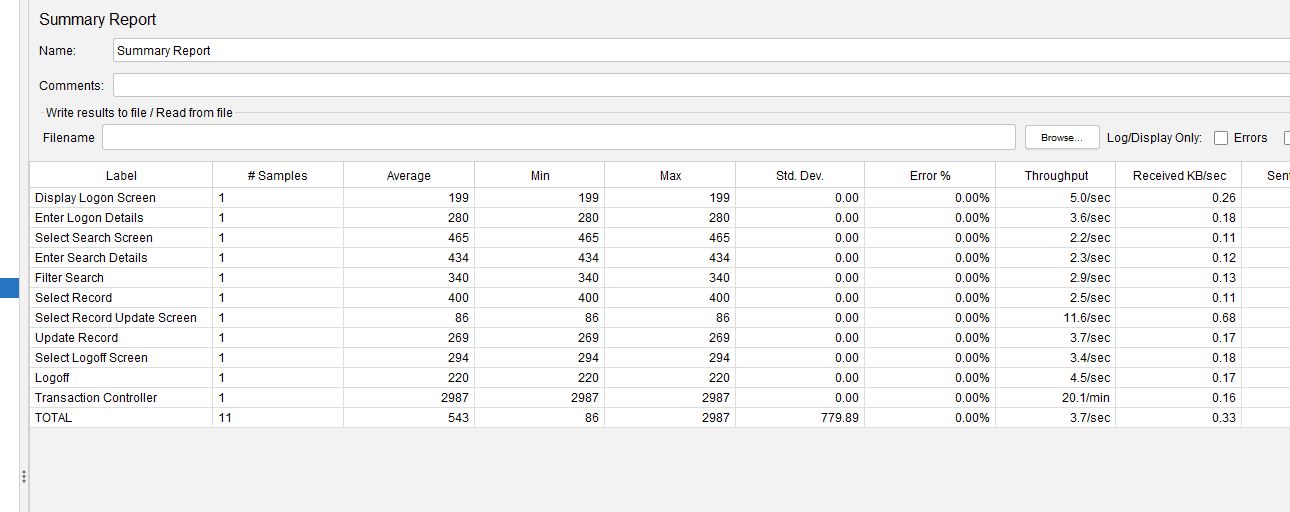
The duration of the Transaction Controller is the total of all its child samples.
If we enable the Generate parent sample option.
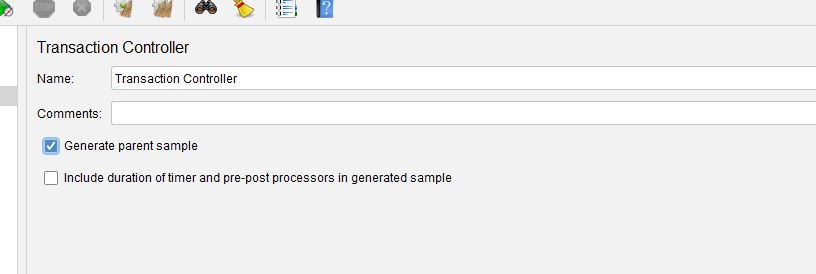
And then re-run the test.

We can see that the Summary Report only contains the Transaction Controller and none of the child sampler times.
If you look at the View results Tree however you can still see the individual samplers.
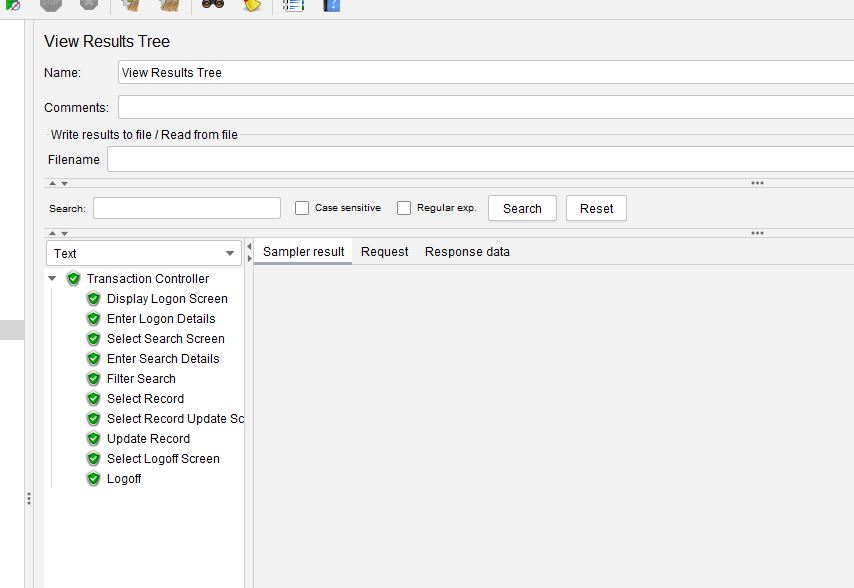
The other option on the Transaction Controller is the one labelled Include duration of time and pre-post processor in generated sample.
If we select this option.

And add a Constant Timer to the test with a 500-millisecond thread delay.
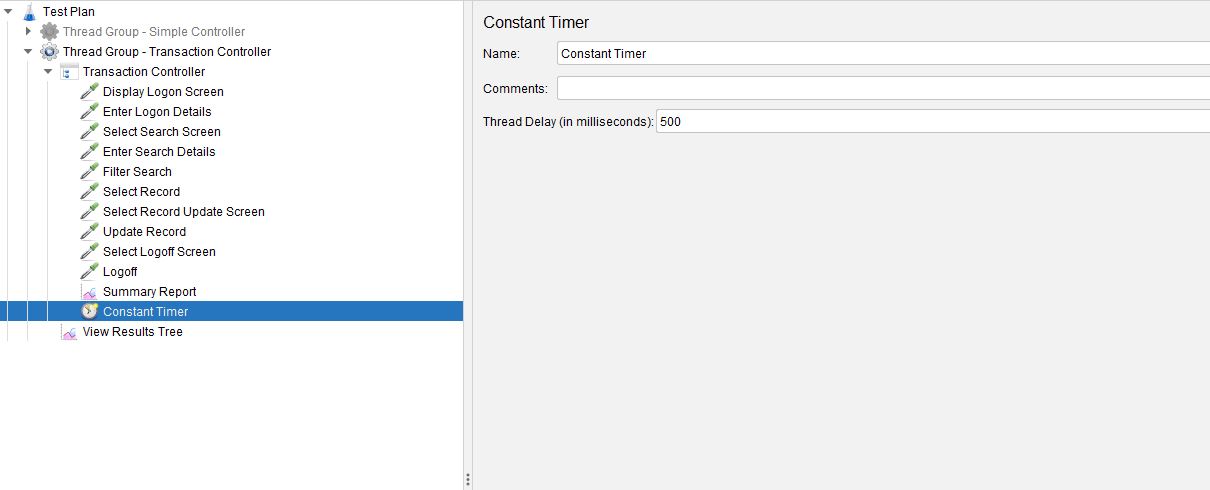
We will now run the test with and without this option set so the results can be seen side-by-side.

We can see that when the option to include timers etc is selected the response time of the Transaction Controller includes the 500-millisecond delays between each sampler and when it is not selected it does not.
This options allows you to ignore time you may spend in your tests waiting for pre-post processors to complete or ignoring artificial timers you may have included to help with your tests pacing as these are technically nothing to do with your applications response time.
Loop Controller
The Loop Controller is a way of moving the number of iterations your samplers run away from the Thread Group to provide more control over your scenario profile.
Let’s look at the controller.
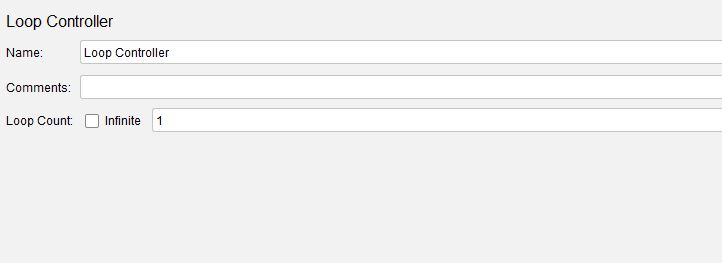
If we take a Test Plan that manages the loop count using the Thread Group.
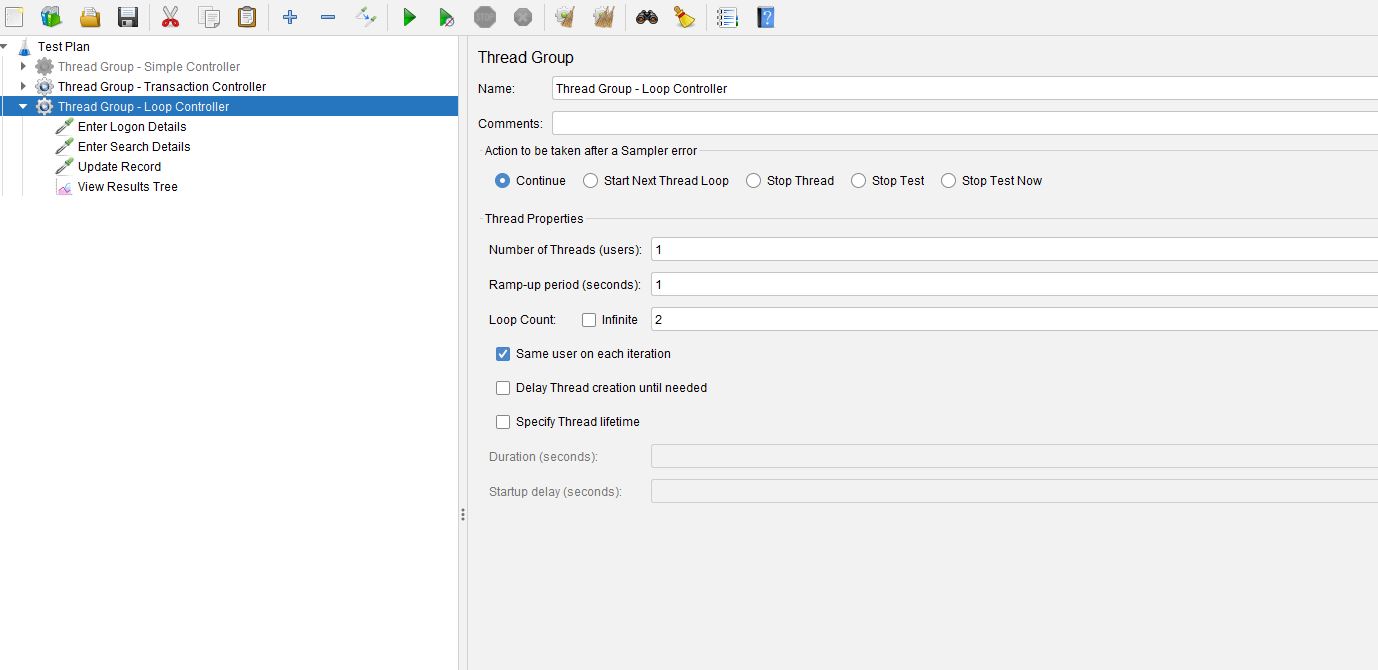
We will see that each sampler is executed 2 times as this is the number that we configured in the Thread Group.
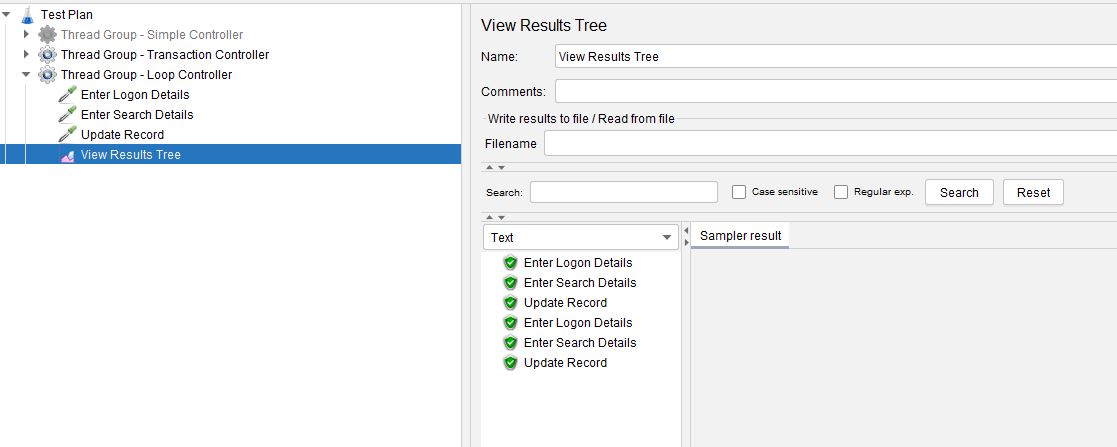
If we wanted each sampler to iterate a different number of times this is where we can use the Loop Controller, we will set the Thread Group Loop Count back to 1 and add some Loop Controllers to control each sampler.
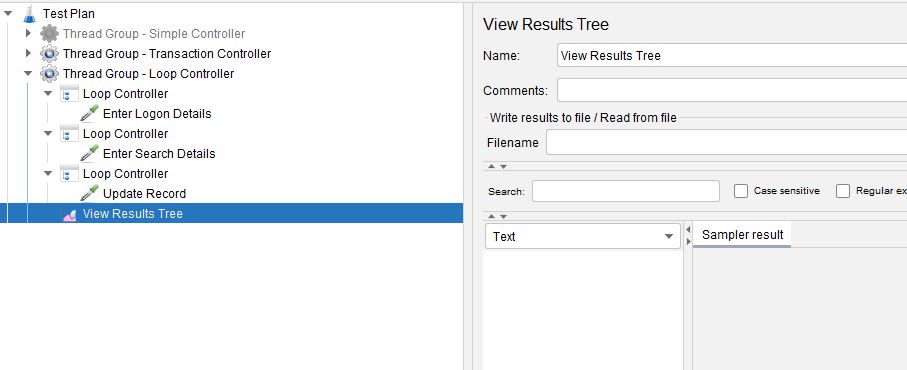
We have set the Loop Count for the first Loop Controller to 1, the second Loop Controller to 2 and the third Loop Controller to 3 and if we execute the test, we see these results.
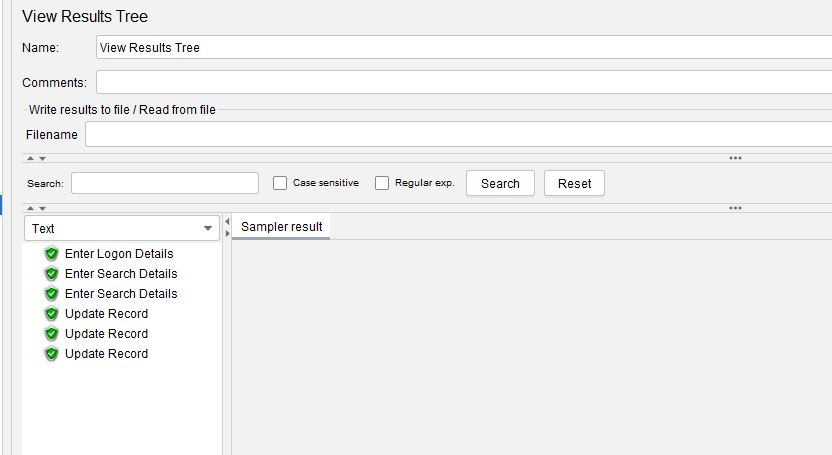
This is clearly a very simple example and is purely to demonstrate how you would use the Loop Controller.
Before completing this section it is worth noting that if the Loop Count in the Loop Controller is set to Indefinite or a value of -1 (as these are interpreted the same way by JMeter) then this will loop forever and the test duration will need to be managed by a Duration.
While Controller
As per the JMeter documentation
The While Controller runs its children until the condition is “false”.
Let’s look at the While Controller.

So basically, the While Loop will only be exited once the condition you check is false.
There are a couple of special cases that we need to look at before we look at how we can create conditions that will benefit you in a real-world scenario.
If you leave the condition empty then the loop is exited when the last sample in the loop fails, the same happens if you use the word LAST as a condition which also checks to see if the last sample just before the loop fails and if it does then it does not enter the loop.
Let’s look at how these may be useful.
We will add a Response Assertion to each of our Dummy Samplers in our test to check for a Response Code of 200.
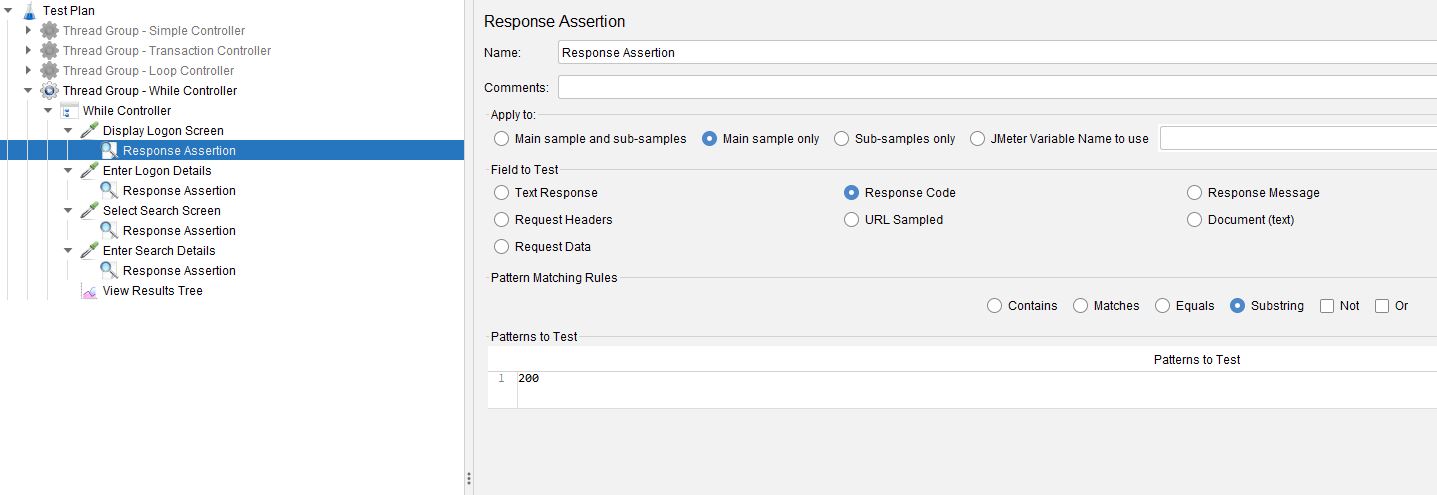
If we set our condition to LAST and run our test it will run indefinitely as the last sample always passes.
If we set the Response Code of our last Dummy Sampler to something other than 200 the last sampler will fail, and the While Loop will exit.
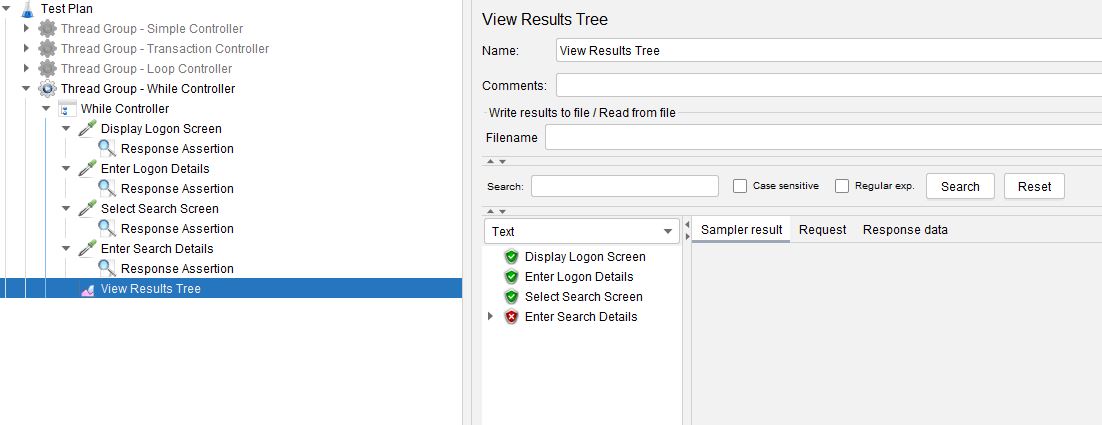
Now what are the real-world benefits of this because what if all samplers except the last one fail, the loop will continue to run just with all samplers failing except for the last one which is pointless.
If we wanted to be able to handle failure of any sampler in our While Controller, we can combine the While Controller with a Transaction Controller that we have already discussed and by setting the Generate Parent Sample option we can exit the While Loop on failure of any sampler.

If we execute this test.
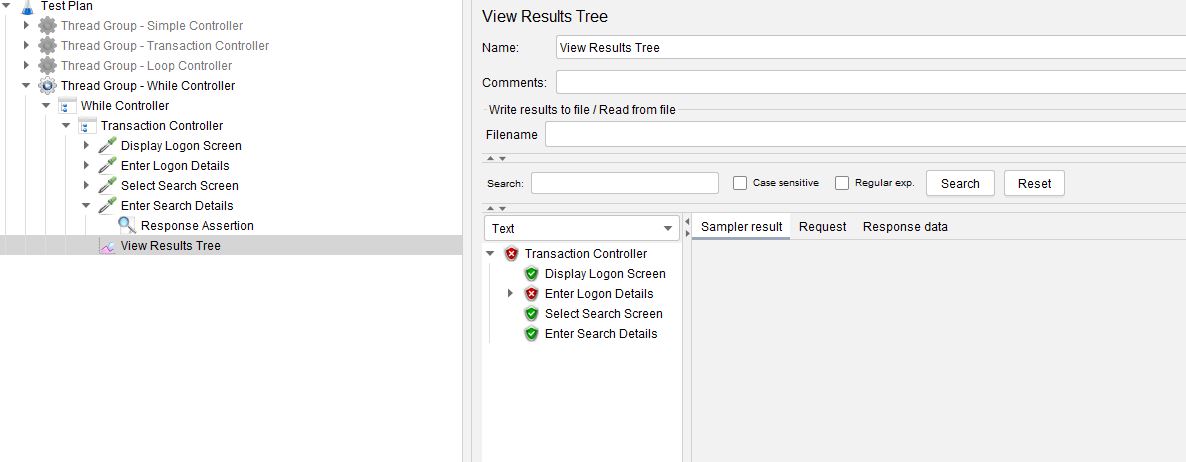
We can see that the while loop is exited on failure of the second sampler.
Let’s move on to discuss how we can create conditions that can be evaluated as the test executes to see the many other uses of the While Controller.
One of the most useful ways of using a While Controller is to use a counter to control the number of iterations, the counter can be a variable or property that can be created dynamically during test execution to provide even more control over your tests.
For the purposes of our example we will use a hard-coded value and make is relatively simple to demonstrate the process.
Let’s look at the test plan.
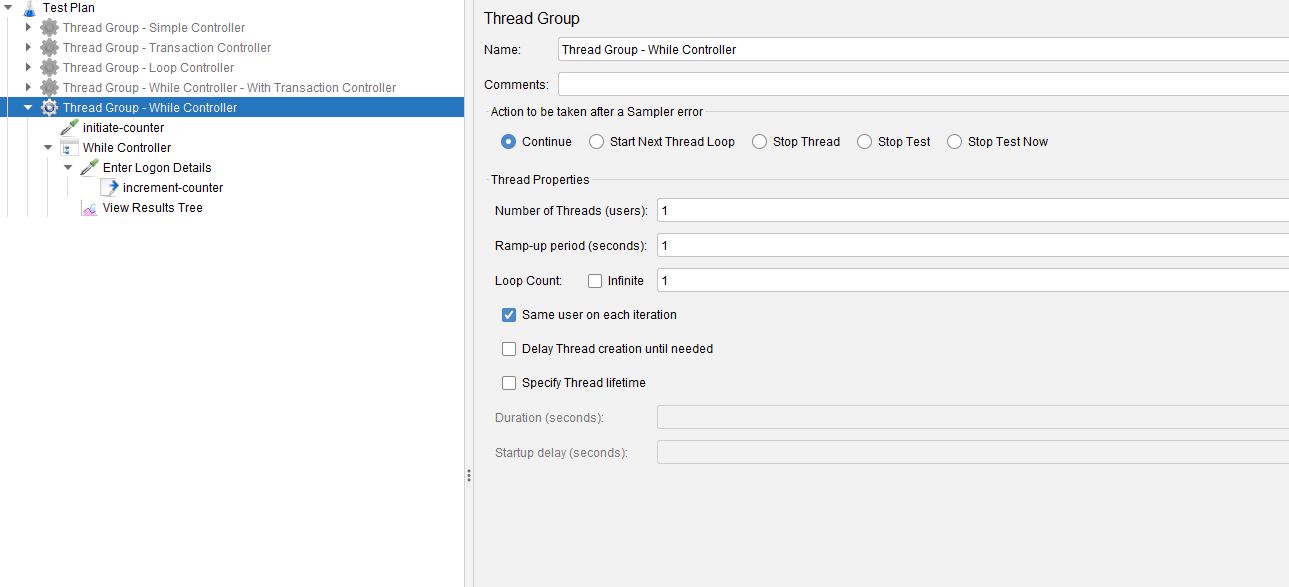
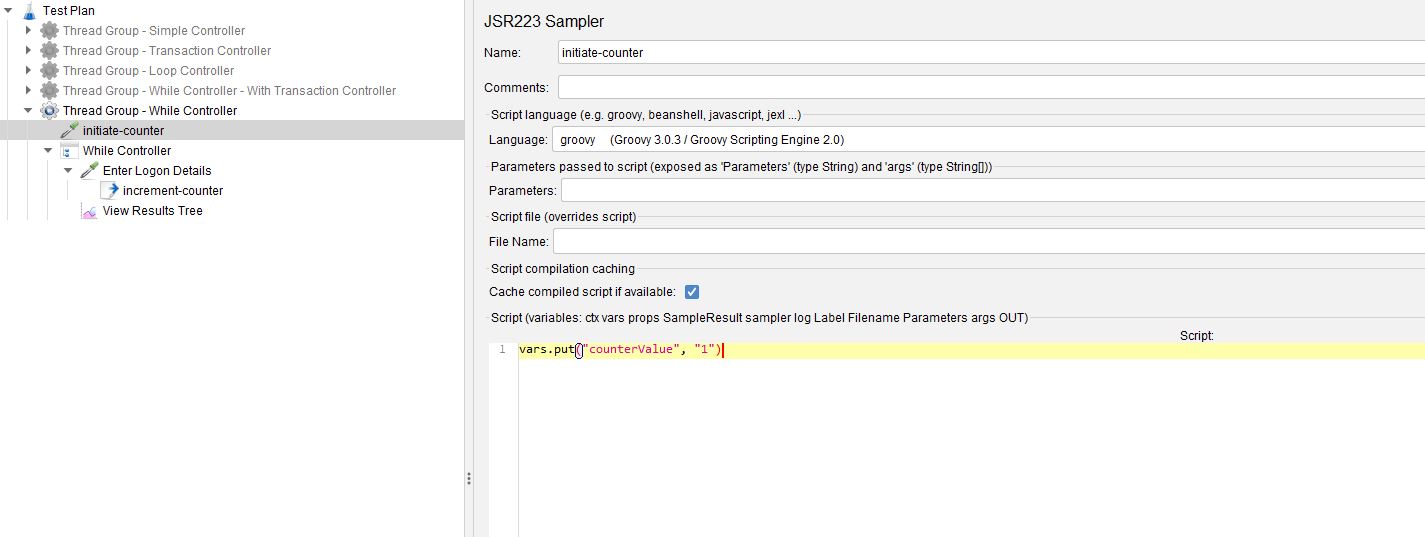
We have a JSR223 Sampler that we have called initiate-counter, this creates the variable and provides an initial value.
We then have created a JSR223 Post Processor after the sampler called increment-counter.
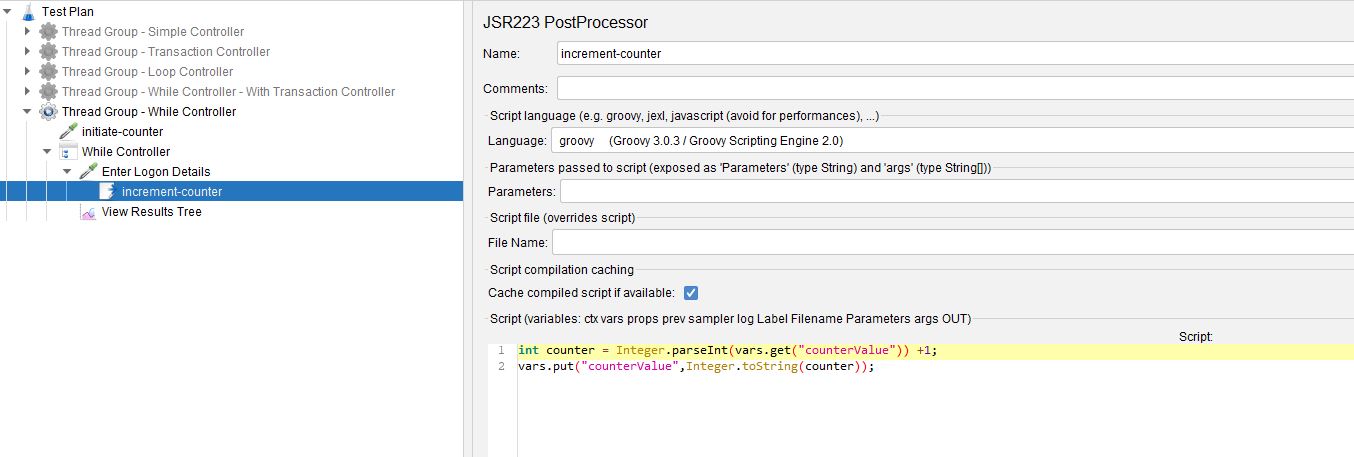
In here we are incrementing the counter by 1 and updating the variable.
We now create a condition in our While Controller that when evaluated to false will see the loop exit.

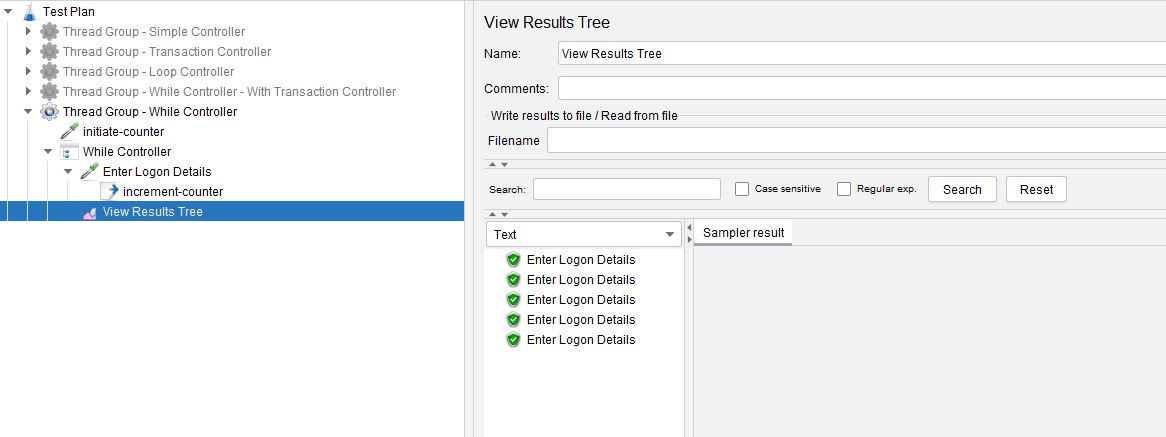
If we now run our test, we will see the While Controller perform 5 iterations and then exit.
The While Controller is useful when you have grouped samplers that need to iterate based on a condition that you can control at runtime during test execution.
For more details and examples, you can check OctoPerf's documentation as well.
ForEach Controller
As the name suggests the ForEach Controller iterates over an array of values.
Let’s look at the controller.
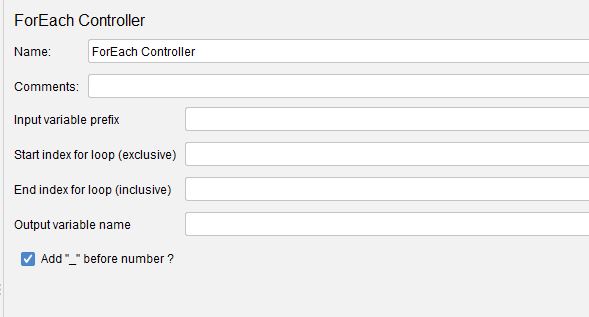
This controller is supplied an array of values and then the array is iterated until completed.
This is a very useful controller when used in conjunction with a Post Processor that extracts data from a previous request.
Real world examples include situations when you call a web page or API that returns data you subsequently want to extract and test such as a number of URL’s or perhaps you have an endpoint that returns a list of customer records that you want to select in turn.
This controller is ideal for these types of scenarios, as well as any time you may want to iterate over a data array.
To demonstrate how this controller works we will use a Dummy Sampler to return an array which we will extract using a JSON Extractor.
Our Dummy Sampler will send this JSON as a response.
    "response": [{
            "responseVal": "value-one"
        },
        {
            "responseVal": "value-two"
        },
        {
            "responseVal": "value-three"
        },
        {
            "responseVal": "value-four"
        },
        {
            "responseVal": "value-five"
        },
        {
            "responseVal": "value-six"
        },
        {
            "responseVal": "value-seven"
        },
        {
            "responseVal": "value-eight"
        },
        {
            "responseVal": "value-nine"
        },
        {
            "responseVal": "value-ten"
        }
    ]
}
And our JSON Extractor will write the values for each responseVal object to an array called responseJsonParse.
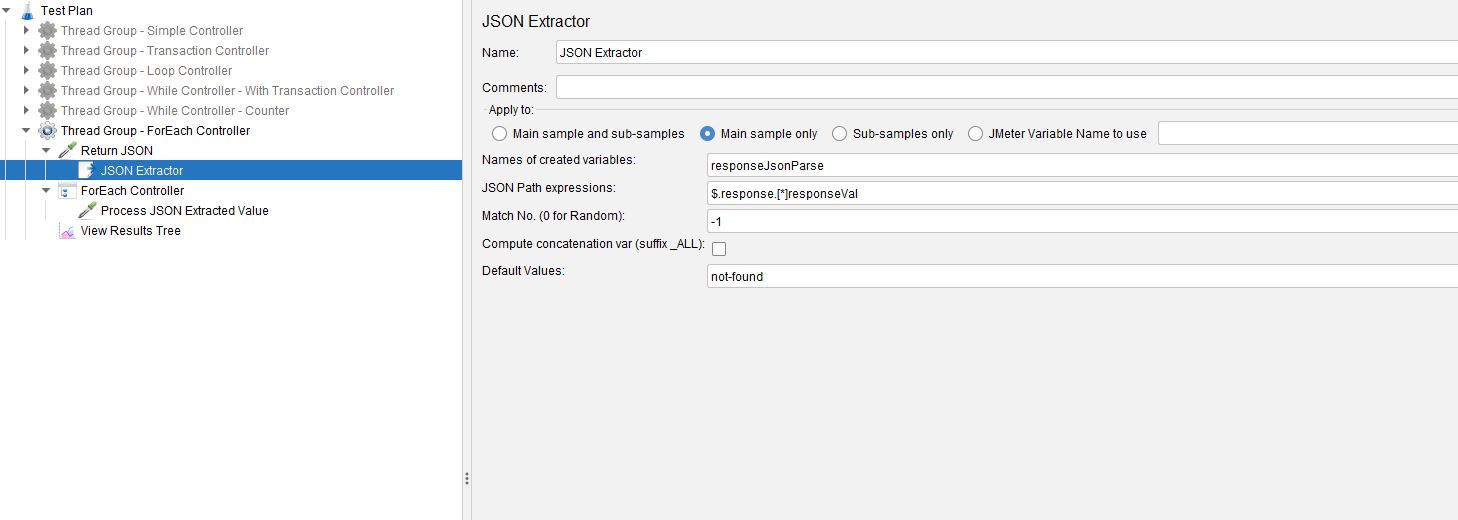
This will give us an array of data we can use in our ForEach Controller, lets look at some of the options, it is worth noting that JMeter will create a variable with an underscore and an integer for each item it extracts.
In the example above the variables created will be:
responseJsonParse_1, responseJsonParse_2….etc
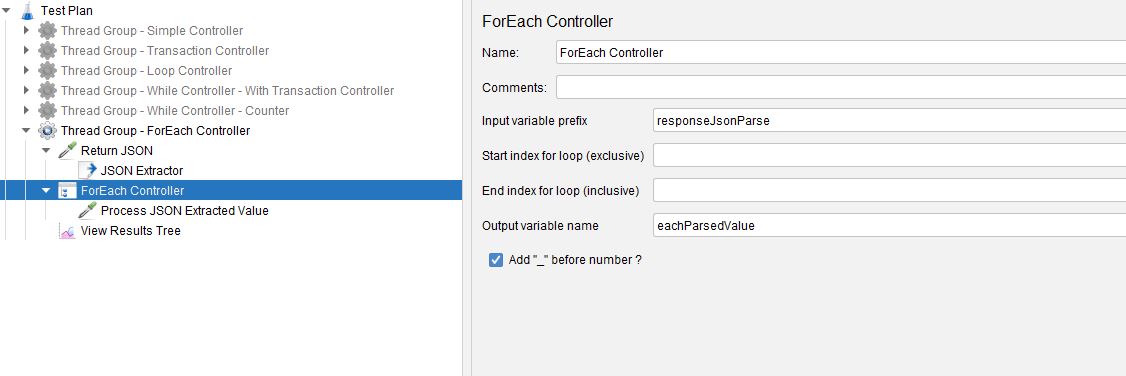
We have provided our Input variable prefix to be the variable array created from the JSON Extractor and we have selected Add "_" before number ? because, as discussed above, JMeter includes a underscore between the variable name and each index in the array.
If you are not using JMeter to create the array and you have created one manually you will probably not include an underscore in your naming convention, in which case un-select this option.
We have also created an Output variable name which will hold the value from the array for each iteration.
If we create another Dummy Sampler and make this a child of the ForEach Controller and set the Request Data to use our output variable.
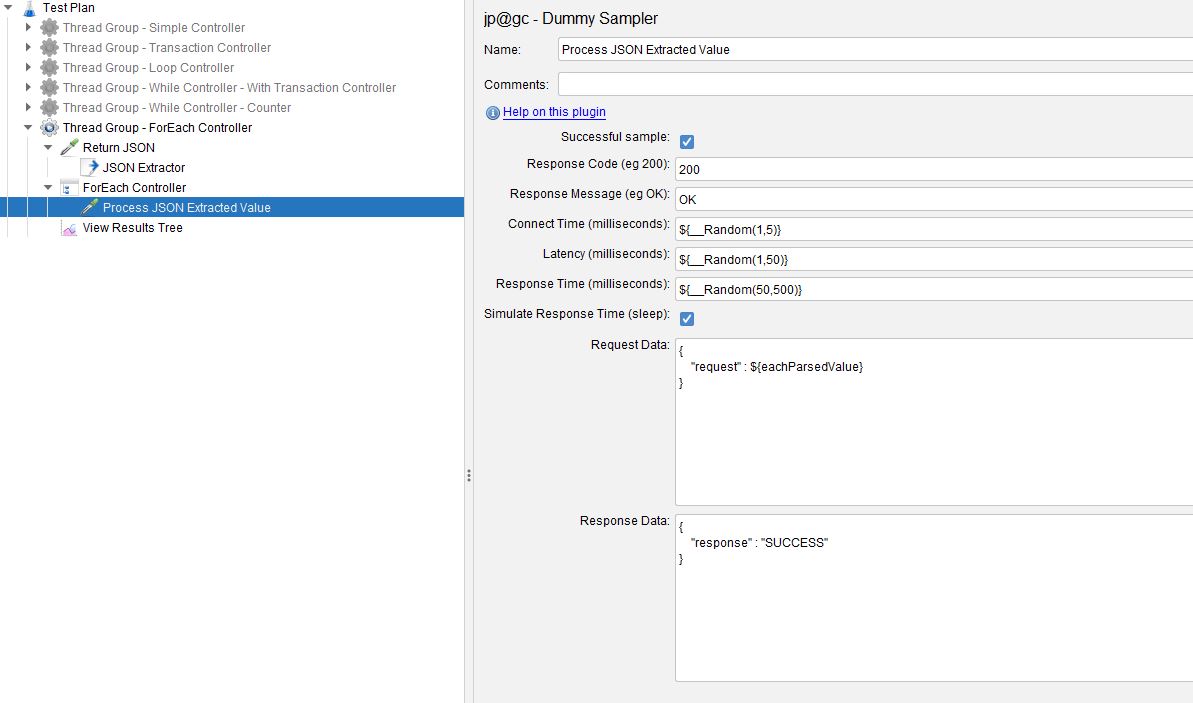
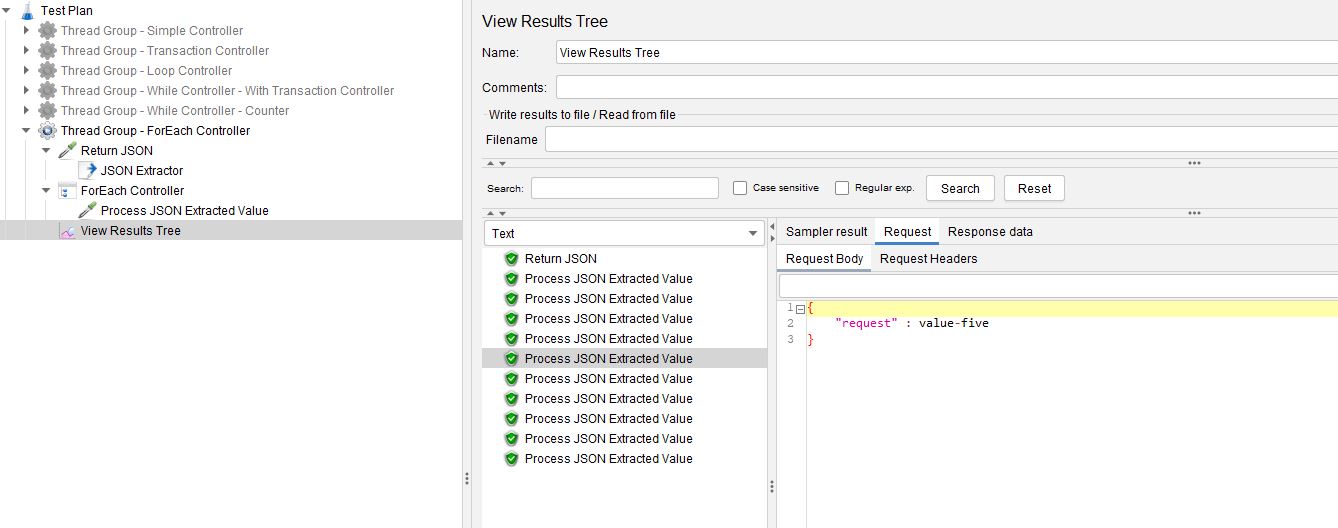
If we run our test now we will see that the ForEach Controller runs for 10 iterations as this is the number of entries we extract from the Return JSON sampler and each iteration contains the value of the response entry.
There are a couple of other options the ForEach Controller offers and these are the ability to start and end at a particular point in the array, if you wanted to exclude the first and last record from the array you would set your controller to look like this.
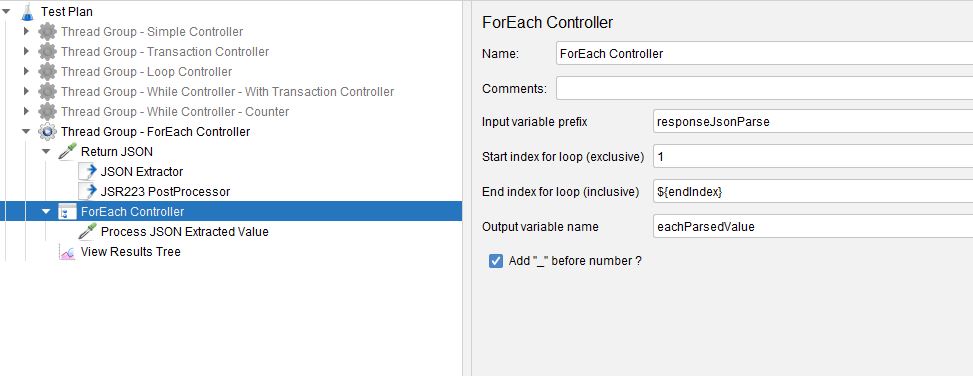
So the start index is set to 1 as this will be the first index to be excluded and we have used a variable to the last record as it is not good practise to use hardcoded values to arrays that may change in length.
We have added a JSR223 Post Processor after the JSON Extractor to determine the value of ${endIndex}, here is the code.
vars.put("endIndex", (Integer.parseInt(vars.get("responseJsonParse_matchNr")) - 1).toString());
We have used the automatically created _matchNr variable and deducted one.
If we run the test, we only iterate eight times instead of ten in the previous example.
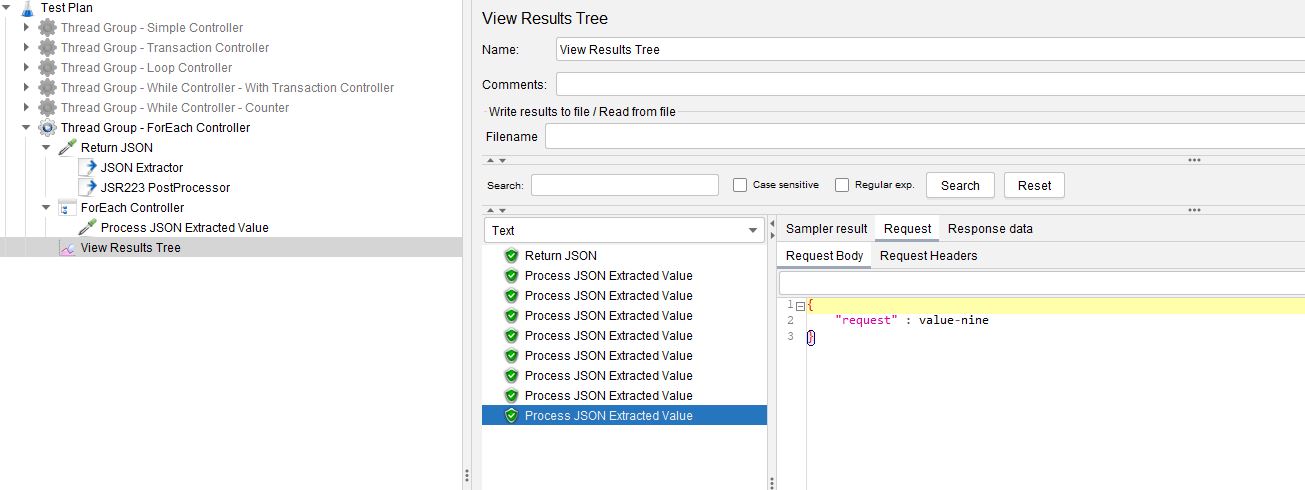
OctoPerf's documentation also provides an example you can run against the jPetStore application.
If controller
We already discussed the If controller in another post on this blog, you can read it here.
OctoPerf's documentation also contains examples of what you can and cannot do with the IF controller.
Only Once Controller
The Once Only Controller is again a very simple controller, lets look at the controller.

It effective does exactly what it sounds like it does and that is execute only once.
Consider this example.
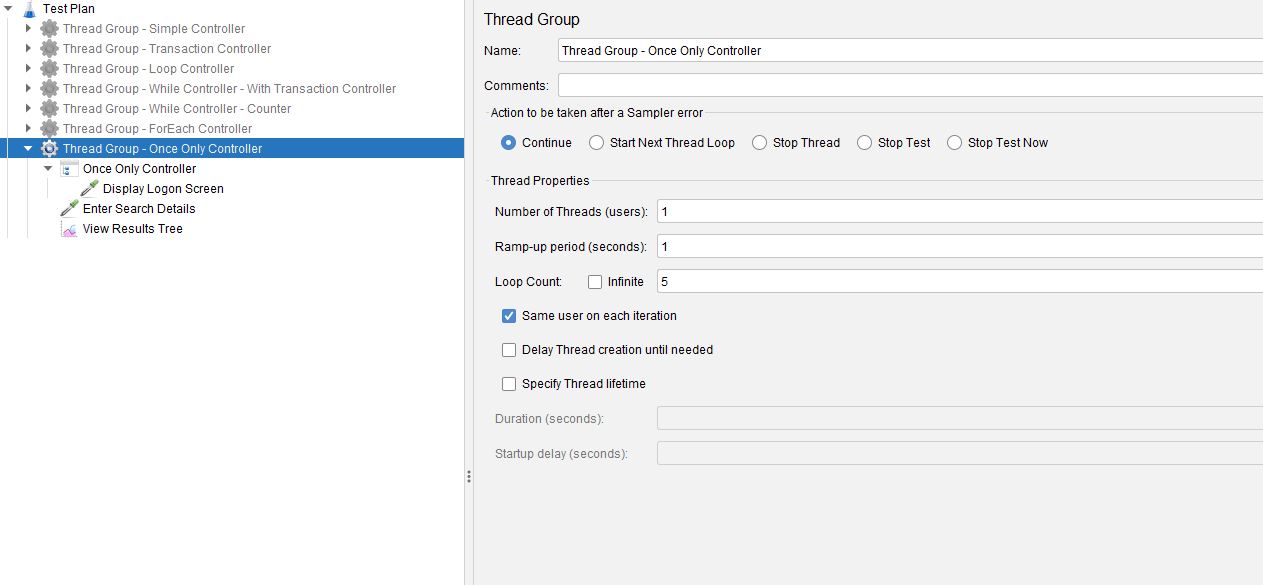
We have set our Loop Count to 5 and have a sampler called Display Logon Details in our Only Once Controller and a sampler called Enter Search Details outside of the controller.
If we execute this test.
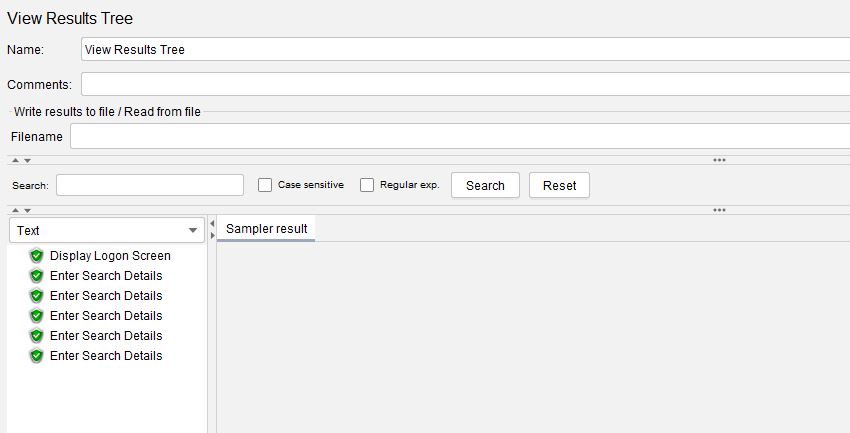
Useful for the logon or logoff parts of your test which you may only want to do once per test execution.
Throughput Controller
This is a very badly named controller as it does not really control the throughput of the samplers in the test, what is does do it allow you to control how often its child samplers are executed.
Let’s look at its options.

There are two modes for this Transaction Controller:
- Percent executions
- Total executions
Let’s start with Percent executions mode and look at an example test.
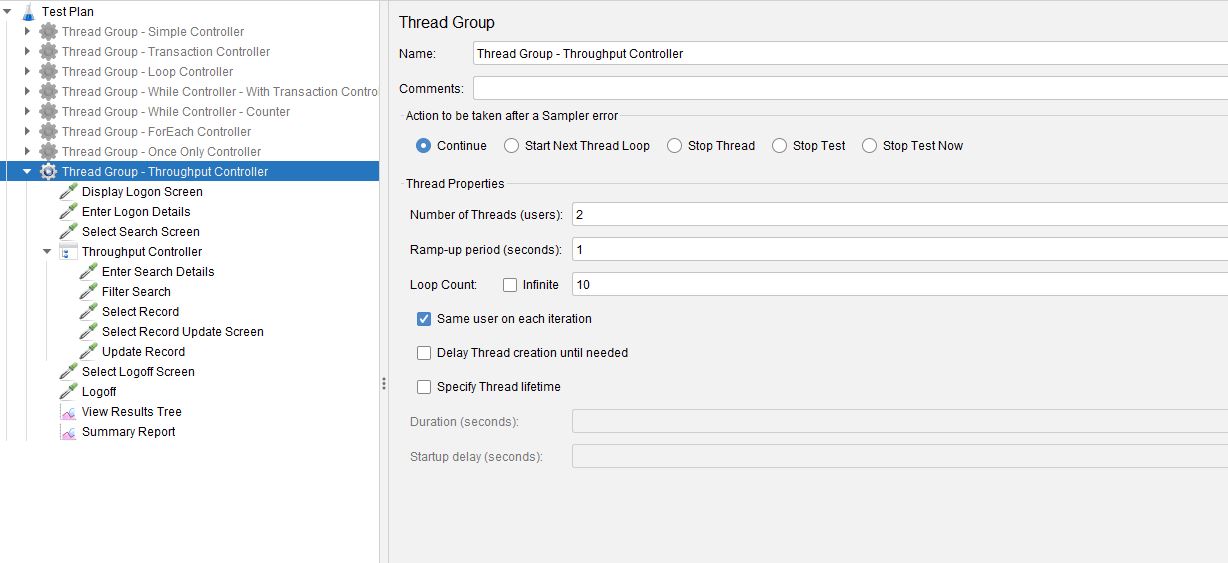
We can see that we have a few samplers under the Thread Group with 5 of these being children of the Throughput Controller.
We have 2 Threads with a Loop Count set to 10, let’s look at the Throughput Controller.
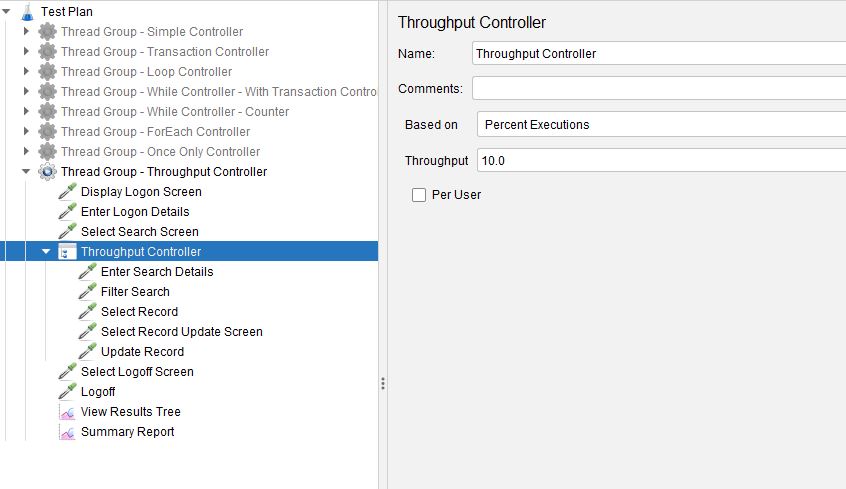
We have a Throughput value of 10.0 set here meaning that the samplers that are children of this controller will be run 10% of the time during the test.
Let’s run the test and look at the Summary Report.
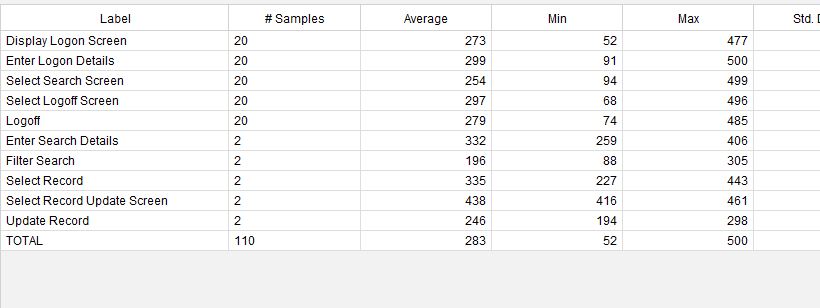
We can see that each sampler performed 20 iterations except for the 5 samplers that were children of our Throughput Controller that iterated 2 times which is 10% as per our controller configuration.
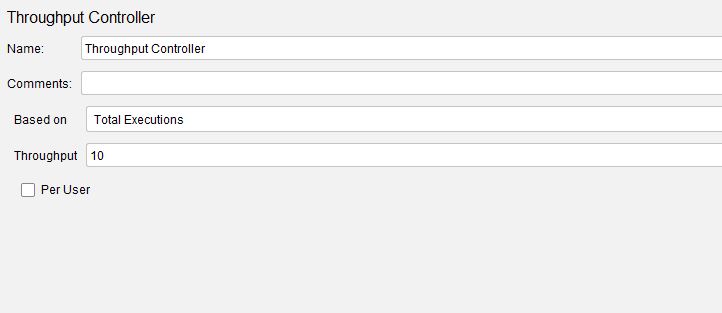
If we set our Throughput Controller to the Total execution mode and keep all values the same.
And run the test again.

We can see that all samplers outside of the Throughput Controller iterated the same number of times and the 5 child samplers iterated 10 times as that was the value set in the Throughput field of our controller.
There is a selection box that is labelled Per User that is available in both modes and the mode does not alter the way it works, let’s enable the selection and re-run the test in Total execution mode.

As we have 2 users set up in our Thread Group and we have 10 set as the Throughput value in the Throughput Controller we now have 20 iterations of the child samplers as opposed to 10 when the Per User selection was not set.
Once again further examples can be found in OctoPerf's documentation.
Interleave Controller
This is another relatively straightforward controller that can provide complexity to your load profiles.
Let’s look at the Interleave Controller.
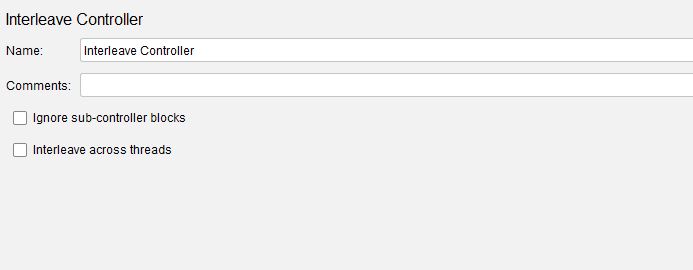
Before looking at the settings lets look at an example test.
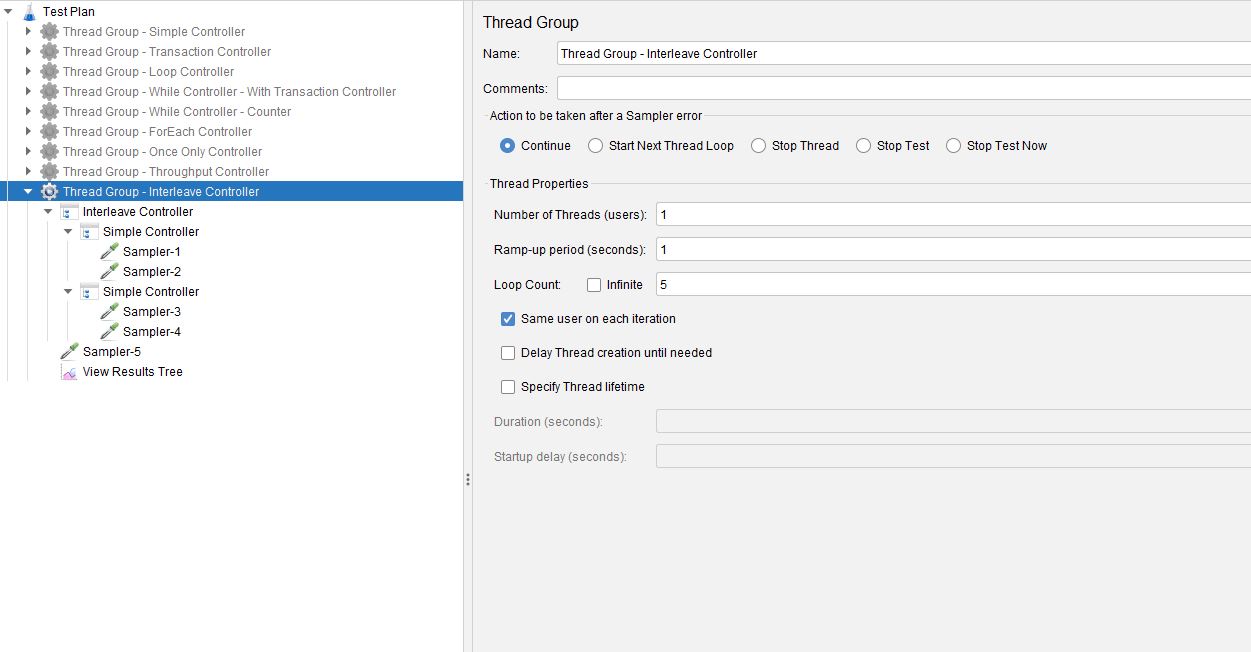
The samplers have been re-name to make following the order in which they are iterated, and the Thread Group has a single thread and 5 iterations.
The best way to show how the controller options work is to have some nested Simple Controllers as we have in our example.
At this point we have not set any of the options in the controller.
If we run the test:
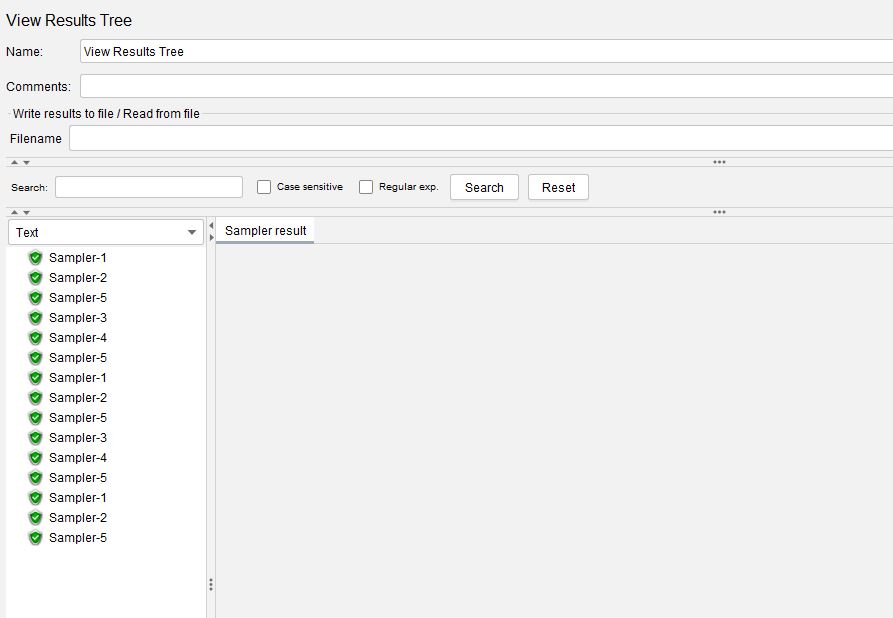
We can see that the first iteration takes both samplers from the first Simple Controller and then runs Sampler-5 as this is outside of the child controllers.
The second iteration runs both samplers from the second Simple Controller and then runs Sample-5.
This pattern is repeated until the iteration count is complete.
Before we start to look at the options the controller provides it is worth noting that if we increase the number of Threads to 2 and re-run our test both threads follow the same pattern.
This is easier to contrast in a Summary Report.
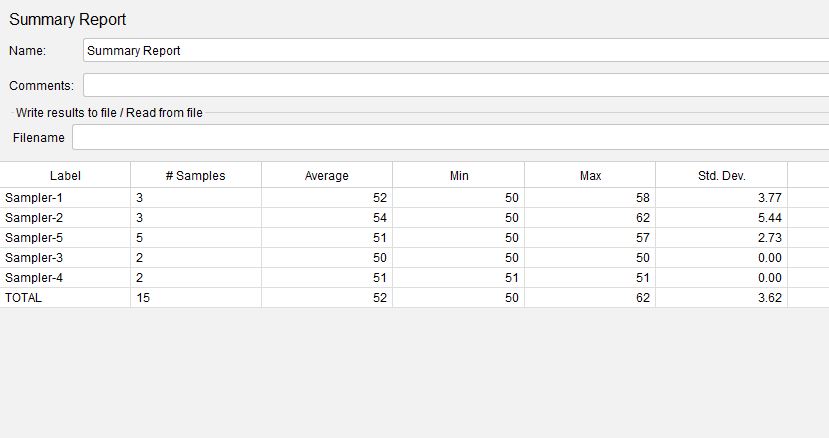
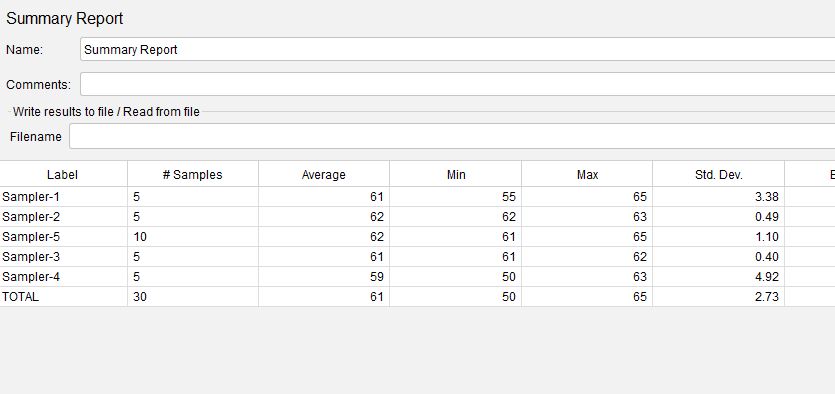
The above is the Summary report for the first test with a single user.
Below is the Summary Report for the second test with 2 users.
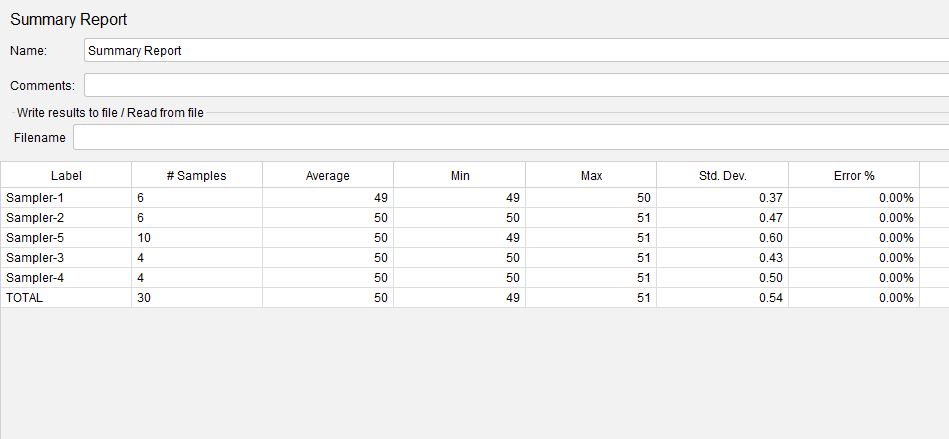
We can see that the Sampler counts have effectively doubled which demonstrates that each thread follows the same pattern.
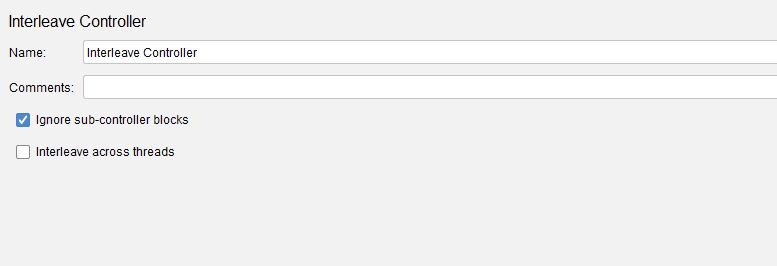
We will set our thread count back to 1 in the Thread Group and select the Ignore sub-controller blocks option in the Interleave Controller.
If we execute our test again.
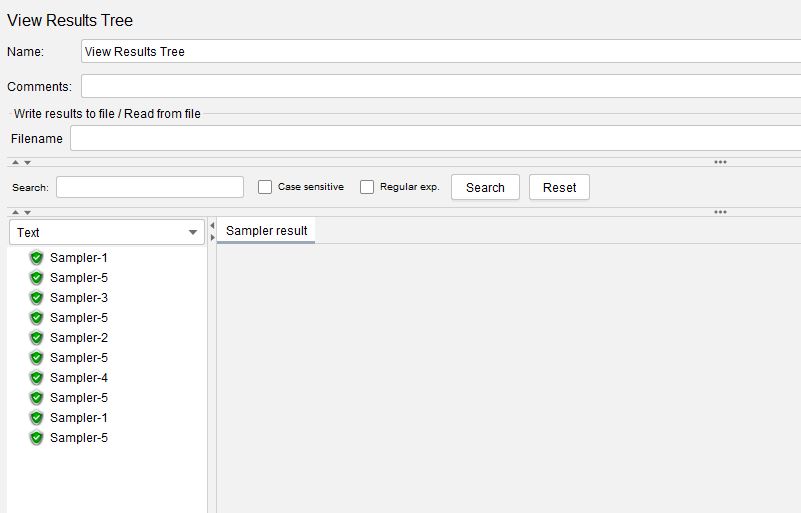
By selecting the Ignore sub-controller blocks option we can see that only one sampler from each Simple Controller is executed on each iteration as opposed to both when we did not have this options set.
We will now select Interleave across threads and de-select Ignore sub-controller blocks.
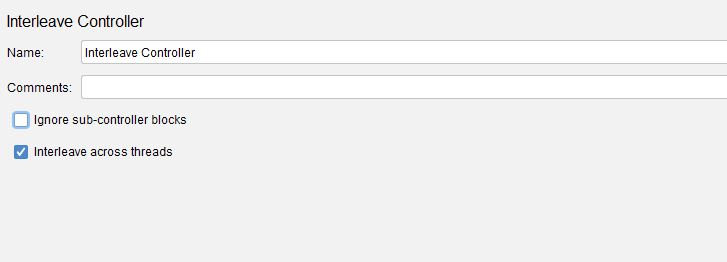
We will once again increase our thread count to 2 and run our test.
What has happened is that the first thread has started by executing the first Simple Controller and the second thread has started by executing the second Simple Controller and then alternating as they iterate.
Finally, if we were to select both options on the Interleave Controller at the same time then each thread would alternate between the Simple Controllers but only execute once of the samplers for each iteration.
This controller is useful for building alternating logic into your scenarios to give some randomness to the execution flow.
Random Controller
The Random Controller is very similar the Interleave Controller in the way it works, let’s look at it.
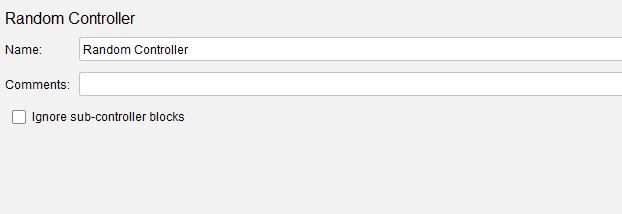
You will recognise the Ignore sub-controller blocks option from the Interleave Controller.
The Random Controller does the same thing as the Interleave Controller but selects a Sub Controller at random on each iteration.
If we select the Ignore sub-controller blocks option, then as before only one sampler is selected rather than both.
Let’s use the same scenario as we used in the previous section and replace the Interleave Controller with a Random Controller, for simplicity we will use a single thread and set our iteration count to 10.
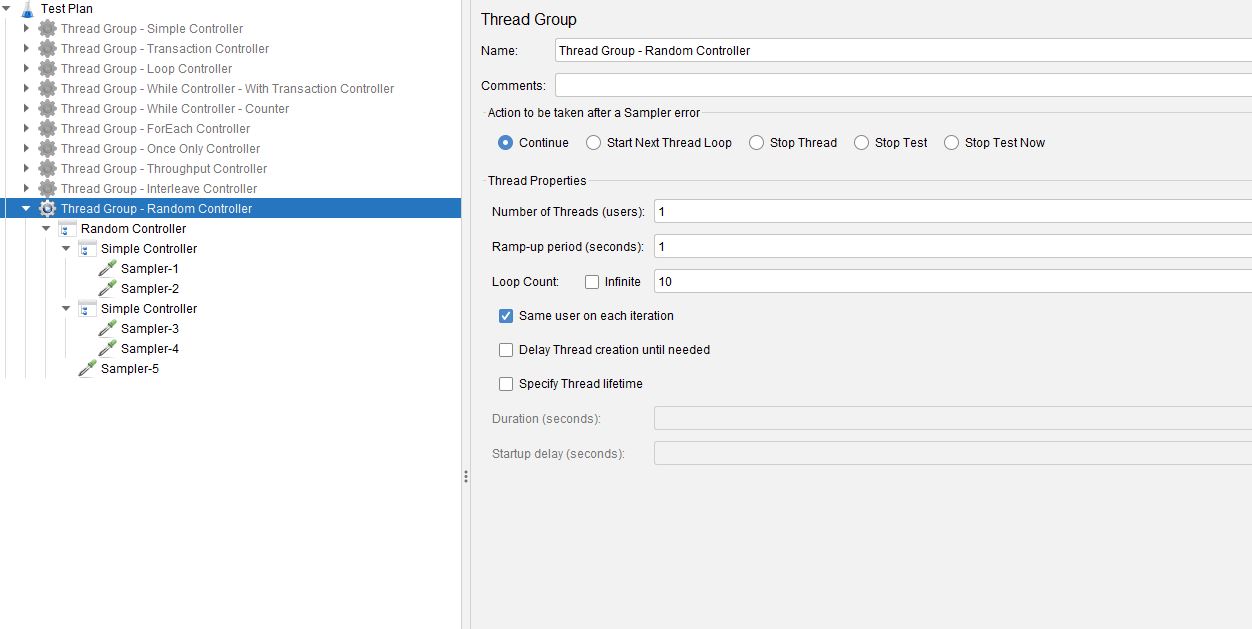
If we execute our test.
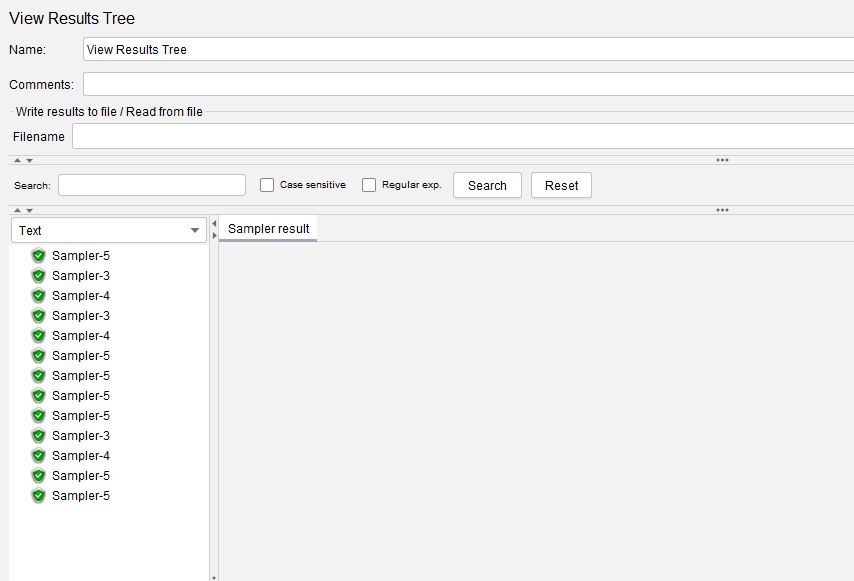
We can see that the samplers are executed in a random order.
Random Order Controller
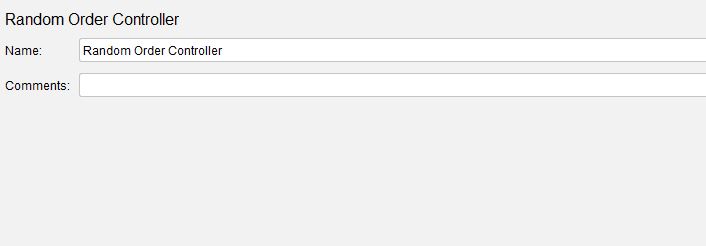
The Random Order Controller just effectively executes the samplers within it in a random order.
Let’s look at the controller.
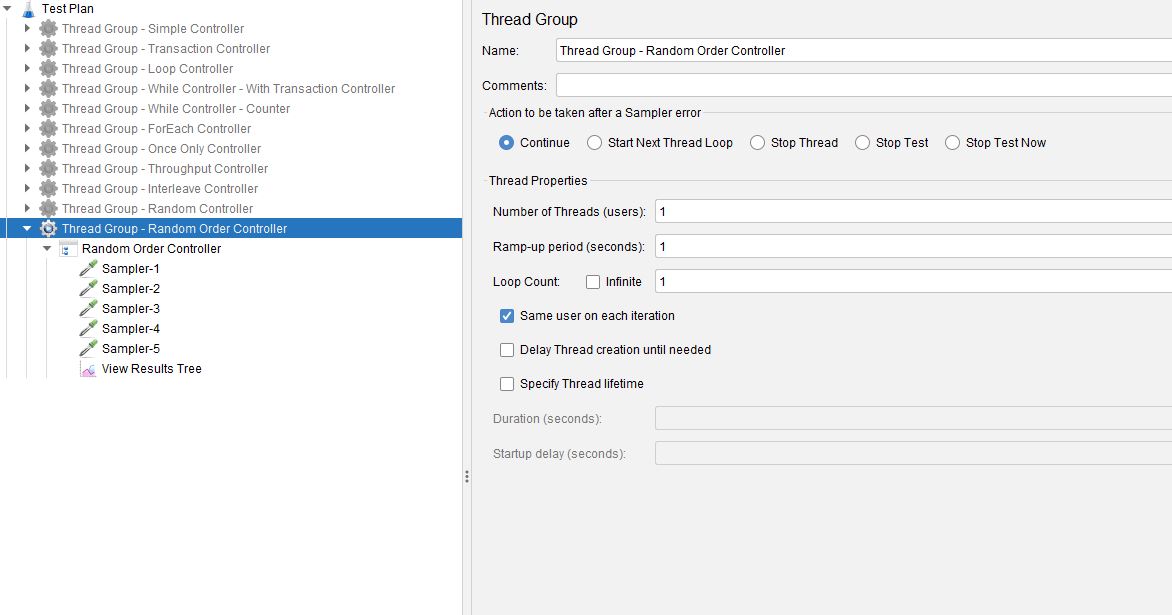
If we build a simple test.
If we execute our test.
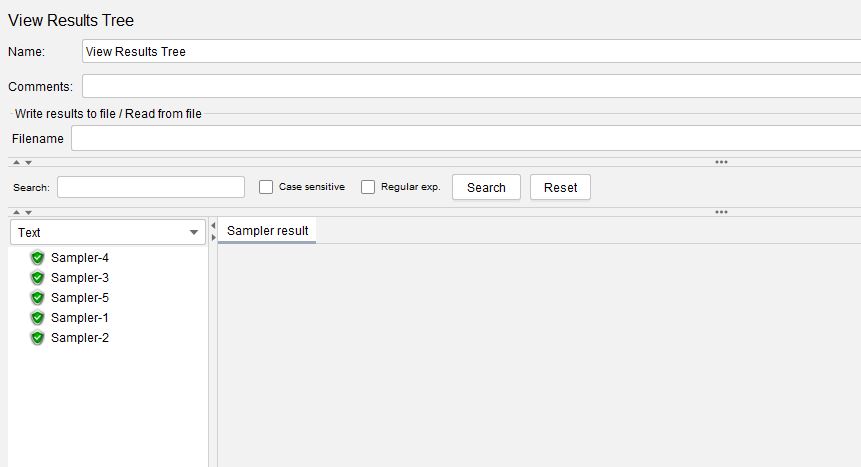
we can see that the samplers are run in a random order.
Conclusion
Controllers are the building blocks for your user scenarios and can be extremely powerful when combining multiple controllers in a single Test Plan.
Hopefully this post has given you enough information to start playing around with the many controllers that JMeter has to offer.
If you missed it in the introduction, the sample Test Plan can be found here.
