
Asynchronous API Performance Testing with JMeter
The principles behind performance testing API’s does not differ from the principles behind the performance testing of any application.
Many API’s however are Asynchronous and a valid response from the API does not necessarily mean the transaction is complete which can cause a problem when measuring the performance of API’s.
There are however ways around this and we will explore these in this post.
Sample JMX and DB files for this blog post are available for download:
Volumes
Before we get into the details of testing it is important to understand that in a microservices architecture API’s may be called by both external consumers and internal consumers.
You should bear this in mind when considering the volumes to execute your tests at as you don’t want to underestimate them.
Synchronous Response API
API can be synchronous and if this is the case then a simple Response Assertion will determine if you are getting a valid response.
Bear in mind that services do not always return a status code of 200.
201, 202 and 204 are all valid status code responses.
If we use a Dummy Sampler to mock service requests and responses, we can test a synchronous response.

There are dummy samplers returning:
- 200,
- 201,
- 202,
- 204,
- 401.
And our Response Assertion looks like this.

Where we are checking the Response Code for any of:
- 200,
- 201,
- 202,
- 204.
Which when run gives us these results:

This test can then be easily scaled up to load test your API and report on response times and concurrency.
Asynchronous Response API
Introduction
Asynchronous requests require a bit more thought about how their duration and measure of success can be determined under load.
Before we go into how we can build a test for an Asynchronous Response it is important to understand that whilst the response time may not be accurate the response code will be, even with Asynchronous API’s requests.
You need to use the same approach with an Assertion as we used in the Synchronous Responses section above to ensure that the service has started processing successfully.
There are going to be some exceptions to this but for the most part a service will persist data in a datastore at some point in its journey, whether using a database technology or file system and this is a useful way to measure performance of an Asynchronous API.
Let’s design a test to measure the response time of the data being persisted in a database as a way of testing Asynchronous Responses.
Requirements
Before we start building the test it is important to understand that you are not measuring a response or a duration of an individual request but of the test, so you must think about your requirements a little differently.
Let’s look at an example of how your requirements need to change for an Asynchronous API.
If your requirements is:
- Process 1000 service calls an hour with a response time of 500 milliseconds
Then, this changes to
- Process 1000 service calls an hour with the last request arriving in the database within 500 milliseconds of the last request being sent.
This might sound a bit of a mouthful but essentially the only way to measure performance of your service calls and to check that requests being sent to a service are not being bottlenecked, in one of the services or message queues that may exist in your application, is to ensure the last request persists within the response time requirements you have.
I've already written a blog post on making requirements testable which may help.
Building our Test
Setup Steps
Let’s look at how we can build a test that is able to measure the time taken for an Asynchronous API to persist data in a database.
In order to demonstrate the data process we are going to create a dummy SQLite database and then we create a dummy sampler to simulate data being inserted into our dummy database. To create our test database, we will first install the database by downloading SQLite and uncompressing the binaries. In an enterprise solution you will be extracting data from alternative database technologies, this does not change the approach only the way you configure your JDBC Connection to them.
Add the SQLite binaries to your PATH and then executed the command sqlite3 OctoPerf.db to create a dummy sqlite database.
We then open the database:
.open OctoPerf.db
We then create a dummy table
CREATE TABLE OctoPerf_Table_1 (Id Int, InsertVal Varchar);
If we run .tables command we see our empty table.
We now have a database we can use this in our test.
Let’s now create a sampler to write data into this database, this will allow us to simulate the behaviour of a service that writes data into a database Asynchronously.
We will add a JDBC Connection Configuration element to our test first and configure it to point to our dummy database.

You can see we have selected org.sqlite.JDBC as our driver, this will change depending on your database technology as will the syntax of the Database URL which for our example is in the format jdbc:sqlite: followed by the location of the database file.
As our test requires multiple concurrent transactions against the database make sure the Max Number of Connections is set to 5 to ensure we can multi-thread requests.
Let’s now update our tests to create a JDBC Request Sampler that will simulate the database insert actions of an Asynchronous API.
In our JDBC Connection we defined a variable for the database connection named octoperf-db we need to use this in our JDBC Request Sampler to access our test database.
Our JDBC Request Sampler looks like this:

You can see where we are using our octoperf-db database connection reference. There is an insert statement in the SQL Query part of the sampler, where our Query Type is set to Update Statement.
If we now run our test and check the database, we see our record inserted:

We are going to make a few more changes to make sure we insert random data into the database and set the test to run for 60 seconds while inserting 100 records. This will give us a test that we can then measure performance against.
First let’s add a User Parameter Pre-Processor and add 2 variables:

We now have 2 variables that create a random integer and a random string.
Let’s update our insert query to use these variable:

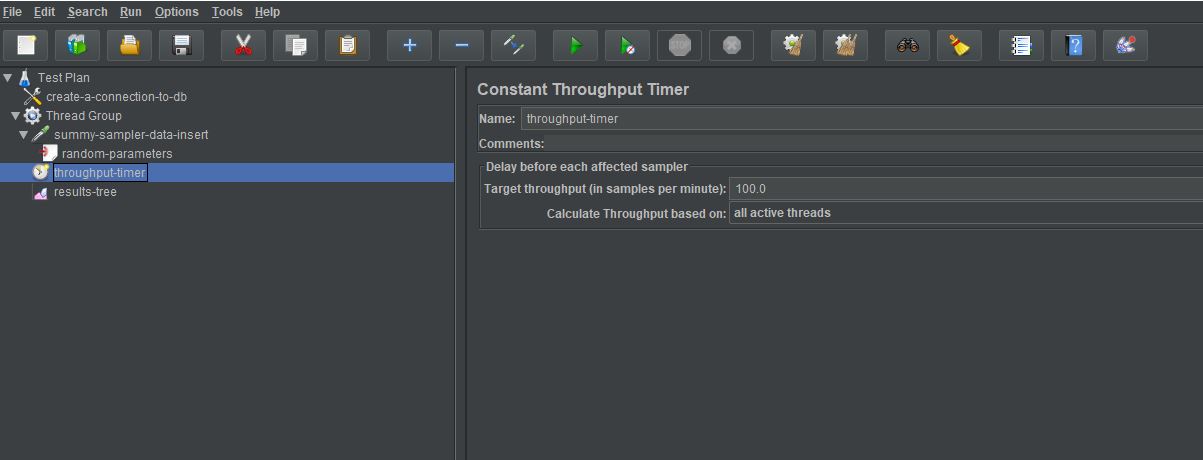
Finally, we will add a Constant Throughput Timer and set it to 100.0 samples per minute:
And we change our Thread Group to have 2 threads, a small ramp up time and a duration of 60 seconds:

If we now run our test, we can see random data in our test table:

And a count shows that we have 100 records:

Measuring Performance
It seems like we have done a lot of work already but really all we have done is create the ability to simulate data being written to a database in the same way an Asynchronous API call might.
The simplicity of this test does not mirror the complexity of your application under test and our simple test is not going to have any latency or bottlenecks because:
- It is a simple database insert,
- it is running on a local machine.
That does not really matter, what we are going to show you is a technique for measuring performance that you can use against your real services.
Let’s build the test.
What we are looking to do is:
- Count the number of records in our test database,
- Store this value,
- Execute the test to add data into our test database,
- At the same time the test begins we again count the records in the test database,
- We keep iterating this count until the number or records match the number we expect,
- Stop the test and output the duration.
To count the records at the start of the test we add a setUp Thread Group to our test with and we add a JDBC Request Sampler to this Thread Group.

We are using our database connection reference as we spoke about earlier to make sure we are using the correct database, we run a piece of SQL to count the number of records in our test table.
SELECT count(Id) As count FROM OctoPerf_Table_1;
You will notice that we added a value to the Result variable name file called count-records. This is a reference to the values returned from the SQL.
The final part of the setUp Thread Group is to write the record count to JMeter properties and we do this using a JSR223 Post Processor.

The first thing we do is ignore the sampler to count the records, we do not want to output the response times for this step as it's not part of the test.
prev.setIgnore();
We then check we have a valid response object from our query.
if(vars.get("count-records") != null) {
Then we allocate the number of records in the database to a property called startCount.
props.put("startCount", vars.getObject("count-records").get(0).get("count").toString());
Finally, we set a property called currentCount to be 0, we will discuss the reason for this next.
props.put("currentCount", "0");
The other new steps in this test are the addition of another Thread Group which runs at the same time as our Thread Group to write date to the database.
This additional Thread Group is a bit more complicated, so we will step through it, it is made up of:
- A Transaction Controller that allows us to generate a parent sample response time for all child components,
- A While Controller to iterate until all records have been added,
- A JDBC Request that mirrors the one we used in the setup Thread Group,
- A JSR223 Post Processor that also mirrors the one used in the setup Thread Group,
- A Constant timer to allow a pause between database checks.
Let’s look at each one in turn.

Our Transaction Controller has the Generate parent sample checked so we only generate a single timing point for this test.

Our While Controller will continue to iterate until the condition it is checking is no longer true, once the condition is false it exits.
Our condition is:
${__groovy(
    ('${__P(startCount)}'.toInteger() + 100) > ('${__P(currentCount)}'.toInteger())
)}
We design the condition to use Groovy as it is JMeter’s recommended approach.
This is effectively saying keep iterating while the startCount property that we defined in the setUp Thread Group plus 100 which is the number of records we are adding (this could be a variable) is less than the currentCount property we set to 0 in our setUp Thread Group.
The next two steps are almost identical to those in our setUp Thread Group:


The only difference is the record count is being assigned to the currentCount property and not the startCount property.
props.put("currentCount", vars.getObject("count-records").get(0).get("count").toString());
The last thing we do as part of the Transaction Controller is to add a small pause to the iteration, so we are not continually submitting database requests.

What we are doing then is effectively constantly counting the number of records in the database while they are being added and when the number in the table before the tests starts plus the number we have scheduled the test to do match the current count we stop.
Finally, we will add a JSR223 Post Processor to the sampler that inserts the records into the database so we do not output the results of the data input and all we want to show is the result of the Transaction Controller above.
If we now run the test:

We can see that we have a single timing point which is the Transaction Controller and the Load time is 60737 milliseconds which is just over 60 seconds.
Our test shows us that the last request was received into the database 737 milliseconds after the data input completed.
Conclusion
Our requirement was made testable based upon this way of testing Asynchronous API’s and what we have done is build a test to measure this.
Measuring Asynchronous events requires the use of many of the Controllers and Samplers that JMeter has and we hope that this post has given you some guidance on how you can go about measuring these Asynchronous events.