Build your own JMeter Docker Image and execute your Performance Test
If you'd like to run load tests in a simple way, and possibly share them, while benefiting from a simplified configuration, with a focus on writing your test plan, and its test typology, this article is for you!
Docker offers virtualization services that simplify the replication of working environments.
Furthermore, each virtualized service is isolated from unrelated services on other containers or the host machine, ensuring portability across host machines and the network.
Using JMeter within a Docker container offers several advantages :
Portability :
Docker enables the creation of lightweight and portable containers that can run on any Docker-compatible system, whether it's Linux, macOS, or Windows. This simplifies the deployment and management of JMeter, avoiding compatibility issues related to different system configurations.
Isolation :
Docker containers provide an isolated environment for running applications, meaning JMeter's dependencies and runtime environment are encapsulated within the container. This reduces potential conflicts with other applications or system components.
Ease of deployment :
With Docker, distributing and deploying JMeter across multiple machines or environments is straightforward.
You can create a Docker image containing JMeter and distribute it to your team or various test environments, streamlining the deployment process.
Version management :
By using Docker, you can version your Docker images containing JMeter, facilitating the management of different versions of JMeter used in your tests. You can also share these images via public or private Docker registries
Docker image creation through Dockerfile, a few explanations before the use :
I assume that you have installed a version of docker on the host that will run the performance test in non-distributed mode.
In order to set up the right environment, we're going to use a Dockerfile.
A Dockerfile is a configuration file used to create a Docker image. It contains a set of instructions telling Docker how to build a specific containerized image.
It is a text file with no extension used by Docker to automate the Docker image creation process.
This file contains a set of instructions describing the steps required to create a complete Docker image.
Each instruction in the Dockerfile is a command that is executed sequentially by the Docker engine when building the image.
The most commonly used instructions in a Dockerfile include :
FROM : This instruction specifies the base image to be used to build the Docker image. All other instructions in the Dockerfile will be executed on this base image. In our example, we'll use a lightweight image that we'll feed exclusively with what we need.
RUN : This instruction is used to execute commands inside the container during the image building process. For example, install dependencies, run system updates, etc.
COPY : This instruction copies files and directories from the local file system into the Docker image under construction.
WORKDIR : This instruction defines the working directory to be used for subsequent instructions in the Dockerfile.
ENV : This instruction defines environment variables to be used in the Docker image.
EXPOSE : This instruction exposes specific container ports to which processes running inside the container can connect.
CMD or ENTRYPOINT : These instructions define the default command to be executed when an image-based container is launched.
Let's move on to the practical case :
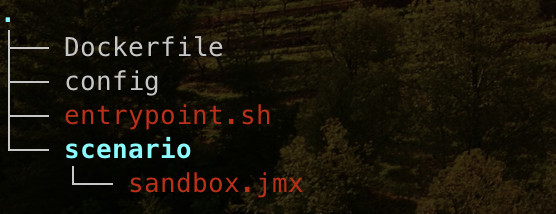
Below is the tree structure of our project :

First of all, let's download a minimalist alpine image, which doesn't weigh much, and add what we'll need to run our tests, we only have to define 2 things : - The JMeter version we want to use in the "JMETER_VERSION" variable. - The name of the relevant project in the "PROJECT_NAME" variable.
FROM alpine

ARG JMETER_VERSION="5.6.3"

ENV PROJECT="sandbox"
ENV JMETER_HOME /opt/apache-jmeter-${JMETER_VERSION}
ENV JMETER_BIN ${JMETER_HOME}/bin
ENV JMETER_DOWNLOAD_URL https://archive.apache.org/dist/jmeter/binaries/apache-jmeter-${JMETER_VERSION}.tgz
Next, let's install the packages we'll need to make our container fully operational :
RUN apk update \
    && apk upgrade \
    && apk add ca-certificates \
    && update-ca-certificates \
    && apk add --update openjdk17-jre tzdata curl unzip bash \
    && apk add --no-cache nss \
    && rm -rf /var/cache/apk/* \
    && mkdir -p /tmp/dependencies \
    && curl -L --silent ${JMETER_DOWNLOAD_URL} > /tmp/dependencies/apache-jmeter-${JMETER_VERSION}.tgz \
    && tar -xzf /tmp/dependencies/apache-jmeter-${JMETER_VERSION}.tgz -C /opt \
    && rm -rf /tmp/dependencies

ENV PATH $PATH:$JMETER_BIN
Finally, the working directory is represented here by : WORKDIR /, when running the dockerfile the files entrypoint.sh, and config files will be copied to the /optdirectory, when the container is created, the entrypoint file will be executed after all the previous steps :
WORKDIR /
COPY entrypoint.sh /opt/entrypoint.sh
COPY config /opt/config

ENTRYPOINT ["bash", "/opt/entrypoint.sh"]
The docker file example is available here
Entrypoint.sh :
In this file, the test execution date is determined by the use of the NOW variable.
Arguments defined and used in the JVM are retrieved via the JVM_ARGS variable in the current session when the container is executed.
JMeter is then executed using the information in the configuration file:
${JMETER_BIN}/jmeter -X -d ${JMETER_HOME} -n -j ${LOG_FILE} -l "${RESULTS_FILE}" ${PARAM_HOSTS_ARGS} ${PARAM_USERS_ARGS} -t "${JMX_FILE}" -e -o "${RESULTS_DIR}/report-${PROJECT_NAME}-${NOW}"
-X : Exit the remote servers at end of test (CLI mode)
-n : Run JMeter in nongui mode
-j : JMeter run log file (jmeter.log)
-l : The file to log samples to
-t : The jmeter test(.jmx) file to run
-e : Generate report dashboard after load test
-o : Output folder for report dashboard
See more details on JMeter Apache website
This script can be downloaded here.
The config file :
In this file, a certain number of parameters are defined and will be taken into account when the test plan is executed :
TEST TYPOLOGY : this defines the load, duration and ramp-up period to reach the expected load, the following information are provided as an example.
NB_USERS=1
DURATION=180
RAMPUP=1
TARGET : which means defining the target information to be solicited as part of the tests, in this case a single example.
TARGET_HOST=TO_REPLACE_BY_TARGET_HOST
TARGET_PORT=443
SCHEME=https
SCENARIO PARAMETERS : Are the arguments that will be used when executing the scenario.
PARAM_USERS_ARGS="-Jthreads=${NB_USERS} -Jduration=${DURATION} -Jrampup=${RAMPUP}"
PARAM_HOSTS_ARGS="-Jhost=${TARGET_HOST} -Jport=${TARGET_PORT} -Jscheme=${SCHEME} -Jresdir=${RESDIR}"
JMX FILE PATH, LOGS PATH : Orchestration of information transmitted during execution, including the test plan and log files.
JMX_FILE=/opt/jmeter/${PROJECT_NAME}/scenario/${PROJECT_NAME}.jmx
LOGS_DIR=/opt/jmeter/${PROJECT_NAME}
LOG_FILE=${LOGS_DIR}${PROJECT_NAME}.jtl
RESULTS_DIR=/opt/jmeter/${PROJECT_NAME}/
RESULT_FILE=results-lt-${PROJECT_NAME}-${NOW}.csv
RESULTS_FILE=${RESULTS_DIR}/${RESULT_FILE}
JVM CONFIGURATION : Time zone definition, IP address stack preferences, garbage collector, JVM memory size, stack size definition for JVM threads.
JVM_ARGS="$JVM_ARGS -Duser.timezone=CET"
JVM_ARGS="$JVM_ARGS -Djava.net.preferIPv4Stack=true -Djava.net.preferIPv6Addresses=false"
JVM_ARGS="$JVM_ARGS -Dcom.sun.management.jmxremote.authenticate=false"
JVM_ARGS="$JVM_ARGS -XX:+UseG1GC -XX:MaxGCPauseMillis=100 -Xms1g -Xmx1g -XX:G1ReservePercent=20 -Xss256k"
The configuration file example can be downloaded here.
Our performance test scenario :
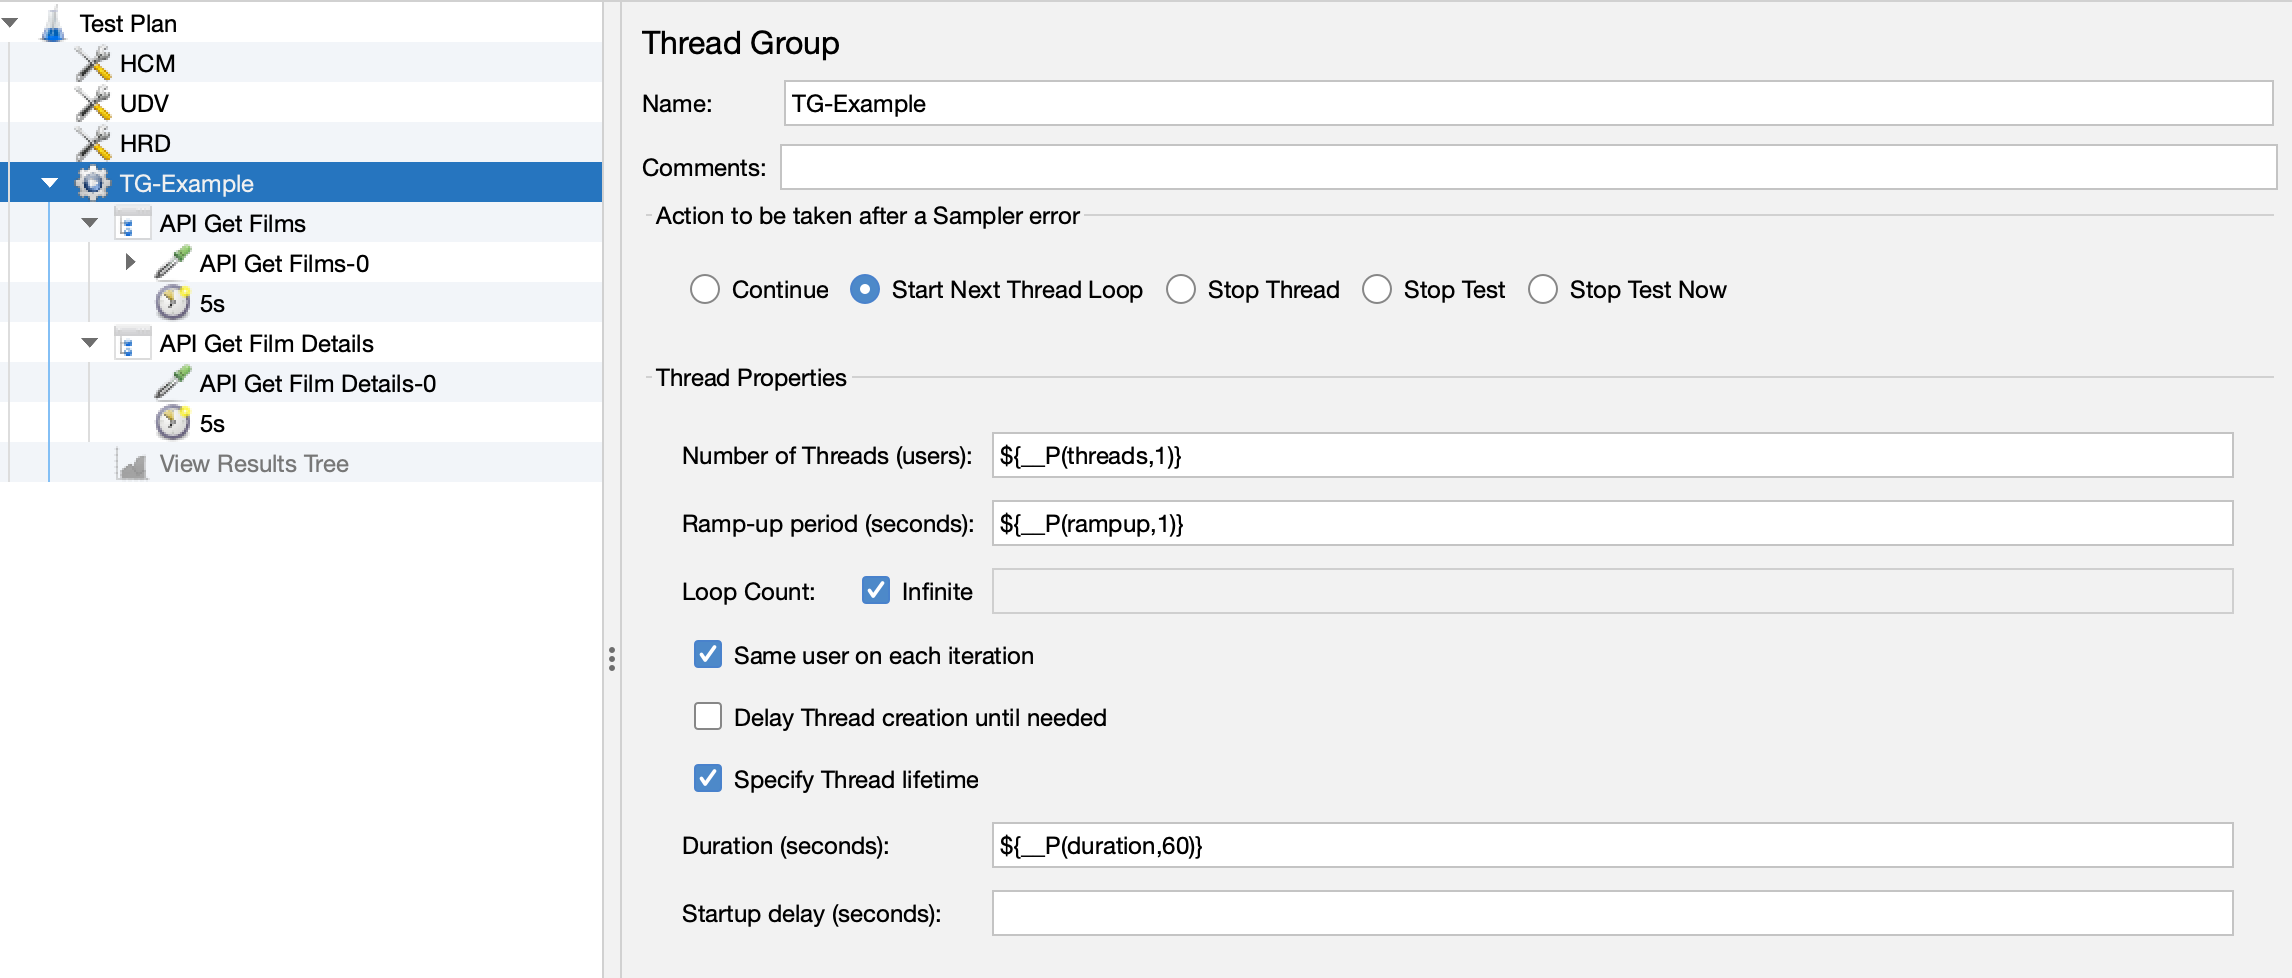
You only have to put your JMeter's scenario into scenario folder, just keep in mind the scheme, host, port, threads, duration, rampup variables will be override when the docker container will be executed, according to the informations filled in the config file :

Don't forget to update/check values for scheme, host, port variables.

Don't forget to update/check values for threads, duration, rampup variables.
The JMX file can be downloaded here.
Image build and container execution :
Image build :
So let's go in our working directory, and lauch the following command :
docker build -t jmeter:v1 .
This is the main command for building Docker images from the Dockerfile.
The -t or --tag option is used to specify the name and version (tag) of the image to build.
In this case, the image will be named jmeter with the tag v1. This means that the image will be referenced as jmeter:v1.
'.' : This is the path to the directory containing the Dockerfile to use for building the image. The dot . signifies the current directory, so Docker will look for the Dockerfile in the directory where the command is executed.
To check if the docker image has been created, the following command should show you some useful informations : docker images
For example :

Description of command line :
docker run --rm -ti -v $PWD/:/opt/jmeter/sandbox/ --name test-jmeter jmeter:v1 /bin/bash
docker run : This is the main command to execute a Docker container.
--rm : This is an option that tells Docker to automatically remove the container once it has stopped. This automatically cleans up resources once the container is no longer running, avoiding the accumulation of unused containers.
-ti : These options allow starting the container in interactive mode with a pseudo-TTY (TTY) terminal. This enables the user to interact with the container's shell via the host's terminal.
-v $PWD/:/opt/jmeter/sandbox/: This is an option that mounts a volume between the host's file system and the container's file system. In this case, the current directory of the host ($PWD) is mounted into the /opt/jmeter/sandbox/ directory of the container. This allows accessing host files inside the container and vice versa, facilitating file sharing between the host and the container.
--name test-jmeter : This is an option that allows giving a name to the container. In this case, the container is named test-jmeter, which facilitates its identification and subsequent management.
jmeter:v1 : This is the name of the Docker image from which the container will be created. In this case, the image used is jmeter with the tag v1.
/bin/bash : This is the command to be executed inside the container. In this case, it launches an interactive Bash shell inside the container, allowing the user to run commands inside the container once it is started.
If all is correct you will see the start date : "PERFORMANCE TEST EXECUTED AT : xxxx"
And the performance test will be executed accordingly :

And then when the performance test will be done : "PERFORMANCE TEST ENDED AT : xxxx"
You will find the JMeter output report in the current working directory.
That's it ! This should help you set up performance tests more easily, share them more simply, through a simplified methodology and benefit from the advantages of docker with JMeter.
