How to build and release an open-source Java Project
I was recently curious on how to create an open-source project from scratch and release it on Maven Central. I'm going to explain in this post how to create and release your first Java open-source project.
I'm going to go through all the steps from creating the source repository, building the project using Continuous Integration, testing the code coverage and finally uploading a release on Maven Central.
No server is required to build the project, nor to publish it. Every tool used here is absolutely free, and most of them are open-source.
Source Control Management
First, we need to store the source code of our open-source project using an SCM.
Git Repository
First, we need a source repository to host the source code of our project. GitHub is perfect for this task. This step is pretty straight forward:
- Create an account on Github,
- Create a new repository.
Cloning Git Repository
Now, we need to clone the Git repository on our local machine to be able to push our source code to Github. You will need to generate SSH keys to complete this step.
At this point, you have a working Git repository on Github and you can pull/push modifications to this repository using your generated SSH key.
Maven Central
In this example, i'm going to explain how to publish a Java project build with Maven. This section supposes you have already some knowledge about using Maven.
Sonatype is maven central repository which makes our Maven artifacts available to the world. By uploading our released artifacts there, everyone will be able to use them as a dependency in Maven compatible projects.
Sonatype Account
We are going to deploy the maven artifacts to Sonatype: create a Sonatype account. Now, create a Jira ticket to ask the validation of your groupId.
In my case, my groupId is com.jeromeloisel. The OSSRH Guide explains how and why this is necessary to allow you to release artifacts to Sonatype.
Once this is done (usually within 2 days), you are now able to upload maven artifacts to Maven Central through Sonatype.
Java Project
In this example, i'm going to explain how to publish a Java project build with Maven. This section supposes you have already some knowledge about using Maven.
Match POM Requirements
Open-source projects published on Maven central must conform to some requirements. For example, you need to publish the Javadoc and Source artifacts. You also need to sign the uploaded artifacts with GPG. Don't be afraid, it's easy!
First, check the POM requirements and make sure you project's POM conforms to it.
Create a GPG Key
The following guide explains how to create and publish a GPG key:
- Install GPG:
sudo apt-get install gpg2 - Generate a new GPG key:
gpg --gen-key - Publish the GPG Key:
gpg2 --keyserver hkp://pool.sks-keyservers.net --send-keys <Key Id>
You should end up with 2 files: pubring.gpg and secring.gpg. These files are your public and secret GPG keys which will be used to sign the released maven artifacts.
Maven Settings
The Maven settings file will reference both the GPG key and your Sonatype account:
<settings>
  <profiles>
    <profile>
      <id><!--Project name --></id>
      <properties>
        <gpg.homedir>/home/r</gpg.homedir>
        <gpg.keyname><!-- GPG Key --></gpg.keyname>
        <gpg.passphrase><!-- GPG Key Passphrase --></gpg.passphrase>
      </properties>
    </profile>
  </profiles>
  <servers>
    <server>
      <id>oss.sonatype.com</id>
      <username><!-- Sonatype JIRA user name --></username>
      <password><!-- Sonatype JIRA pwd --></password>
    </server>
  </servers>
</settings>
Let me explain a little bit the content:
- Project name: this is the name of your open-source project,
- GPG Key and Passphrase: these are pretty self explanatory,
- Sonatype username and password: supply your Sonatype account access.
These files will be necessary in the next steps to setup project build and release.
Project Build
We haven't talked about how we are going to build our source project, aka create JAR from sources. For this step, we are going to use TravisCI.
TravisCI is great because it seamlessly integrates with Github. We could have used Jenkins but this would have required to setup a machine to build the project.
TravisCI setup
First, login to TravisCI using your Github account. Then, find your open-source project and allow TravisCI to build it. TravisCI needs a configuration file, called .travis.yml, to understand how to build your project. Here is a sample one:
language: java
jdk:
  - oraclejdk8
This tells TravisCI your project is a Java project, and must be built using Java8. Create a .travis.yml file at the root of your project with the content above if you are using Java8 too. For further TravisCI configuration, see Building with Java.
TravisCI assumes your project uses Maven and will automatically execute the right command to launch the unit tests.
TravisCI Build
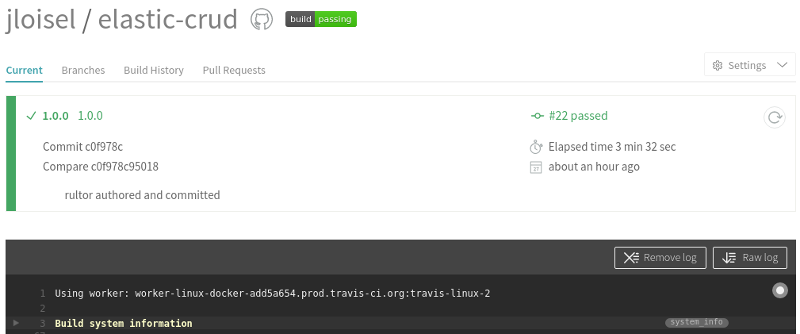
The screenshot above shows Elastic-crud, an open-source project which is built using TravisCI.
TravisCI builds your project automatically each time you push modifications to the git repository. It can do even more like automatically merge pull requests.
Build Badge
I find it fancy to display a build badge on the project page to show the user the build status:
Now we have a project with source available on GitHub, builds done by TravisCI and a valid Sonatype account to publish the artifacts on Maven central. So, what's missing?
We need now a way to easily publish the artifacts on Maven central.
Release on Maven Central
Rultor is a Devops online tool which can release our source code. It fetches our source-code from GitHub, builds it and then releases it to Maven Central.
Rultor Setup
First, we need to provide Rultor a few configuration files to allow him to fetch our sources and release them. You remember the three files created before?
We need to encrypt those three files:
$ gem install rultor
$ rultor encrypt -p name/project pubring.gpg
$ rultor encrypt -p name/project secring.gpg
$ rultor encrypt -p name/project settings.xml
Replace name/project with your Github username and Github git repository name. In my case, it was jloisel/elastic-crud. Then, put the encrypted files at the root of your source repository.
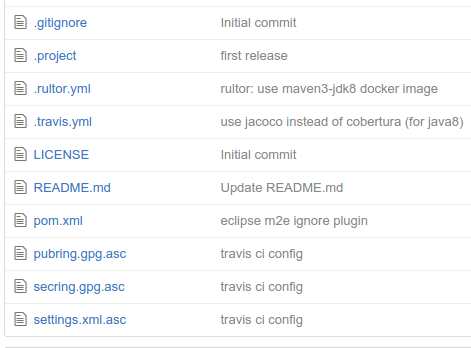
These files allow rultor to sign your artifacts using your GPG key and publish them to Sonatype.
Rultor Github Access
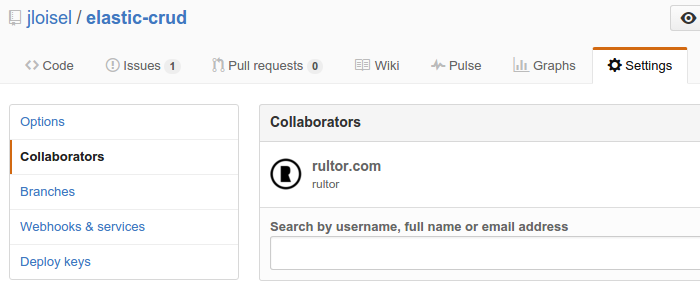
To allow Rultor to tag the source code with the released version, you will need to add Rultor as a Collaborator of your project.
Rultor Config
Create a .rultor.yml configuration file at the root of the project. Here is an example configuration:
docker:
  image: "maven:3-jdk-8"
decrypt:
  settings.xml: "repo/settings.xml.asc"
  pubring.gpg: "repo/pubring.gpg.asc"
  secring.gpg: "repo/secring.gpg.asc"
release:
  script: |
    mvn versions:set "-DnewVersion=${tag}"
    git commit -am "${tag}"
    mvn clean deploy -Pelastic-crud --settings ../settings.xml
This configuration file tells Rultor where to find the encrypted configuration files, how to release on Maven Central and finally create a git tag and release on GitHub. That's a lot of things done with minimal configuration!
The maven profile elastic-crud is needed to activate the gpg signature. It has to match with the id provided in the settings.xml we previously encrypted.
Source Setup
The final step to be able to release your project to Sonatype is to have a properly configured Maven POM. I would recommend using jcabi-parent, as a parent pom for your project:
<project>
  <modelVersion>4.0.0</modelVersion>
  <parent>
    <groupId>com.jcabi</groupId>
    <artifactId>parent</artifactId>
    <version>0.40.1</version>
  </parent>
  <groupId>your-group-id</groupId>
  <artifactId>your-artifact-id</artifactId>
  <version>1.2.3-SNAPSHOT</version>
  [...]
</project>
Make sure to use the latest version. If you don't want to use JCabi parent pom, you will need to setup GPG plugin, Versions plugin and Deploy plugin. Needless to say, it's way easier to stick with preconfigured JCabi parent.
Release
Once the build is running fine on TravisCI, it's time to test a release with Rultor. Create a new ticket in the GitHub issue tracker of your project, and post the following message:
@rultor release, tag is
0.1
Rultor should answer within seconds and start the build. Once finished, he should answer something like:
@jloisel Done! FYI, the full log is here (took me 4min)
Code Coverage
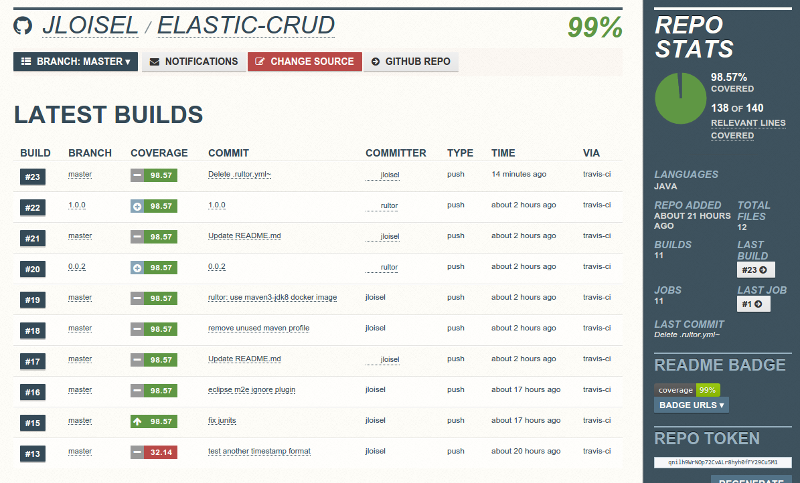
It's always nice to show your users your code is well tested. Coveralls.io integrates perfectly with TravisCI to provide Code coverage. It seamlessly integrates with GitHub too.
First, to setup coveralls to work with TravisCI, you need to generate code coverage reports using Cobertura or Jacoco (preferred if Java8). Edit your .travis.yml file and add:
after_success:
  - mvn clean test jacoco:report coveralls:report
Then, edit your root POM and add the following Maven plugins in the build section:
<plugin>
    <groupId>org.eluder.coveralls</groupId>
    <artifactId>coveralls-maven-plugin</artifactId>
    <version>4.1.0</version>
    <configuration>
        <timestampFormat>${maven.build.timestamp.format}</timestampFormat>
    </configuration>
</plugin>
<plugin>
    <groupId>org.jacoco</groupId>
    <artifactId>jacoco-maven-plugin</artifactId>
    <version>0.7.5.201505241946</version>
    <executions>
        <execution>
            <id>prepare-agent</id>
            <goals>
                <goal>prepare-agent</goal>
            </goals>
        </execution>
    </executions>
</plugin>
I encountered an issue with Coveralls (could not parse Build timestamp) which was fixed by adding to POM properties:
<maven.build.timestamp.format>yyyy-MM-dd'T'HH:mm:ss</maven.build.timestamp.format>
Code coverage should now be published on Coveralls each time TravisCI builds your project!
Final words
I really enjoyed learning how to build and publish some code I wanted to open-source (we use it at Octoperf. I have been impressed how easy it was! (although it looked hard at first place)
And, even better: TravisCI and Coveralls are free for open-source projects! It's amazing to see how many companies are now offering free services for open-source projects. After all, who can decently create products without using open-source libraries?
I would like to thank Yegor Bugayenko for his excellent article who inspired me to write this one.
