
How to load test OpenID/OAUTH
Summary
Load-testing applications using OpenID Connect requires simulating real authentication flows and validating token handling under stress. The guide walks through the OIDC “code” flow, explaining tokens, JWT internals, and the roles of the application, user, and identity provider. A full JMeter scripting workflow is detailed—from recording traffic to extracting dynamic values like state, nonce, session codes and authorization codes.
The process includes generating tokens, decoding them, managing headers, and preparing for token refresh logic. Keycloak is used as a reference example, but the same approach applies to any OIDC-based system. Guidance is provided on load modeling, login frequency, token expiration, and designing realistic test policies.
Table of Contents
Introduction
Performance testing scripts need to go through authentication in order to access target services with the right authorization. They also need to validate that the authentication servers are able to handle the target load. OpenID Connect (OIDC) has become a popular authentication and authorization protocol for securing web applications. This article will present the OIDC protocol and how to implement a JMeter script to performance test it.
OIDC Protocol
The OIDC protocol allows the application to rely on an authentication server to identify users accessing it. Usually the authentication server is linked to the enterprise access directory. In other words this protocol is aimed at providing Single Sign-On (SSO) solution for applications. Some big internet actors even allow users to authenticate on third party services through OIDC (for example authenticating on Gitlab using a google account).
The authentication flows are driven by the 'response_type' parameter set by the application. The possible values are:
- code
- token
- id_token
- id_token
- token
- code id_token
- code token
- code id_token token
- none
For simplification in this article we will consider the flow for value "code". This flow is as shown in the sequence diagram below:
Actors
As shown in this diagram there are 3 actors involved so far:
- End user through his browser
- Target application, which requires the user to be authenticated with specific role and privileges
- Authentication server that takes care of the user identity validation and provides the application with the roles and the privileges that are granted
Token types
Let's not forget to mention that once the authentication is done the user is provided with a token that the application API will validate for granting access. There are 3 kinds of tokens that are generated:
-
id token: a JWT format containing the identity of the user and information related to his profile,
-
access token: even if it is usually in the JWT format the specification doesn't require any typical format,
-
refresh token: used to renew the access token once it expires.
JWT
According to jwt.io, JWT stands for
JSON Web Token (JWT) is an open standard (RFC 7519) that defines a compact and self-contained way for securely transmitting information between parties as a JSON object. This information can be verified and trusted because it is digitally signed. JWTs can be signed using a secret (with the HMAC algorithm) or a public/private key pair using RSA or ECDSA.
In practice the JWT token comes in base 64 encoded string consisting of three parts separated by dots:
- Header: provides the algorithm used for signature
- Payload: contains claims (statements about the identity) usually about the connected user
- Signature: using a private key of the provided data. This allows to verify the validity of data relying on the authentication server private key
JWT tokens can be decoded to JSON document using this link.
Sample application
To puts hands on and implement a sample script, let's choose an application to work on. Among the OIDC implementation, Keycloak is one of the most commonly used and thus, the keycloak-quickstarts repository have been selected for this purpose. The application chosen is js/spa which provides a page that allows to show the authentication tokens and refresh them.
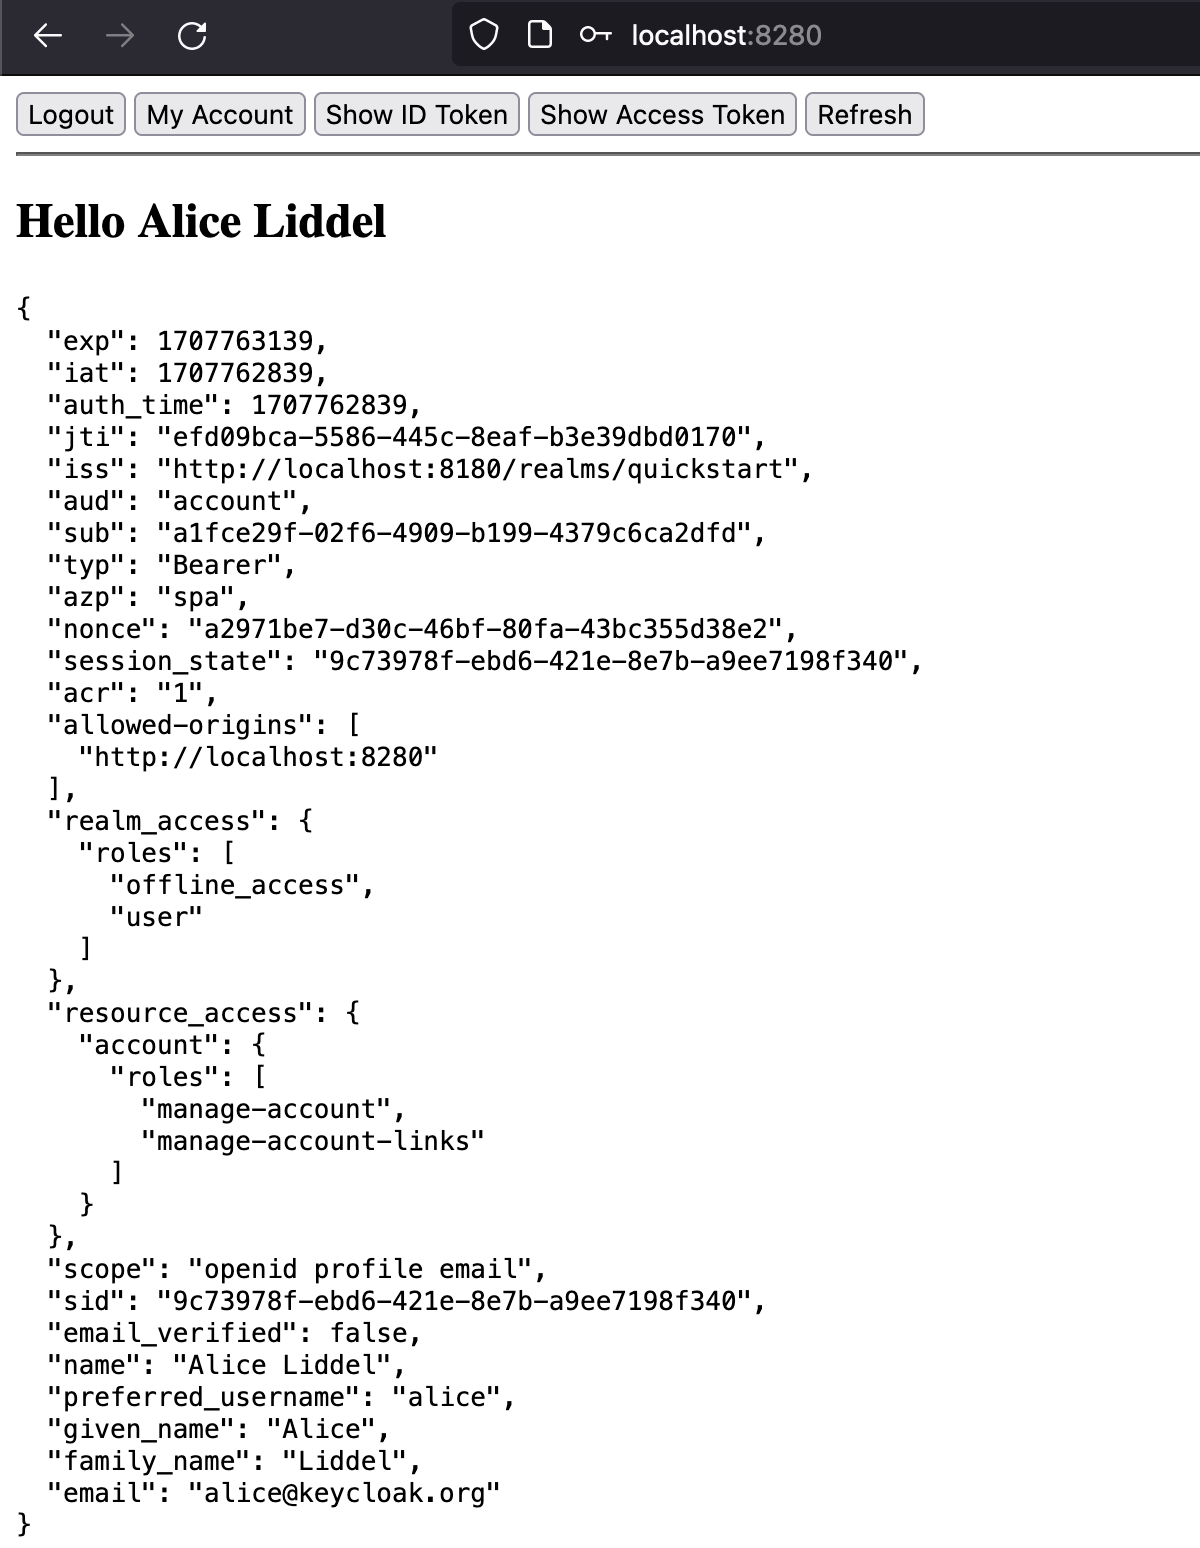
This application relies on a Keycloak server listening on localhost on port 8180. the application itself is listening on port 8280 on localhost.
Scripting with JMeter
Now that we have the necessary knowledge and the sample application, let's implement the authentication process using JMeter for this application.
Script recording
In order to proceed we can record the HTTP requests either:
- by using JMeter recorder as described here.
- or by using the development view of the browser, then importing it in OctoPerf as described here. For scripting you can use OctoPerf with a free account then you can export your script to JMX JMeter file.
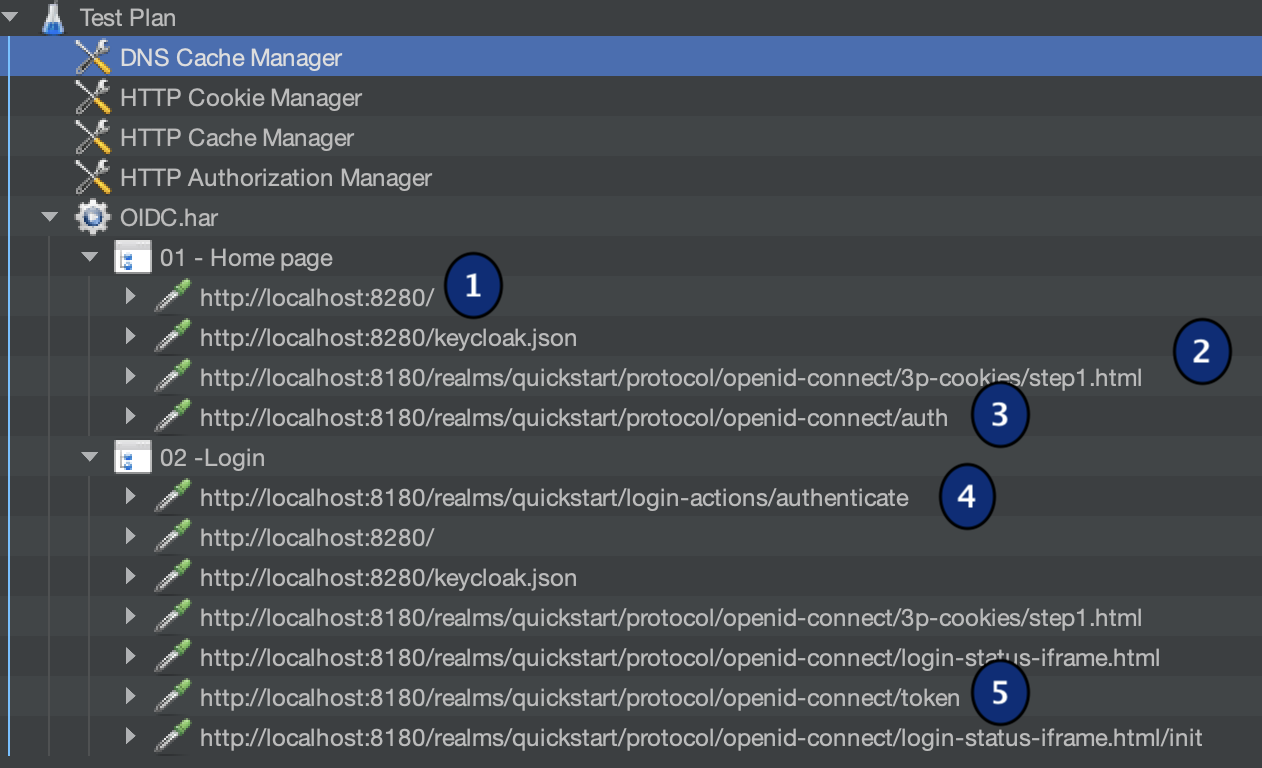
Let's have a look at the recorded script (formatted for presentation purposes). You can download the sample JMX here.
-
The first http request is sent to access the application and in return gives us resources to download,
-
Resources: keycloak.js and step1.html. The JS will be run by the browser and will redirect to the next page,
-
Login form page which is served by keycloak,
-
Once the user enters the credentials and submits the form, the request is triggered to keycloak and if the login succeeds a redirection is sent back (here it's a 302 response) to the browser with the address of the application with a code,
- In this case as the browser is sent back to the home page of the application, the same resources are loaded again and a token is requested by the js script as it receives the valid code.
in some cases an additional request called user-info is issued to load additional information about the connected account.
Variablizing script
Now that we have the structure let's look inside each request and make the parameter dynamic:
The first request that requires changes is the authentication form (3):
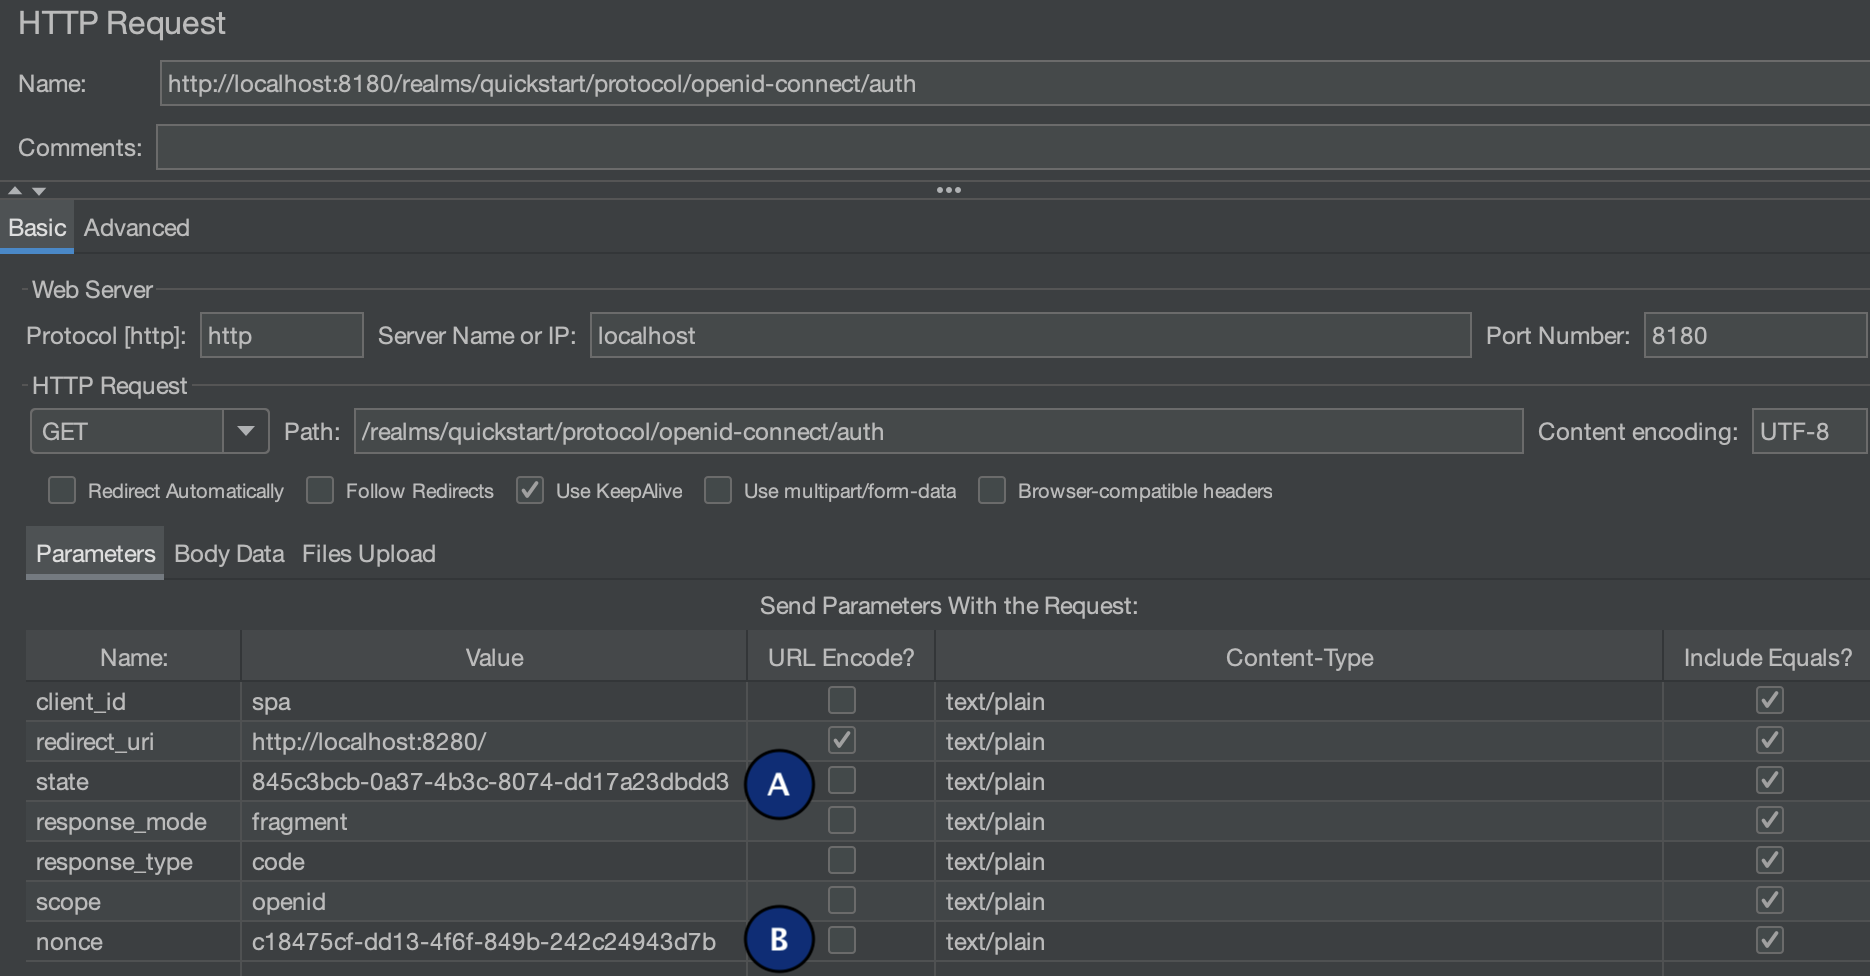
As shown in the screenshot it's a GET request with mostly static parameters except: (A) state and (B) nonce. These two parameters are uuid generated by the browser (keycloak.js). In JMeter the UUIds can be generated using a JSR223 PreProcessor script with the following code:
vars.put("state",java.util.UUID.randomUUID().toString())
vars.put("nonce",java.util.UUID.randomUUID().toString())
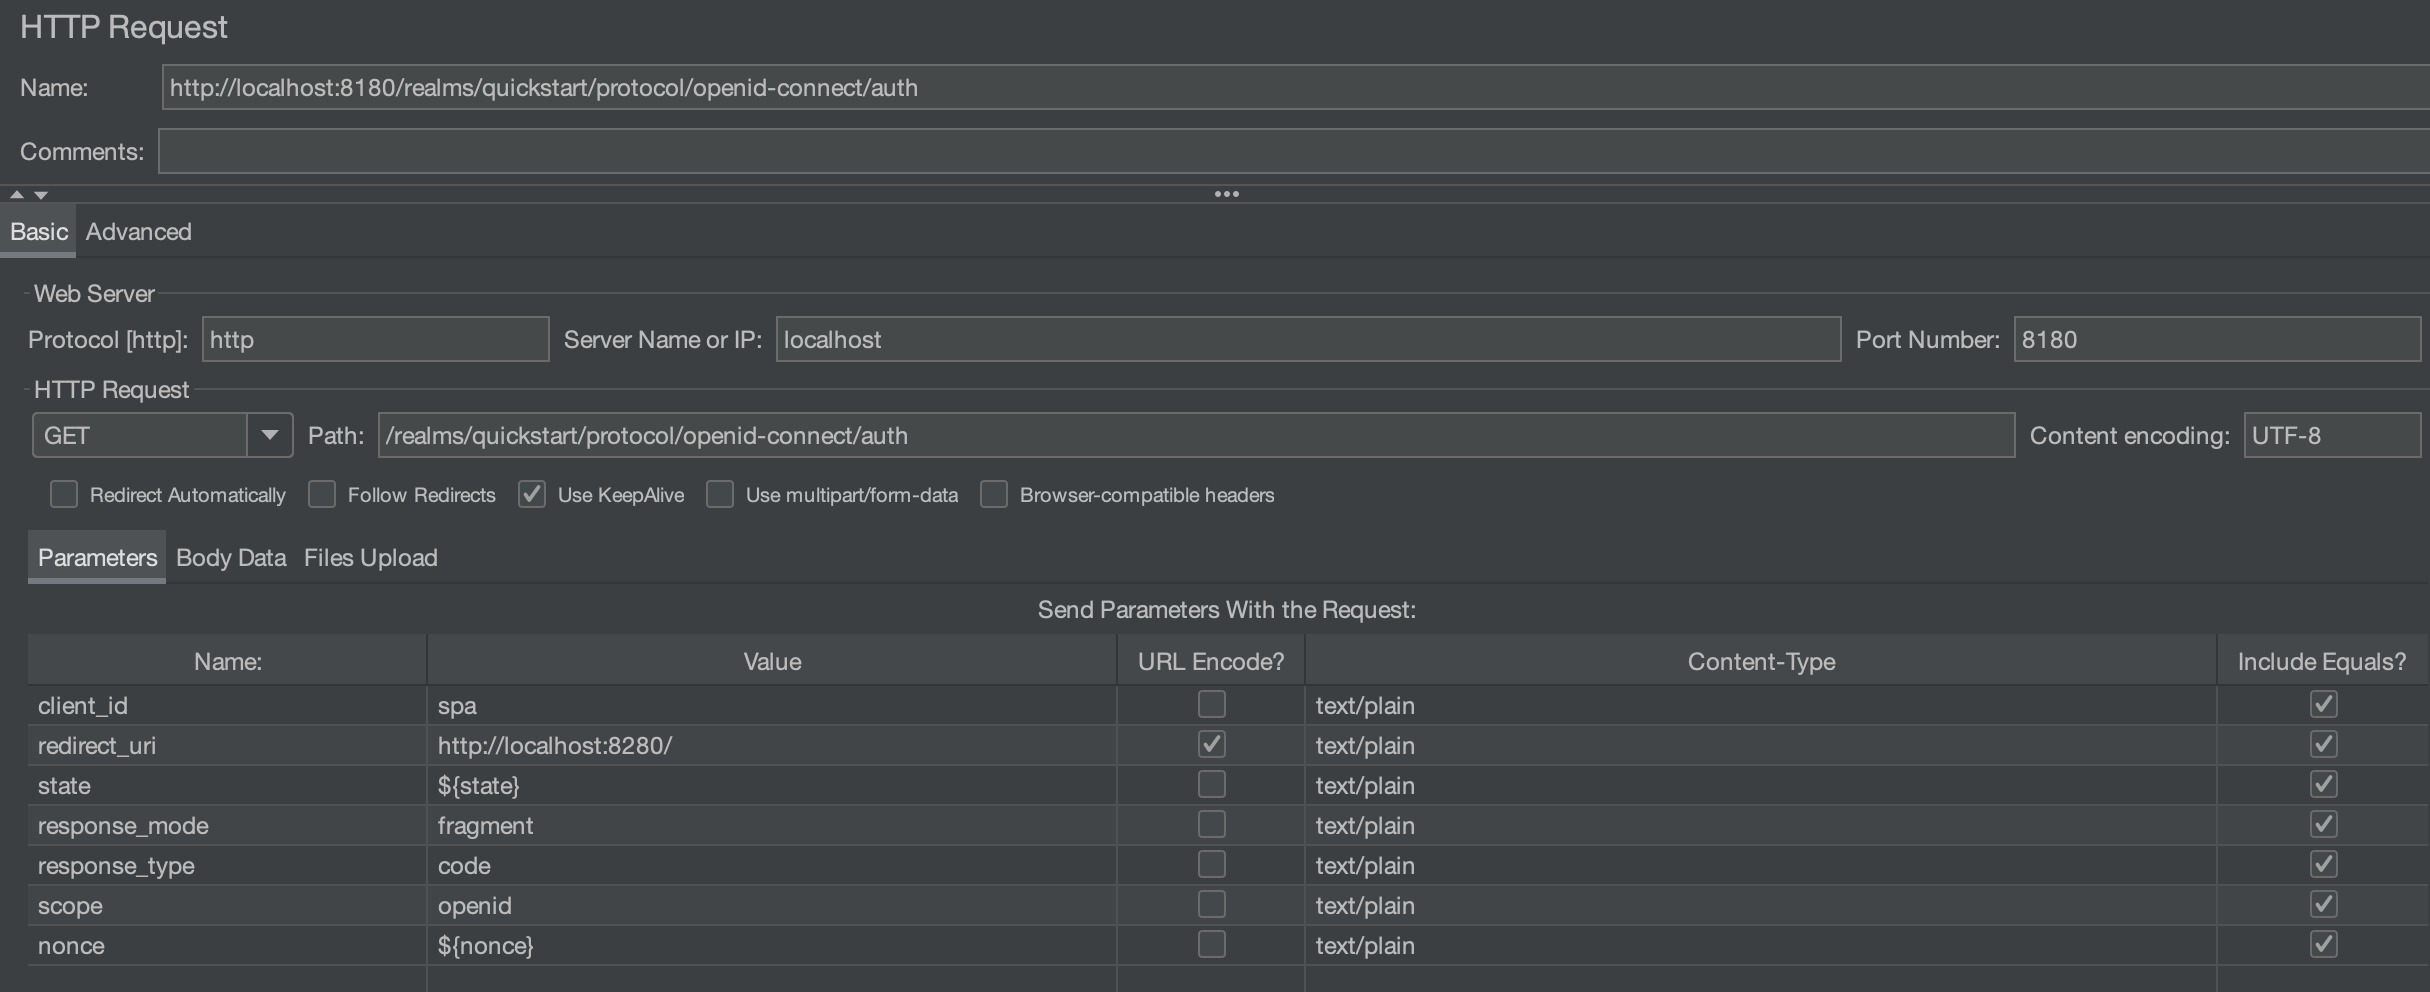
The next request that requires attention is the authenticate one (4):
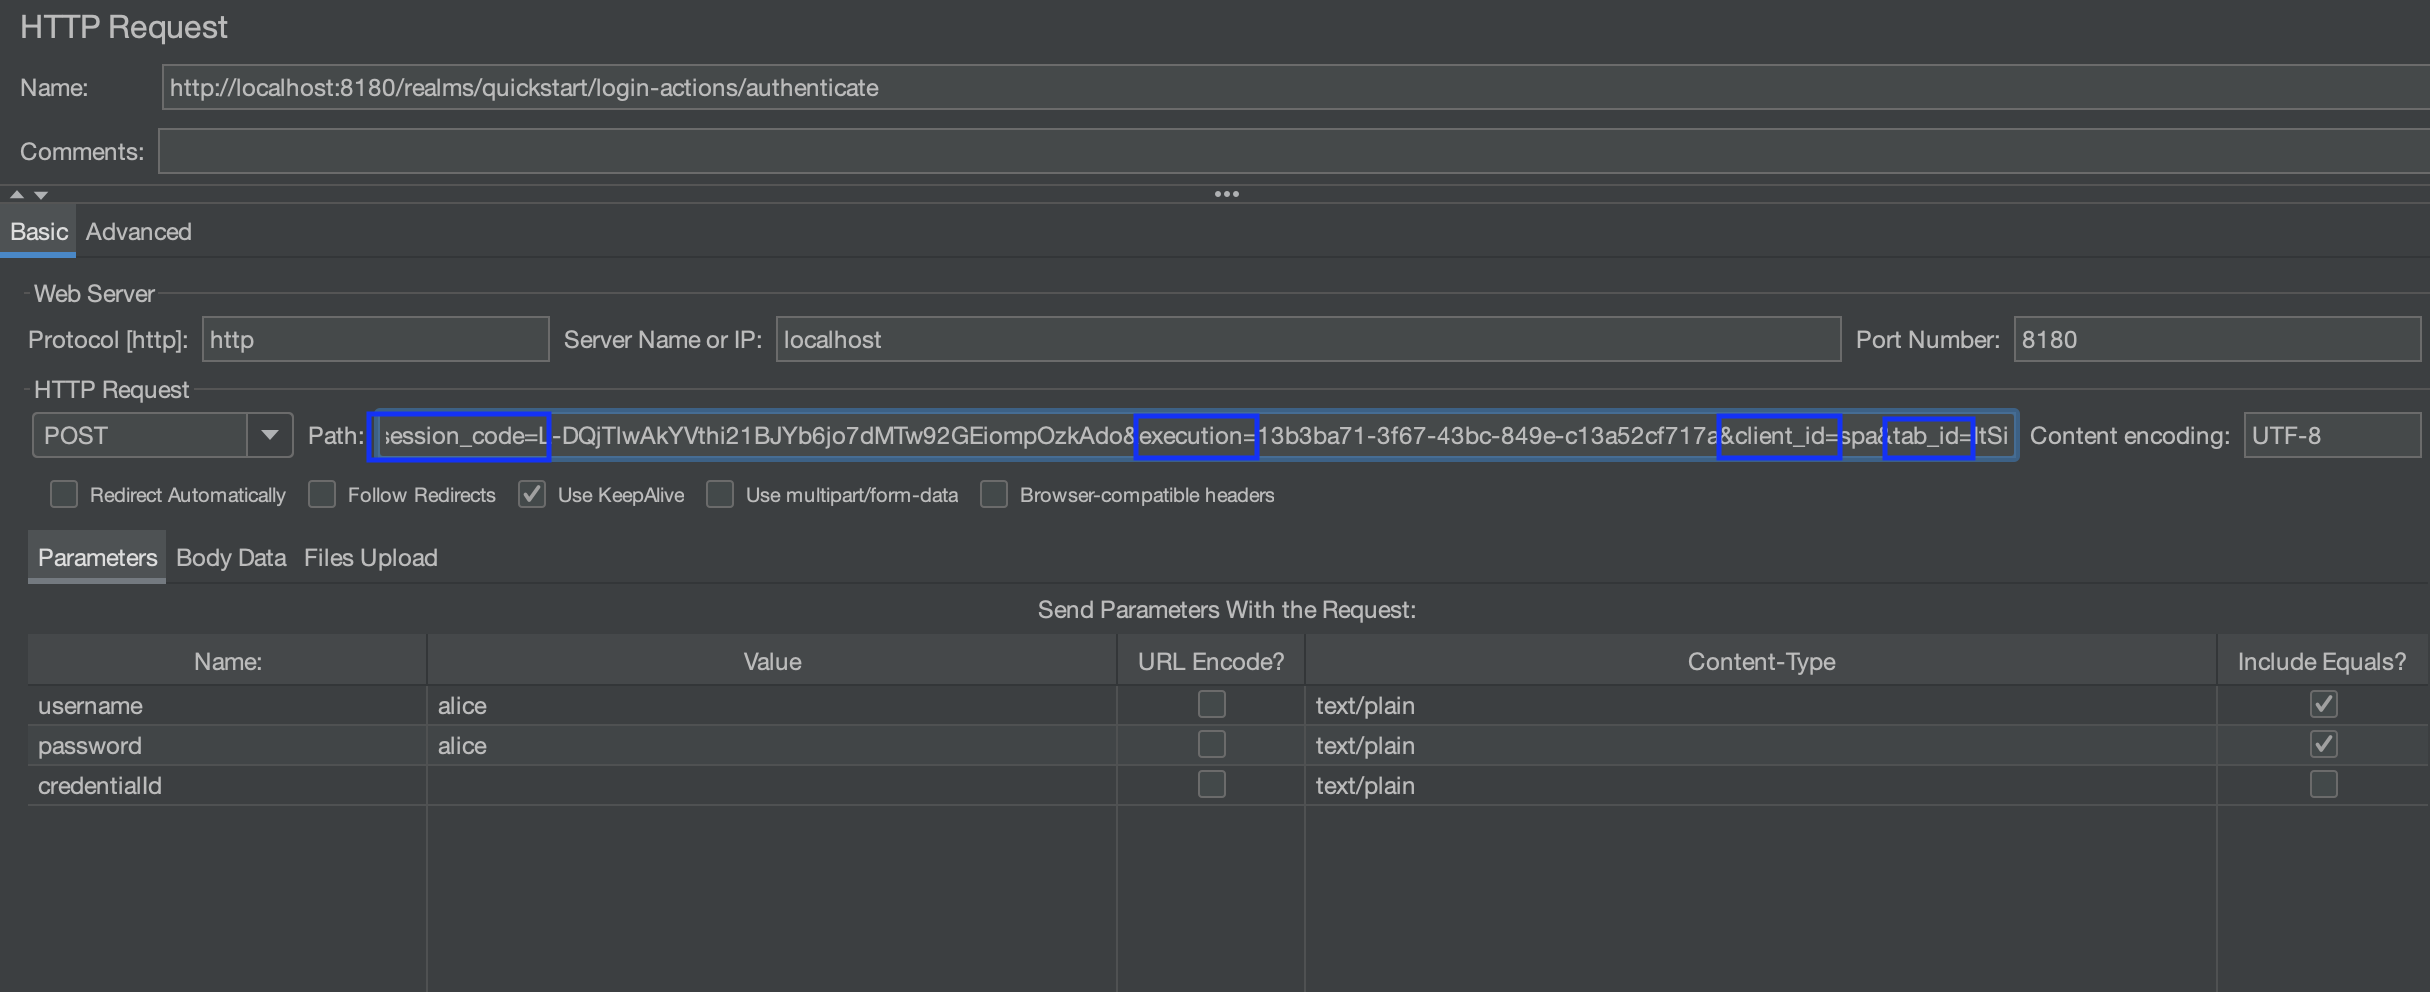
There are 2 main changes that should be done here:
- extracting the values of session_code, execution and tab_id from the previous request (3). The client_id is usually a static value that doesn't need to be extracted
- using dynamic usernames and passwords instead of the alice/alice shown in the screenshot
For the first point the values need to be extract for the auth request (3):
<form id="kc-form-login" onsubmit="login.disabled = true; return true;" action="http://localhost:8180/realms/quickstart/login-actions/authenticate?session_code=L-DQjTlwAkYVthi21BJYb6jo7dMTw92GEiompOzkAdo&execution=13b3ba71-3f67-43bc-849e-c13a52cf717a&client_id=spa&tab_id=ItSibQWq0VQ" method="post">
<div class="form-group">
<label for="username" class="pf-c-form__label pf-c-form__label-text">Username or email</label>
Regexp extractor can be used to get these values. Here is one way to extract them, you can try them yourselves using a tool like regex101:
authenticate\?session_code=(.+?)& // for session code
execution=(.+?)& // for execution
tab_id=(.+?)" // for tab_id
The extractors will look as shown in the screenshot below
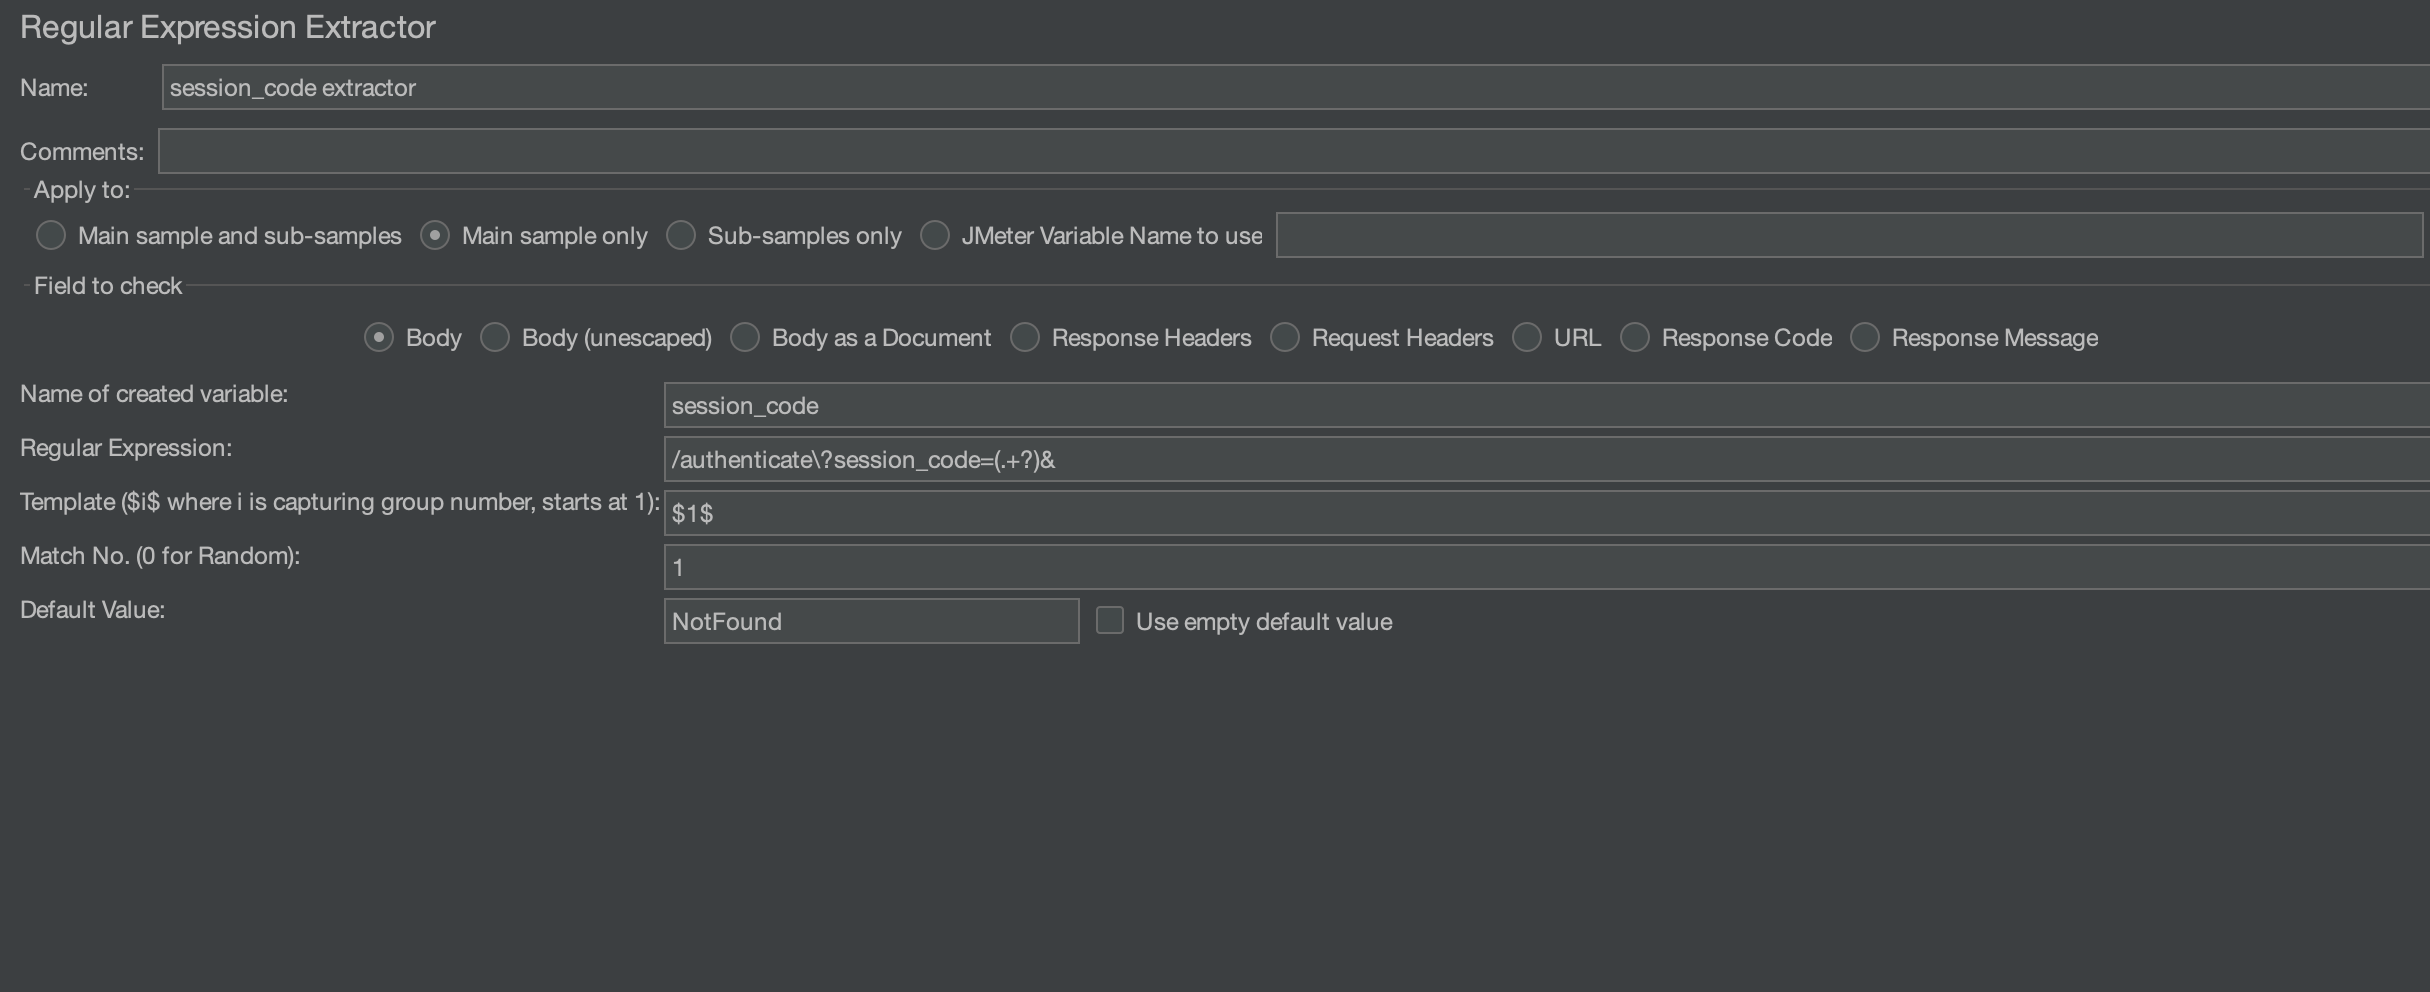
Once the extractors are ready, the new variables can be used in the authenticate request:

The response to this request, when the credentials are correct is a redirect to the target application with a code. Let's extract the code for later use:
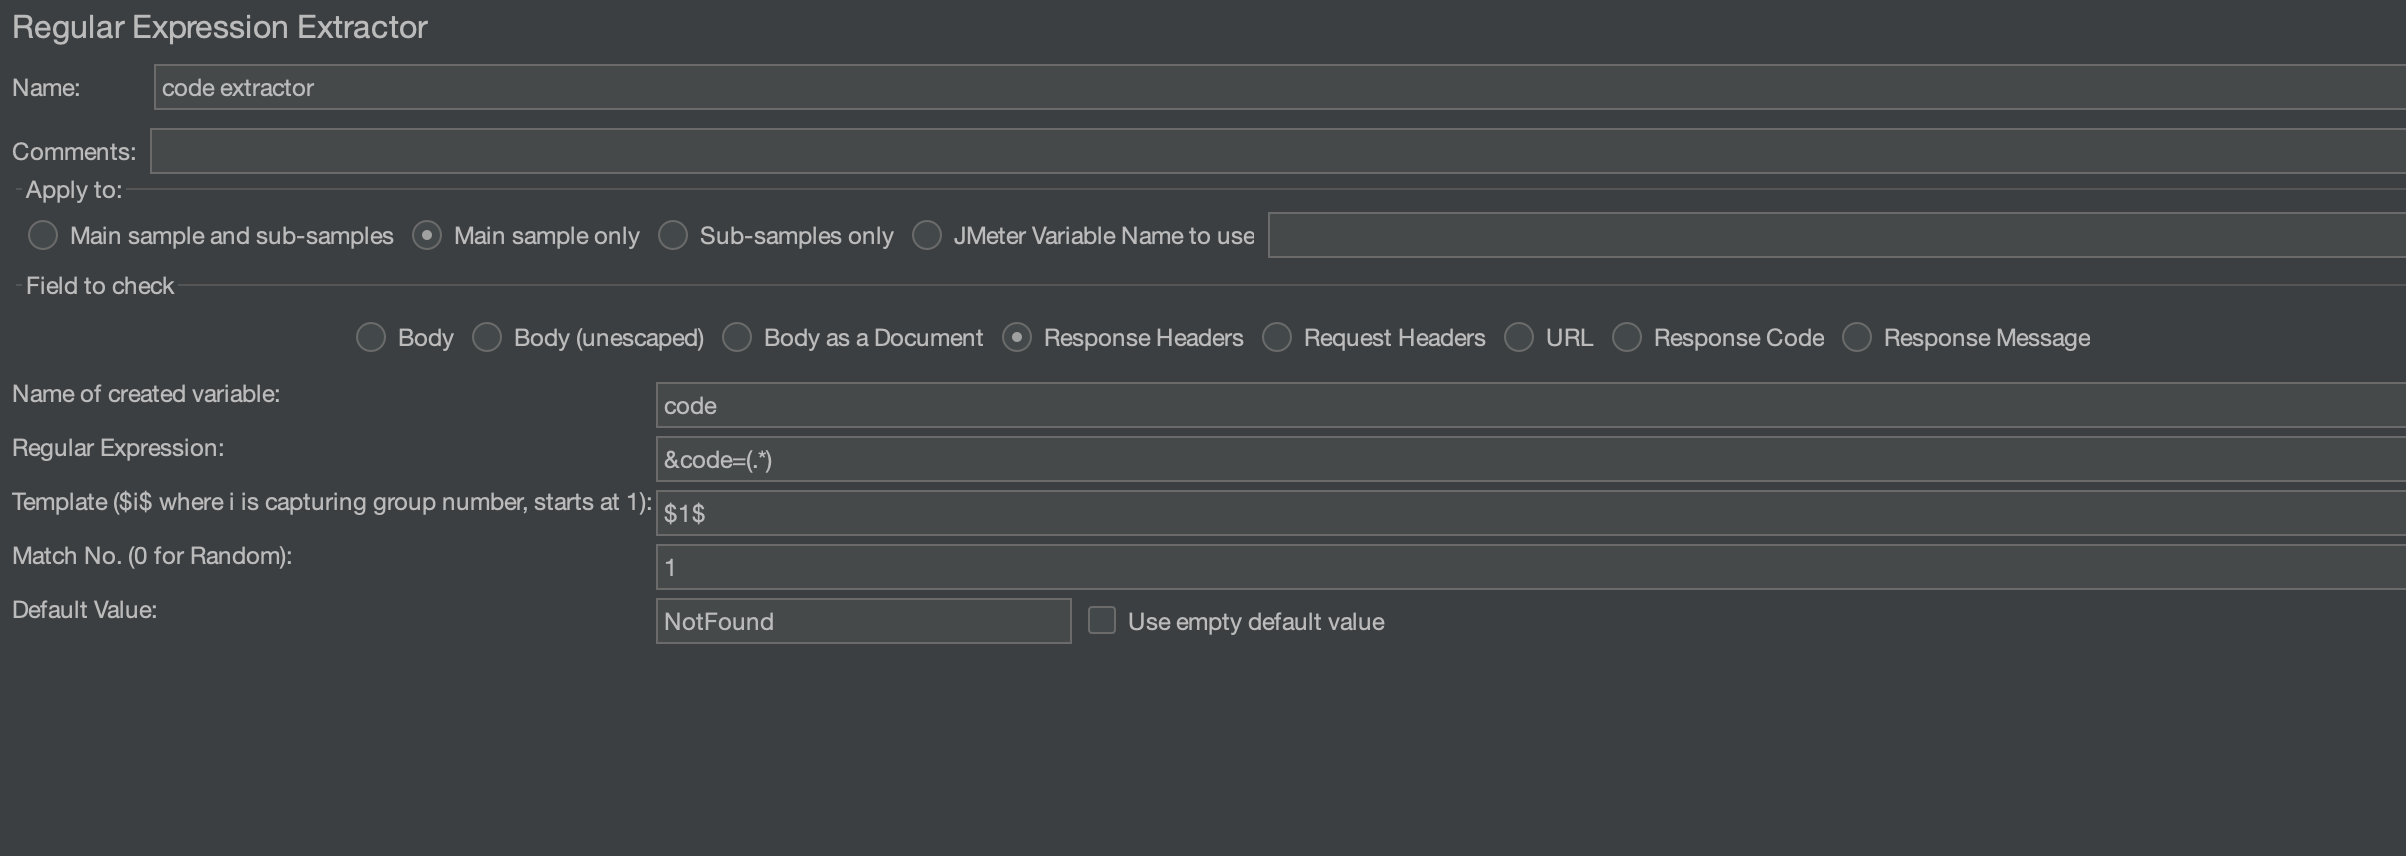
Note that the extractor is configured to handle the response header instead of the response body which is the default configuration.
Access token
The extracted value is then used to generate the token:
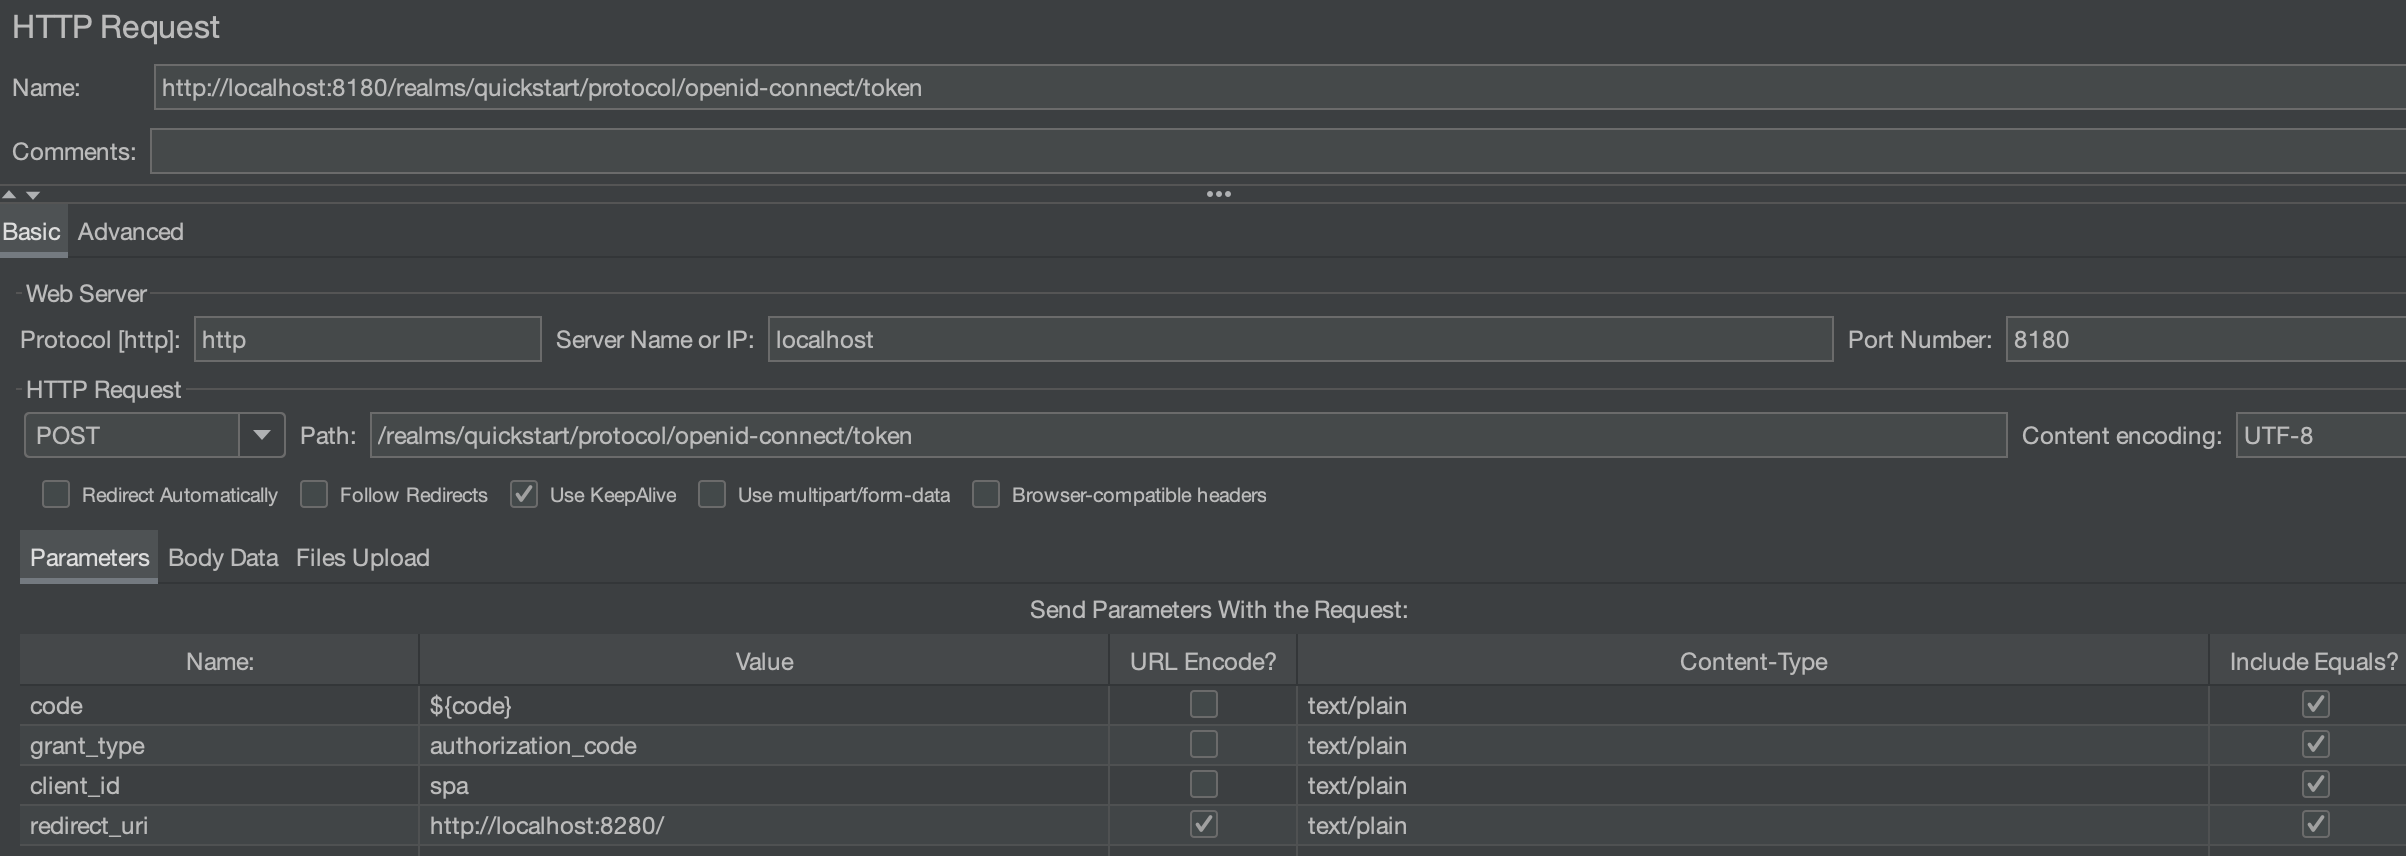
The response of this request contains the tokens that will be used in the header of the following requests:
{  "access_token":"eyJhbGciOiJSUzI1NiIsInR5cCIgOiAiSldUIiwia2lkIiA6ICJwaUdPeExxYTZGSy0xcUZzYTVQa2FTSDF4M29fdWN6N3dfWXhINUlWZTlNIn0.eyJleHAiOjE3MDcyNjY3NjQsImlhdCI6MTcwNzI2NjQ2NCwiYXV0aF90aW1lIjoxNzA3MjY2NDY0LCJqdGkiOiJiNGMyN2Q2MC04NjQwLTQwZjYtYTI4OS1mZjcwMTczMTA3N2EiLCJpc3MiOiJodHRwOi8vbG9jYWxob3N0OjgxODAvcmVhbG1zL3F1aWNrc3RhcnQiLCJhdWQiOiJhY2NvdW50Iiwic3ViIjoiOTU1MTJjYTQtOGFkNC00NjllLThmYWUtNmNkYzdiMTEzOWVlIiwidHlwIjoiQmVhcmVyIiwiYXpwIjoic3BhIiwibm9uY2UiOiJjMTg0NzVjZi1kZDEzLTRmNmYtODQ5Yi0yNDJjMjQ5NDNkN2IiLCJzZXNzaW9uX3N0YXRlIjoiODgzNDI1OTEtYjQ2My00MjgwLWJjMTItODdmMWNjM2Y0YjZjIiwiYWNyIjoiMSIsImFsbG93ZWQtb3JpZ2lucyI6WyJodHRwOi8vbG9jYWxob3N0OjgyODAiXSwicmVhbG1fYWNjZXNzIjp7InJvbGVzIjpbIm9mZmxpbmVfYWNjZXNzIiwidXNlciJdfSwicmVzb3VyY2VfYWNjZXNzIjp7ImFjY291bnQiOnsicm9sZXMiOlsibWFuYWdlLWFjY291bnQiLCJtYW5hZ2UtYWNjb3VudC1saW5rcyJdfX0sInNjb3BlIjoib3BlbmlkIGVtYWlsIHByb2ZpbGUiLCJzaWQiOiI4ODM0MjU5MS1iNDYzLTQyODAtYmMxMi04N2YxY2MzZjRiNmMiLCJlbWFpbF92ZXJpZmllZCI6ZmFsc2UsIm5hbWUiOiJBbGljZSBMaWRkZWwiLCJwcmVmZXJyZWRfdXNlcm5hbWUiOiJhbGljZSIsImdpdmVuX25hbWUiOiJBbGljZSIsImZhbWlseV9uYW1lIjoiTGlkZGVsIiwiZW1haWwiOiJhbGljZUBrZXljbG9hay5vcmcifQ.DjTBGDyTi48hqF4e6zM5B0IAk1VOjCoQITJayXal6ZrxOHhqxj8-37L1JqcYYpiOEbFENXFrmZeqf4GhaPTzqbkRTGqj4QqjqtvoobG7sOGlCG4zmgykqXUHS7OYhKxLAOaDSg4zriAMuvAKMjvoSxfOqrD-b5oSKP7yJwo2B6iSactbB8n08xqoN7zEVgIvFvog-_DLXVpswmk_e3Y91uxCdgYP2MI_U0GEDffKU95qHpeNEEphk-tG6wWqxKthlPjQAev1zOVzsbC6xzGdbypIossmdk91LPdipHDhL8DdzDy2Q8FfAKzFaRKrOQHsScwbIB-0XPPJbu_WK0sCmw",
"expires_in":300,
"refresh_expires_in":1800,   "refresh_token":"eyJhbGciOiJIUzI1NiIsInR5cCIgOiAiSldUIiwia2lkIiA6ICIyNjg4NGY0Mi00MDZhLTRiYjYtOTQ2Ni1iOGQ5M2UxMWZlNGMifQ.eyJleHAiOjE3MDcyNjgyNjQsImlhdCI6MTcwNzI2NjQ2NCwianRpIjoiMDJiZTMxOTAtZWJlMi00OGRlLWFhNTUtMzM1YjI0ZmVkMTFiIiwiaXNzIjoiaHR0cDovL2xvY2FsaG9zdDo4MTgwL3JlYWxtcy9xdWlja3N0YXJ0IiwiYXVkIjoiaHR0cDovL2xvY2FsaG9zdDo4MTgwL3JlYWxtcy9xdWlja3N0YXJ0Iiwic3ViIjoiOTU1MTJjYTQtOGFkNC00NjllLThmYWUtNmNkYzdiMTEzOWVlIiwidHlwIjoiUmVmcmVzaCIsImF6cCI6InNwYSIsIm5vbmNlIjoiYzE4NDc1Y2YtZGQxMy00ZjZmLTg0OWItMjQyYzI0OTQzZDdiIiwic2Vzc2lvbl9zdGF0ZSI6Ijg4MzQyNTkxLWI0NjMtNDI4MC1iYzEyLTg3ZjFjYzNmNGI2YyIsInNjb3BlIjoib3BlbmlkIGVtYWlsIHByb2ZpbGUiLCJzaWQiOiI4ODM0MjU5MS1iNDYzLTQyODAtYmMxMi04N2YxY2MzZjRiNmMifQ.nsWmnk8rCWMLzYVVYyzMb_630AUgUqys5DqtSkgMIDw",
"token_type":"Bearer", "id_token":"eyJhbGciOiJSUzI1NiIsInR5cCIgOiAiSldUIiwia2lkIiA6ICJwaUdPeExxYTZGSy0xcUZzYTVQa2FTSDF4M29fdWN6N3dfWXhINUlWZTlNIn0.eyJleHAiOjE3MDcyNjY3NjQsImlhdCI6MTcwNzI2NjQ2NCwiYXV0aF90aW1lIjoxNzA3MjY2NDY0LCJqdGkiOiI5MWQzZjE1NS03ZjdiLTQ0ZDktOTBjZS02ZjJjOGMwNTJjMjgiLCJpc3MiOiJodHRwOi8vbG9jYWxob3N0OjgxODAvcmVhbG1zL3F1aWNrc3RhcnQiLCJhdWQiOiJzcGEiLCJzdWIiOiI5NTUxMmNhNC04YWQ0LTQ2OWUtOGZhZS02Y2RjN2IxMTM5ZWUiLCJ0eXAiOiJJRCIsImF6cCI6InNwYSIsIm5vbmNlIjoiYzE4NDc1Y2YtZGQxMy00ZjZmLTg0OWItMjQyYzI0OTQzZDdiIiwic2Vzc2lvbl9zdGF0ZSI6Ijg4MzQyNTkxLWI0NjMtNDI4MC1iYzEyLTg3ZjFjYzNmNGI2YyIsImF0X2hhc2giOiJxeXJzdGVDLVYxVThqZ0R3emZTS0JRIiwiYWNyIjoiMSIsInNpZCI6Ijg4MzQyNTkxLWI0NjMtNDI4MC1iYzEyLTg3ZjFjYzNmNGI2YyIsImVtYWlsX3ZlcmlmaWVkIjpmYWxzZSwibmFtZSI6IkFsaWNlIExpZGRlbCIsInByZWZlcnJlZF91c2VybmFtZSI6ImFsaWNlIiwiZ2l2ZW5fbmFtZSI6IkFsaWNlIiwiZmFtaWx5X25hbWUiOiJMaWRkZWwiLCJlbWFpbCI6ImFsaWNlQGtleWNsb2FrLm9yZyJ9.LykqDsCthBv-YQBurl2YxhRyR0zFuuULc2Lb_ALC7sz8CSBIdjCadG2cJj3N0uqUwFVhH63TihryT9q5JlczlKgSeTESrXMpgwpeoSy61VYNiZ6SBiiM9WYZqP8XNcObuapsu4xWovjBz39uJ2q6kWwhDCHnMMullO8e39PKVeYCdgJuyjJe7dyL7htO-koOf7JTRaGoYlWU5ZIhdKcFR_RKd_h_lhaQREoozG1DDbpwBl0uy-Lu_LnqYWDFC4OAb04k0e_hHfgxgjU31caIv04rVgyiablScwyt-zuOTT96fQixQsIAQ-RGwmon8sFaQu9rIBm1KqcGaFSD5SIfCg",
"not-before-policy":0,
"session_state":"88342591-b463-4280-bc12-87f1cc3f4b6c",
"scope":"openid email profile"
}
Let's decode the access token to see the information embedded in it:
{
  "exp": 1707266764,
  "iat": 1707266464,
  "auth_time": 1707266464,
  "jti": "b4c27d60-8640-40f6-a289-ff701731077a",
  "iss": "http://localhost:8180/realms/quickstart",
  "aud": "account",
  "sub": "95512ca4-8ad4-469e-8fae-6cdc7b1139ee",
  "typ": "Bearer",
  "azp": "spa",
  "nonce": "c18475cf-dd13-4f6f-849b-242c24943d7b",
  "session_state": "88342591-b463-4280-bc12-87f1cc3f4b6c",
  "acr": "1",
  "allowed-origins": [
    "http://localhost:8280"
  ],
  "realm_access": {
    "roles": [
      "offline_access",
      "user"
    ]
  },
  "resource_access": {
    "account": {
      "roles": [
        "manage-account",
        "manage-account-links"
      ]
    }
  },
  "scope": "openid email profile",
  "sid": "88342591-b463-4280-bc12-87f1cc3f4b6c",
  "email_verified": false,
  "name": "Alice Liddel",
  "preferred_username": "alice",
  "given_name": "Alice",
  "family_name": "Liddel",
  "email": "alice@keycloak.org"
}
The details that are shown may vary according to the configuration on the Authentication Server. In our case we can see that it provides account role information, scope and several keys that the application might need to grant access or just expose on the interface.
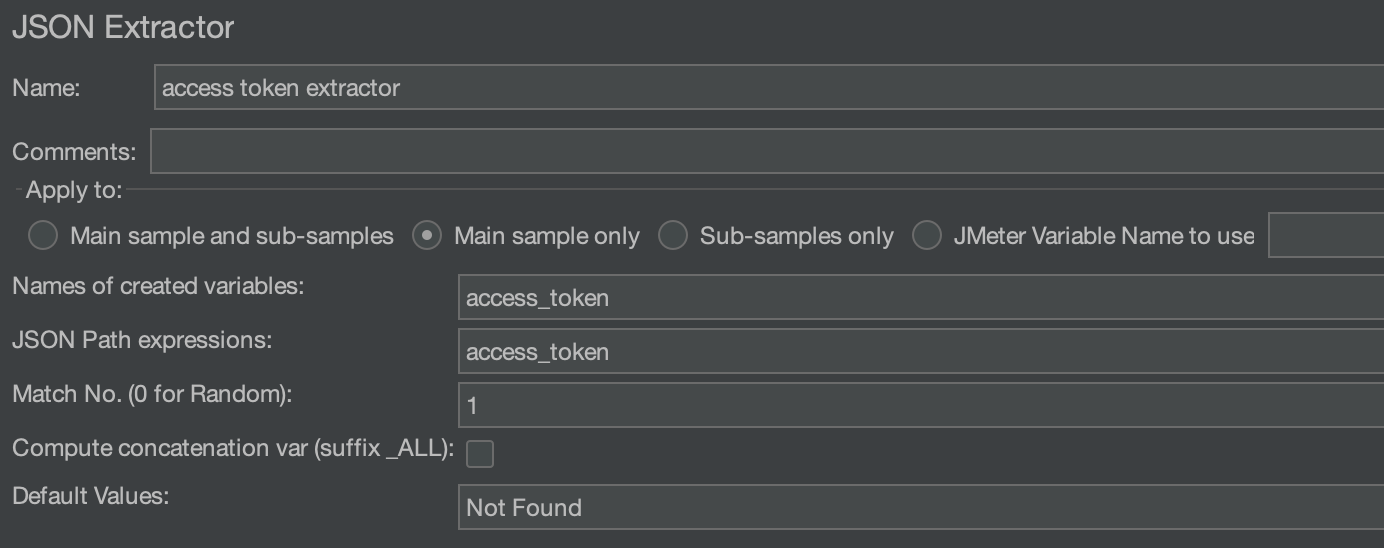
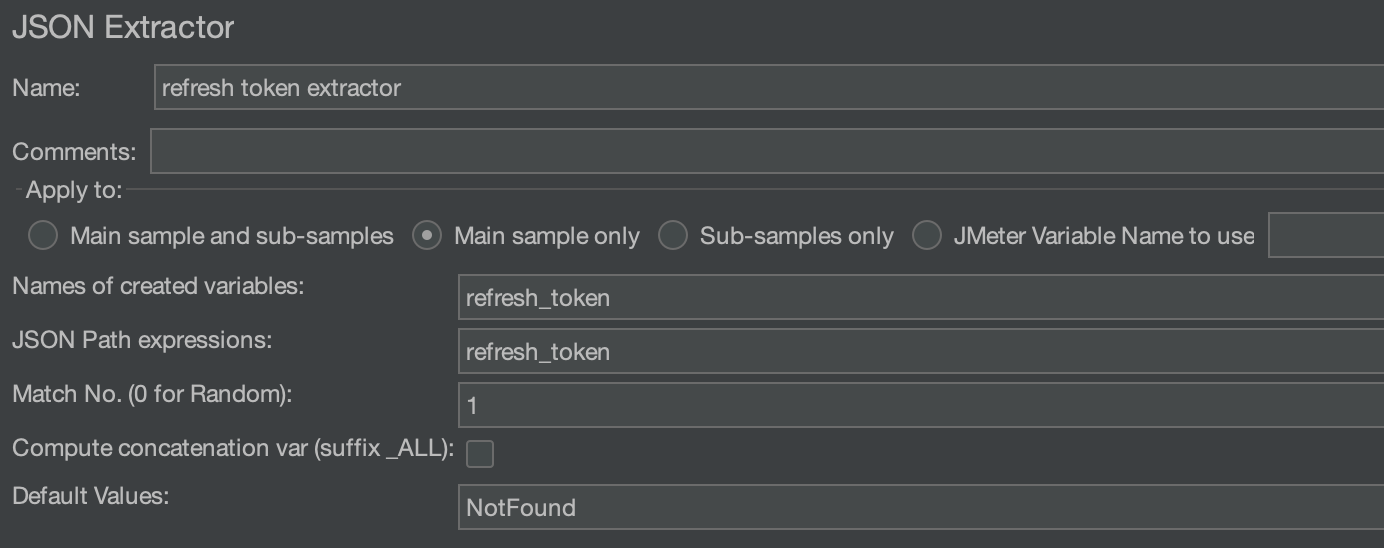
In order to extract the tokens, we will create JSON extractor for the access_token and another one for the refresh_token that will look as follows:
At this point the browser will add an authorization header with the access token for the requests it will be generating to request the application API:
Authorization: Bearer ${acess_token}
As shown in the decoded message, the access token has an expiry time that is configured on the Authentication Server. Once expired the application will reject any request having this token in its header. The browser will be required to renew the token before it expires using the refresh token. The refresh request looks as follows:
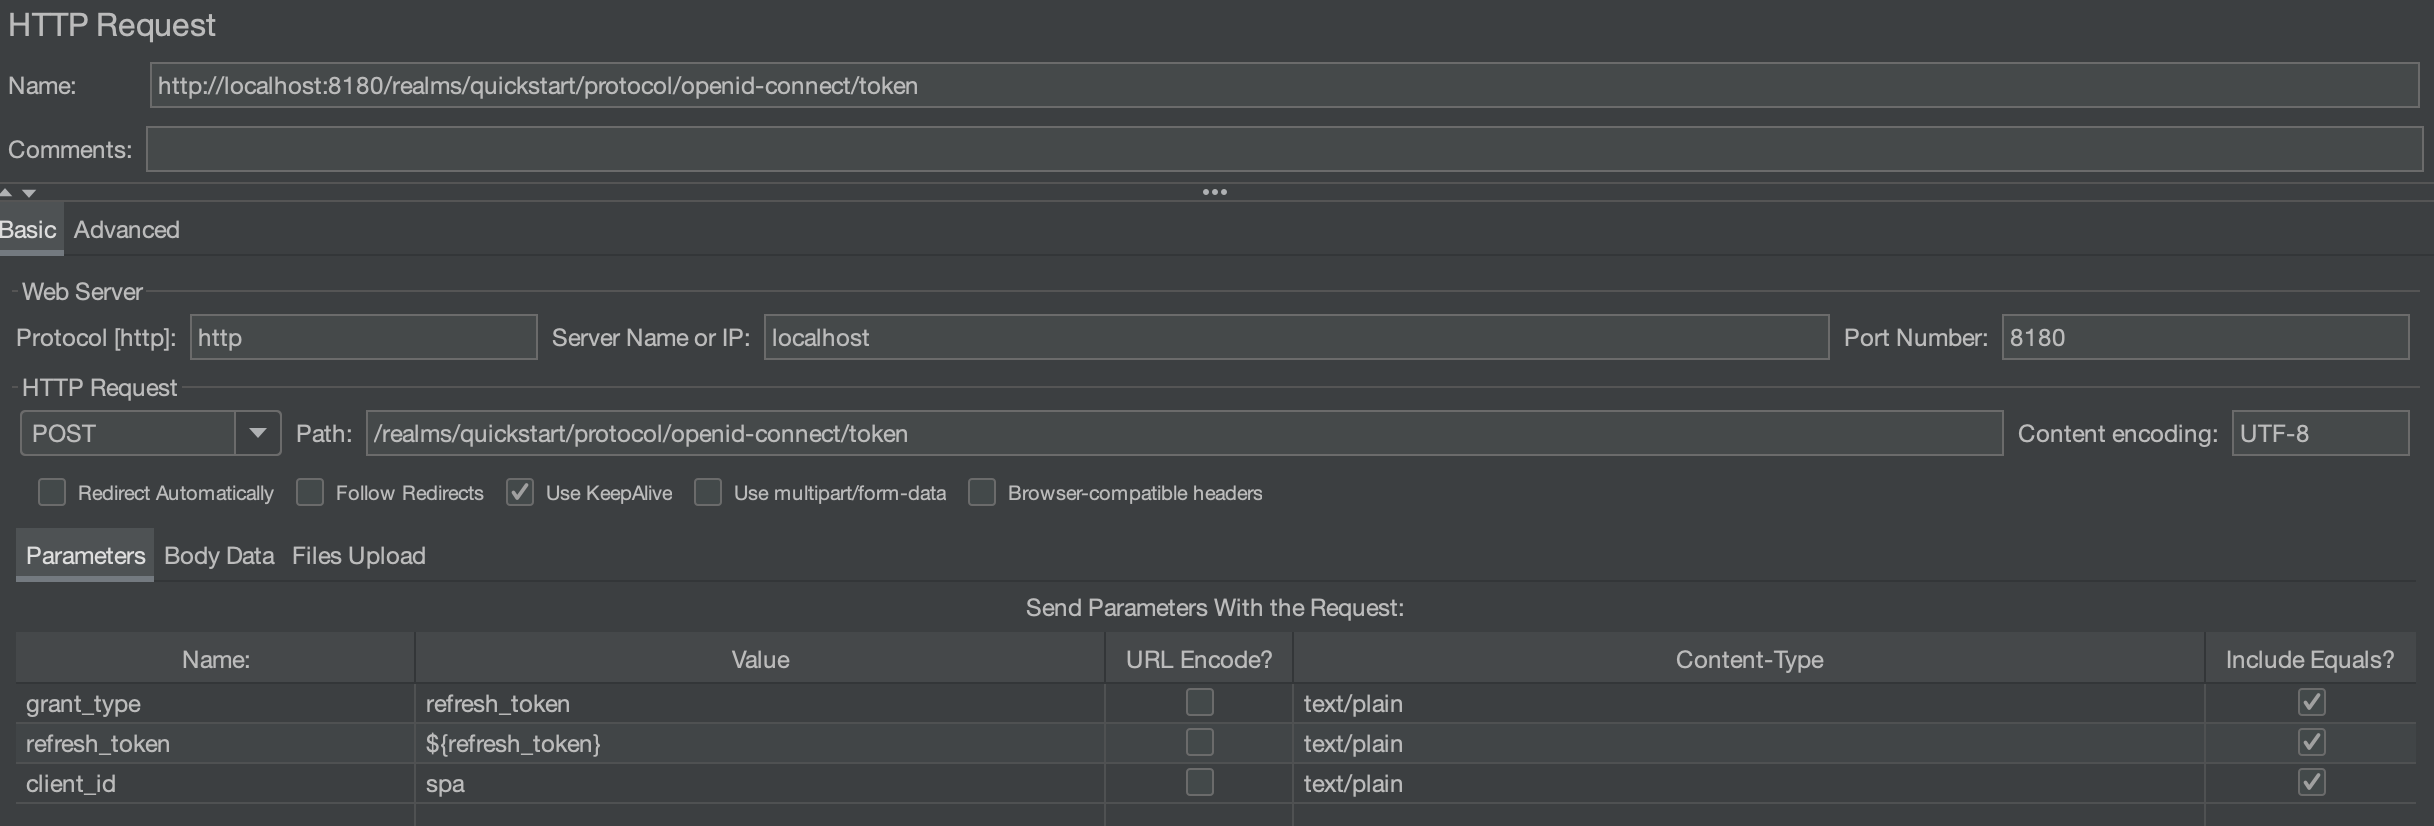
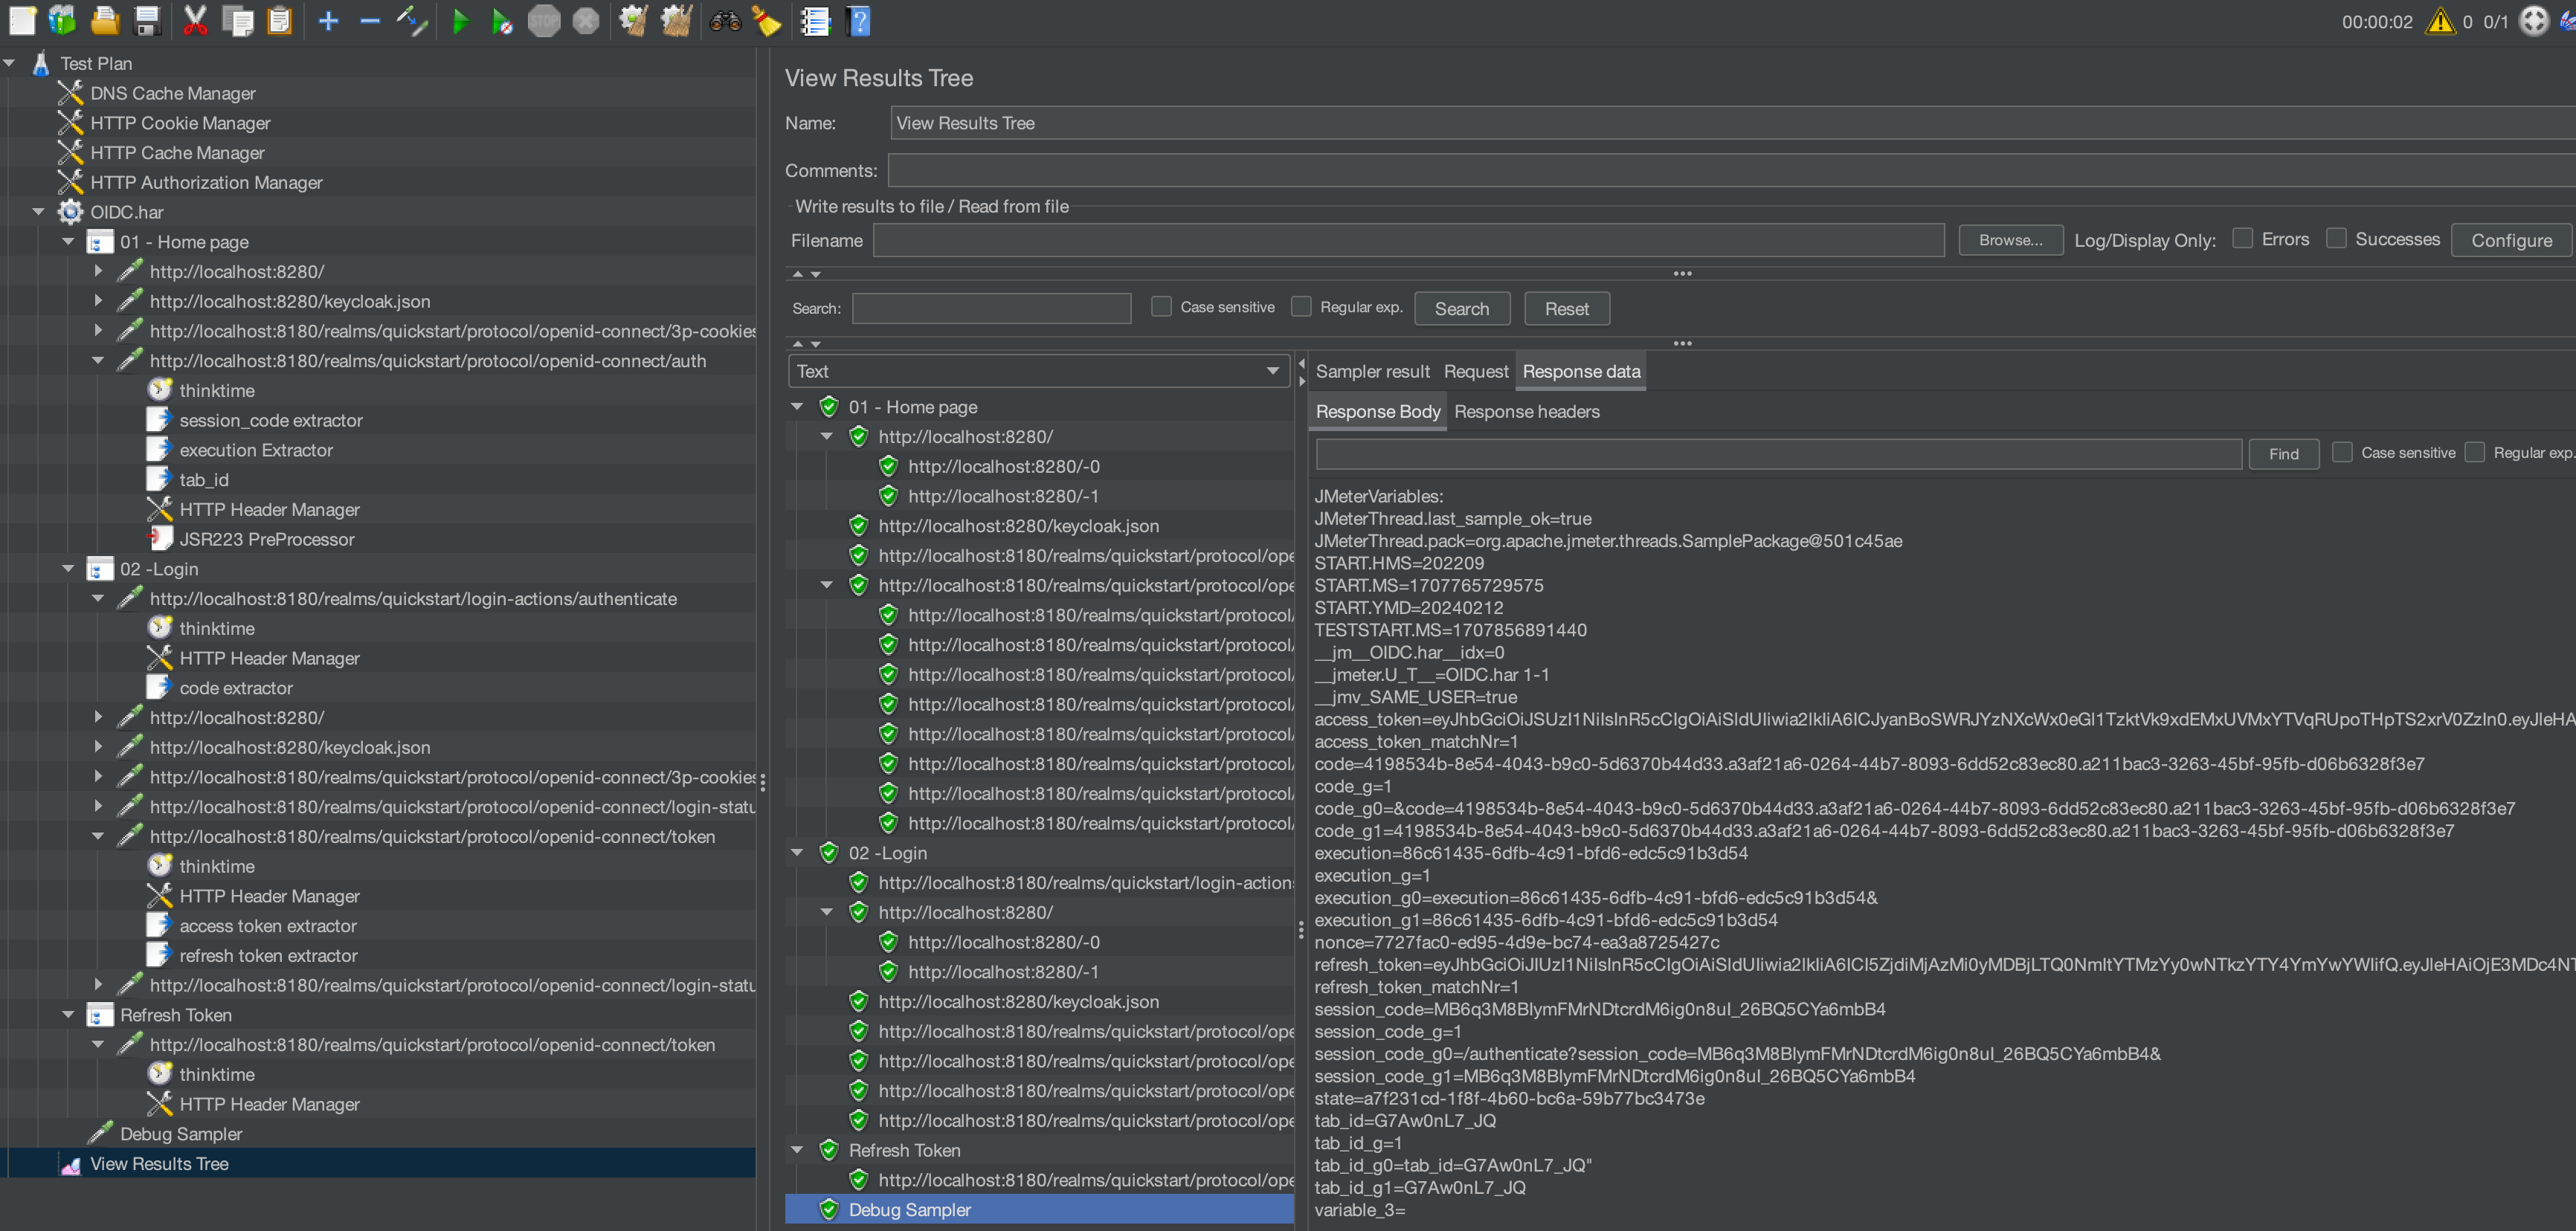
Depending on the expiration delay, and the duration of an iteration of the script the token refresh should be handled in the script. This topic requires an entire blog article and won't be detailed here.
The final script looks as follows:
Headers
The headers of all requests have not been detailed so far because they didn't need to be reworked from the original recording. It's important to note that there are some mandatory headers for example
- Accept
- Content-type
- Origin
The Origin header should indicate the right address if you change your test from an environment to another, otherwise the request might get an error response.
Load policy
Hints
Now that the script is ready let's have some advices to design the load model:
- usually we define the load according to the application load. For the authentication part it's important to remember that OIDC servers are shared and might have higher load than the one generated by one application
- The login rate have to be realistic as sometimes in enterprise application, the user logs in only once and proceeds with multiple iterations. In such a case the login rate is much lower than the iteration rate and it has to be designed in the script using loops, or once only controller
- Refreshing the token would generate an important activity on OIDC servers if the life span of the token is short. In some contexts the token life span is 1 minutes which means multiple requests during one script iteration. With JMeter it might require to start a separate thread group dedicated for generating refresh token activity
- Using different kind of profile for the chosen dataset in order to test the impact on performance
- Make sure that the database volume is set up as in production to get relevant test results
Example
Lets consider an example of application to apply these hints. You can follow along and download the sample JMX here.
Hypothesis:
- Authentication Server is shared between many application
- The tests focus on only one application but are required to test the full load on Authentication server (the load generated by all applications using it)
- The access token expires every minute and need to be regenerated using refresh token
- The main application being tested doesn't exceed 1 minute for one iteration
The following script configuration can help testing this configuration:
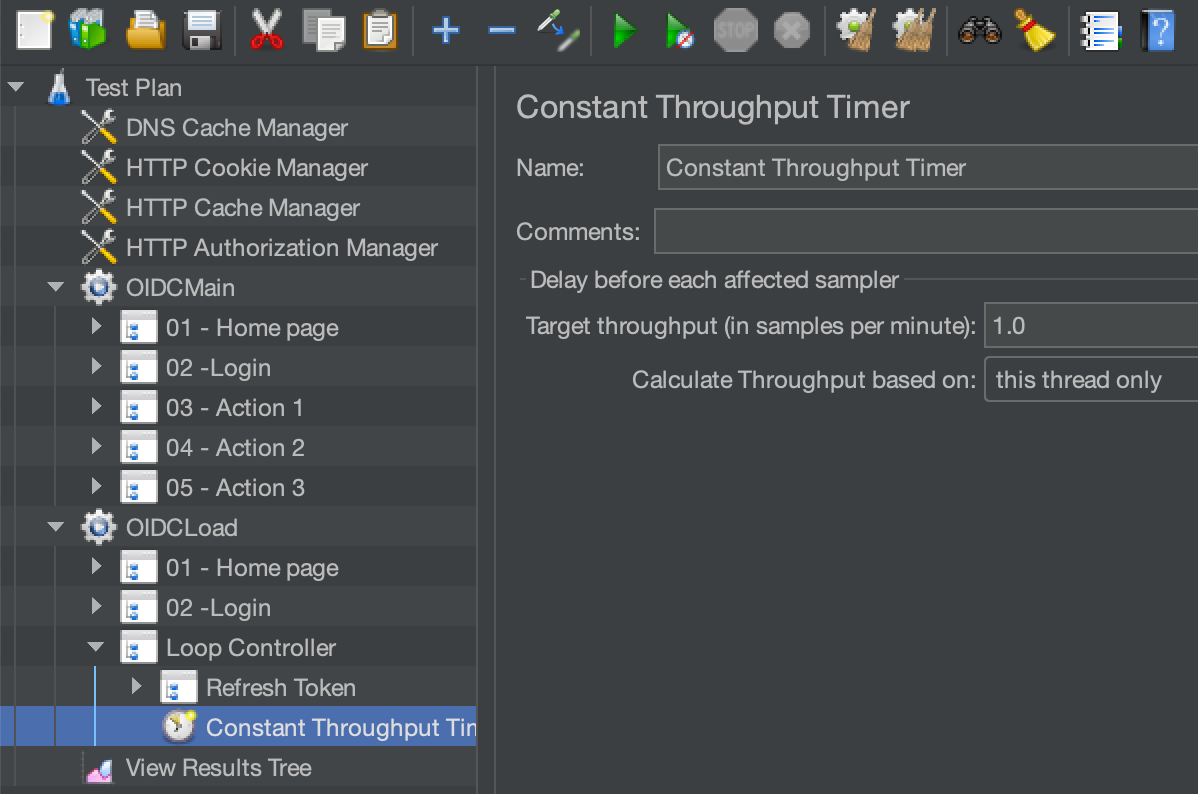
The screenshot shows a main thread group (OIDCMain) that generates load on the main application. This group runs the login and then executes the application workflow that doesn't exceed 1 minute. Another thread group will created load on authentication server by executing a login then iterating on refresh token request every minute as the application using the Authentication server would behave.
Conclusion
As a conclusion, this article presents an overview of the OIDC protocol and how to implement JMeter scripts to load test the servers and application that are using it, to end up with some advices on how to design the load policies for the tests. Some aspects, like the refresh of the access token could be part of another article.
The flow presented is specific to an example application taken from Keycloak repository. In other contexts you might see different flows depending on the configuration set by the developers/administrators.

