
JMeter Throughput Controller
In this blog post we are going to be looking at the Throughput Controller. Its name is a little misleading as it does not control the throughput in terms of managing load across the duration of a test, this is handled by elements such as the Constant Throughput Timer. The Throughput Controller can support you in building quite complex scenarios especially when coupled with other Controllers and we will explore this in this blog post as well as looking at how this Controller can provide benefit in real-world performance testing scenarios. OctoPerf support this behaviour natively on their SAAS platform through the use of the Flow Control Action that can support the same patterns of behaviour that we will discuss in this blog post.
Basic example
Let’s create a JMeter test to demonstrate how this Throughput Controller Works. We will use a set of Dummy Samplers to achieve this. If we create this test where we have 2 Samplers:
- Sampler A
- Sampler B
With Sampler B being a child of a Throughput Controller.
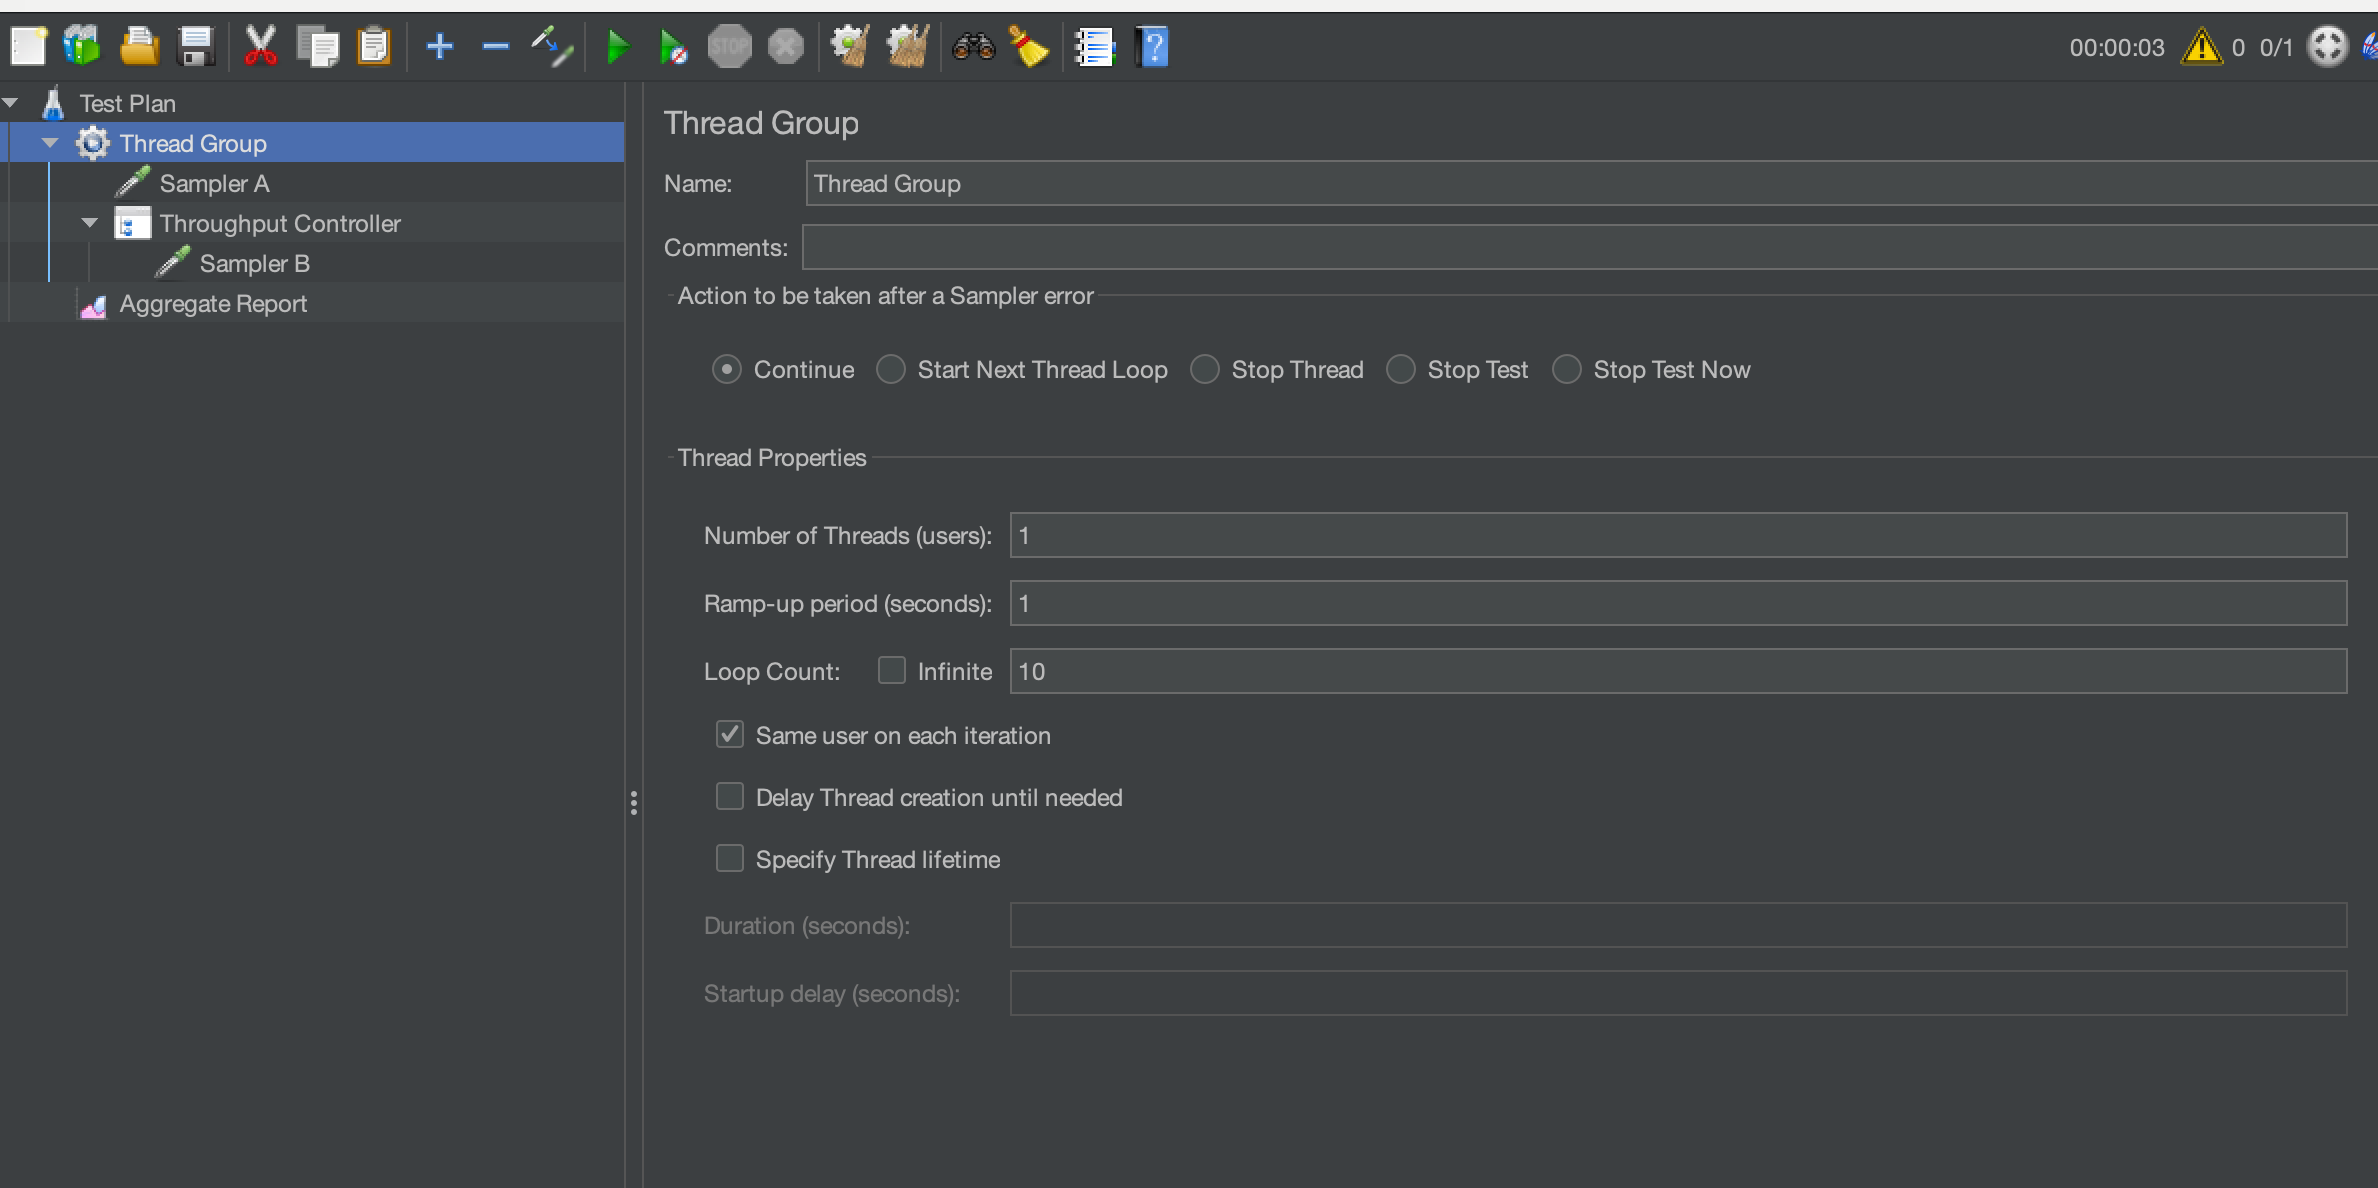
We can see that we have a single Thread with the Loop Count set to 10.
If we look at the Throughput Controller:
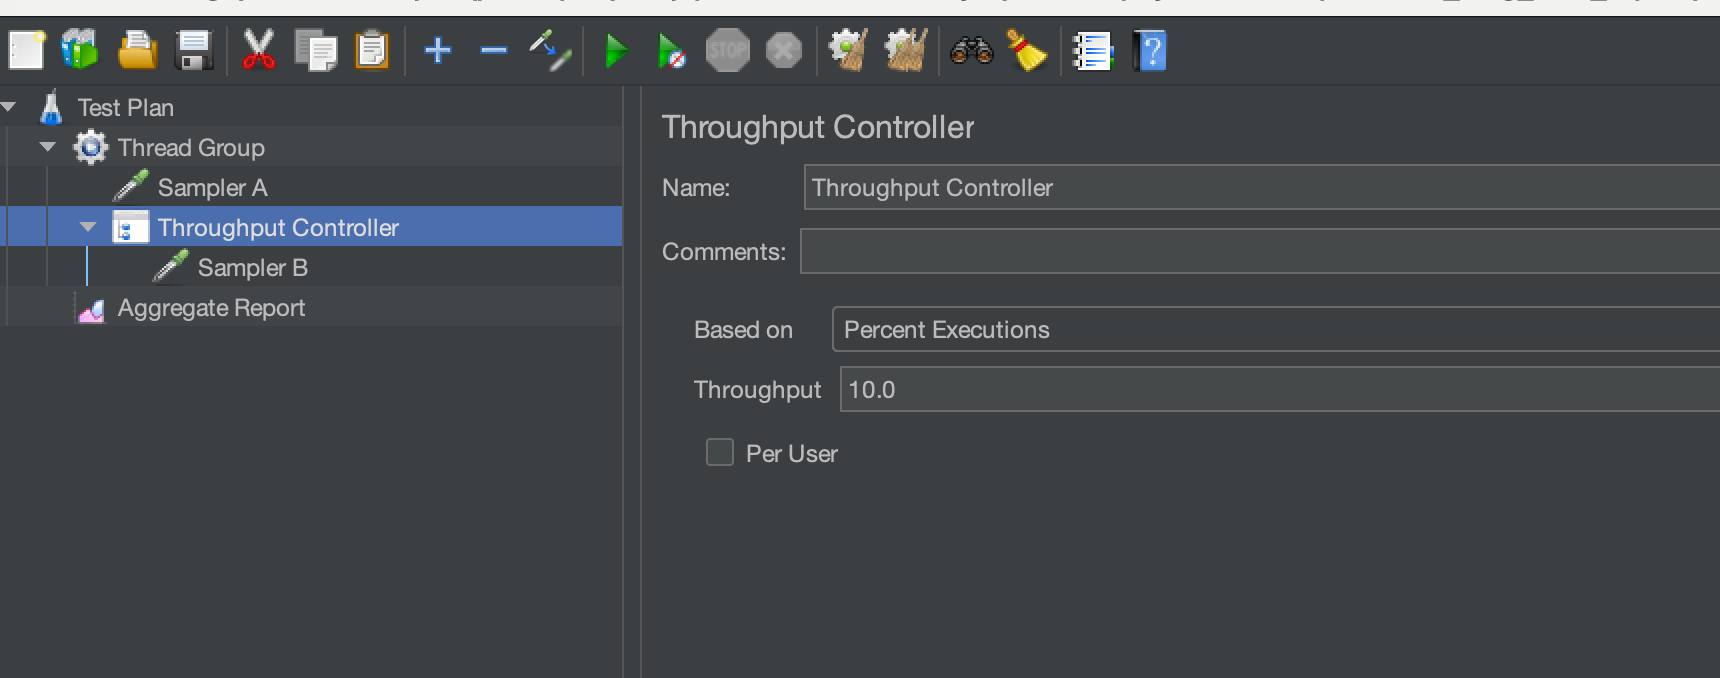
We can see that we have 3 Fields that determine the behaviour of this controller.
- Based On
- Throughput
- Per User
Based On has 2 possible values:
- Percent Executions
- Total Executions
Throughput contains a numerical value that control the percentage value if in Percent Executions mode or the actual number of execution if in Total Executions mode.
Per User determine whether the values above are calculated for each Thread or for all Threads that are configured in the Thread Group.
We will work through all these permutations to understand their impact on the load profile of our simple test before moving on to more complex examples and real-world test scenario usage.
Simple Example 1
We have set in our Thread Group:
- 1 Thread
- 10 Loops

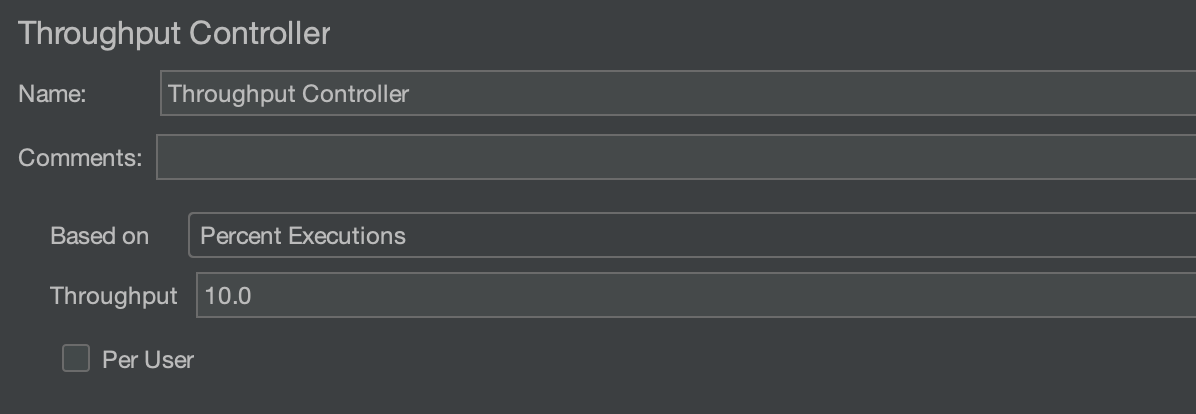
We have set in our Throughput Controller:
- Percent Executions mode
- 10.0 Throughput
- Per User unchecked
We have added a Summary Report so we can see the frequency of each sampler being executed. If we execute this test we can see in our Summary Report:
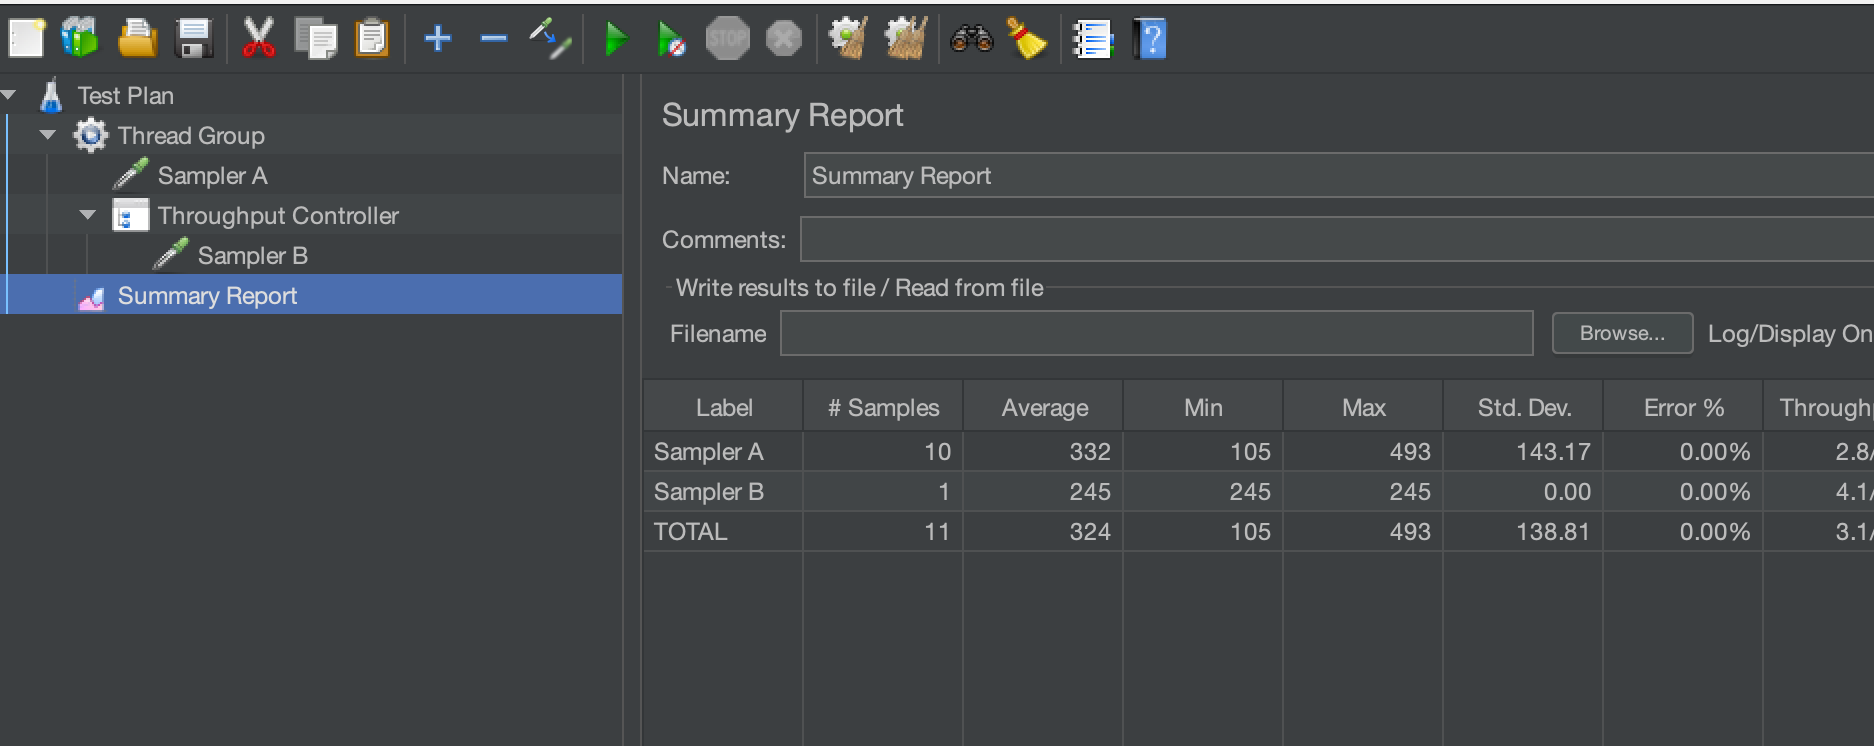
That Sampler A was executed ten times and Sampler B was executed once. Which matches our Throughput value of 10.0 in Percentage mode which is effective 10% of 10 iterations which equals 1.
Simple Example 2
For our second simple example we will consider the impact of the Per User checkbox on Percent Executions. We have set in our Thread Group:
- 2 Threads
- 10 Loops

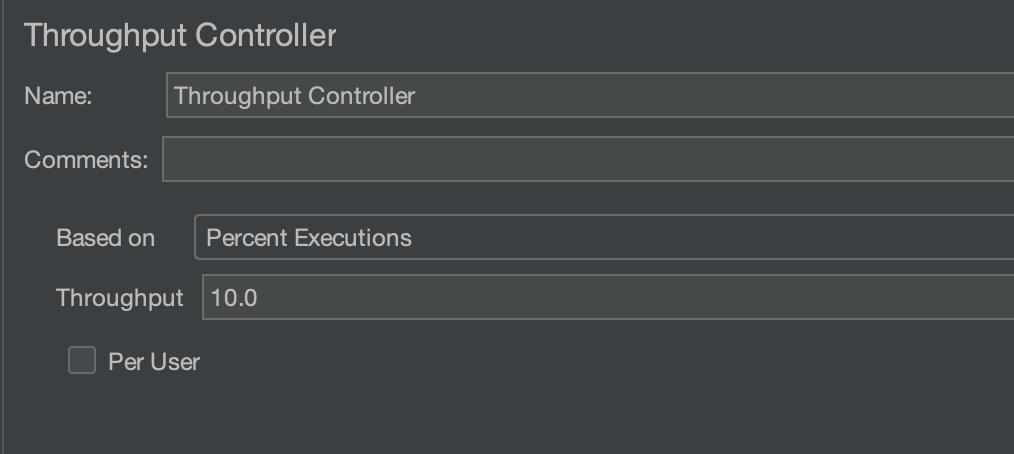
We have set in our Throughput Controller:
- Percent Executions mode
- 10.0 Throughput
- Per User unchecked
If we execute this test we can see in our Summary Report:
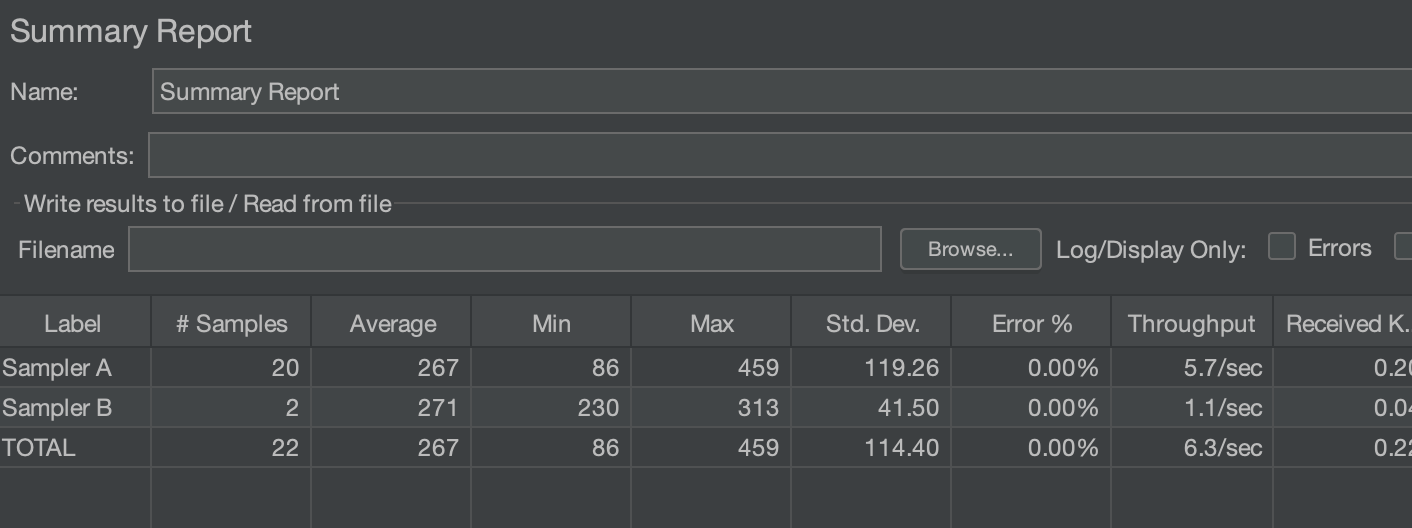
That we have 2 Threads each running 10 iterations therefore 10% of 20 iterations equals 2. If we then select the Per User checkbox and re-run the test.
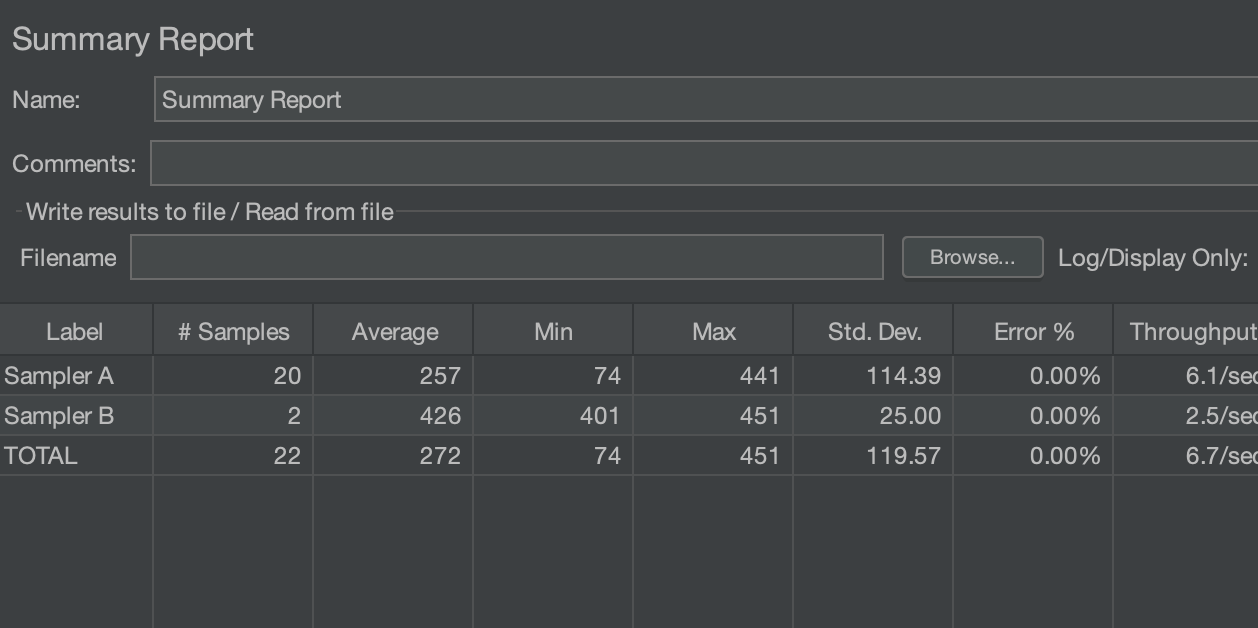
The results are identical as in Percent Executions mode this makes no difference. We will look more closely into the Per User checkbox when we discuss Total Executions mode.
Simple Example 3
For our third test we will change the mode to be Total Executions.
We have set in our Thread Group:
- 2 Threads
- 10 Loops

We have set in our Throughput Controller:
- Total Executions mode
- 5.0 Throughput
- Per User unchecked
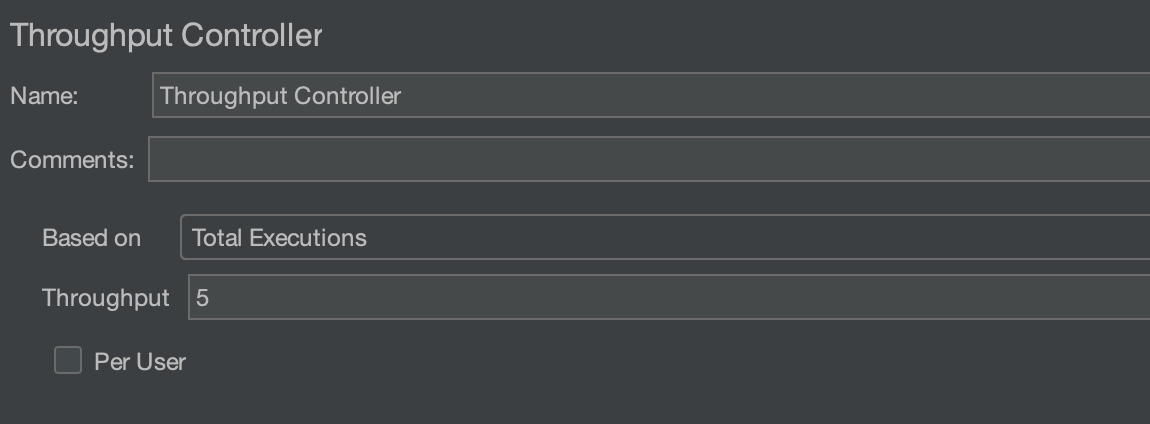
If we execute this test we can see in our Summary Report:
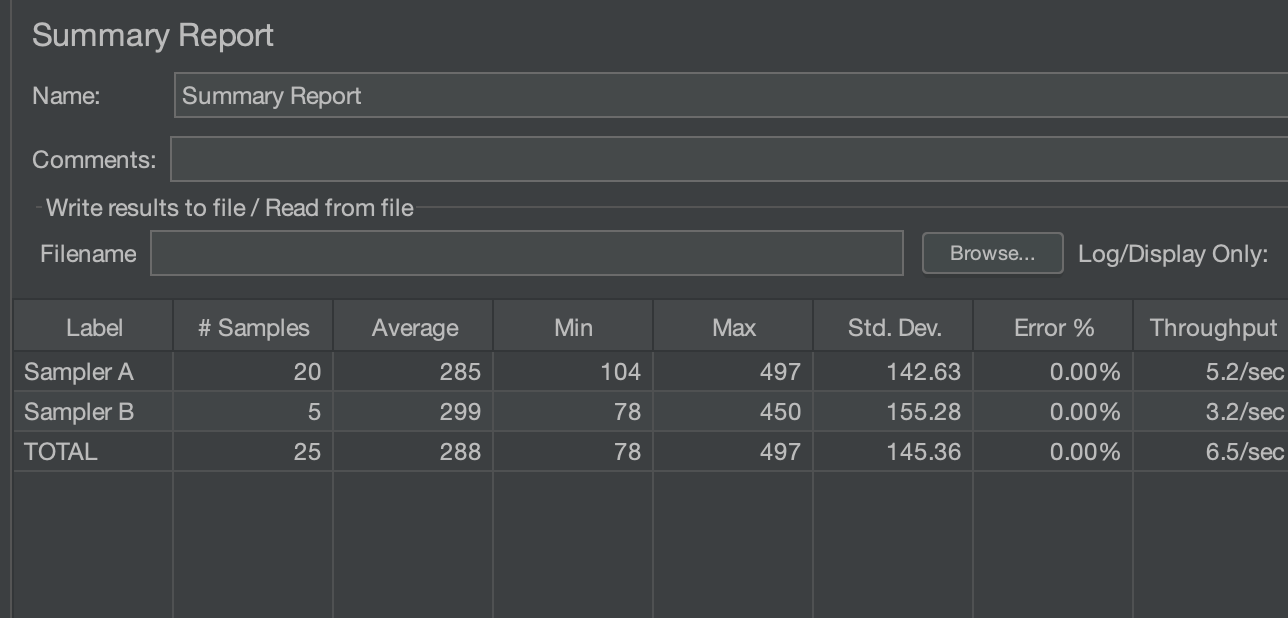
We have 20 iterations of Sampler A which is 2 Threads each iterating 10 times. We have 5 iterations of Sampler B as this is explicitly set to 5.0.
Simple Example 4
For our fourth simple example we will consider the impact of the Per User checkbox on Total Executions.
We have set in our Thread Group:
- 2 Threads
- 10 Loops

We have set in our Throughput Controller:
- Total Executions mode
- 5.0 Throughput
- Per User checked
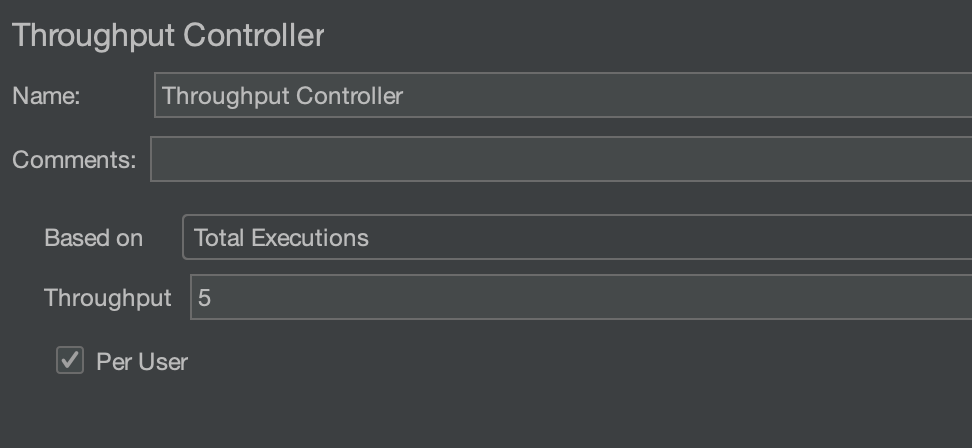
If we execute this test we can see in our Summary Report:
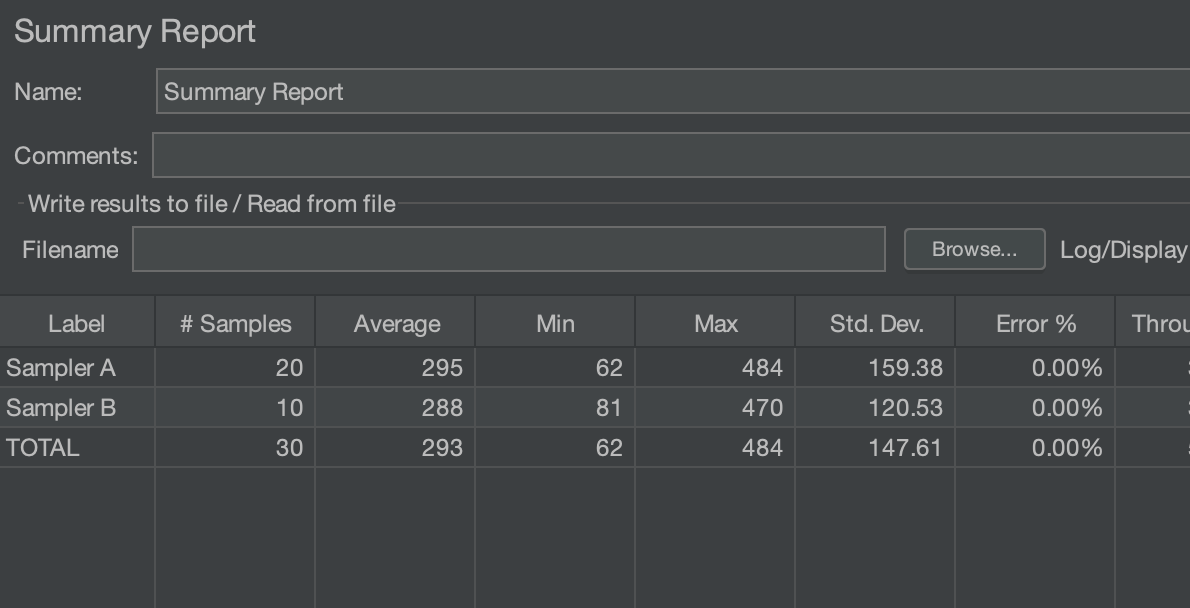
We have :
- 20 iterations of Sampler A which is 2 Threads each iterating 10 times.
- 10 iterations of Sampler B as this is explicitly set to 5.0 for each user which equals 10.
We can see how the Per User checkbox does have an effect in Total Executions mode.
We have now looked at some basic examples of how the Throughput Controller works and the impact on the load model by changing the values that are available to us in the Throughput Controller. We will now move on to discussing some real-world examples of this controllers use.
Real world examples
In our first example let’s consider you are testing a payment engine, and you want to vary the payment method in a random fashion. We will build a dummy test to demonstrate how you can achieve this with a Throughput Controller.
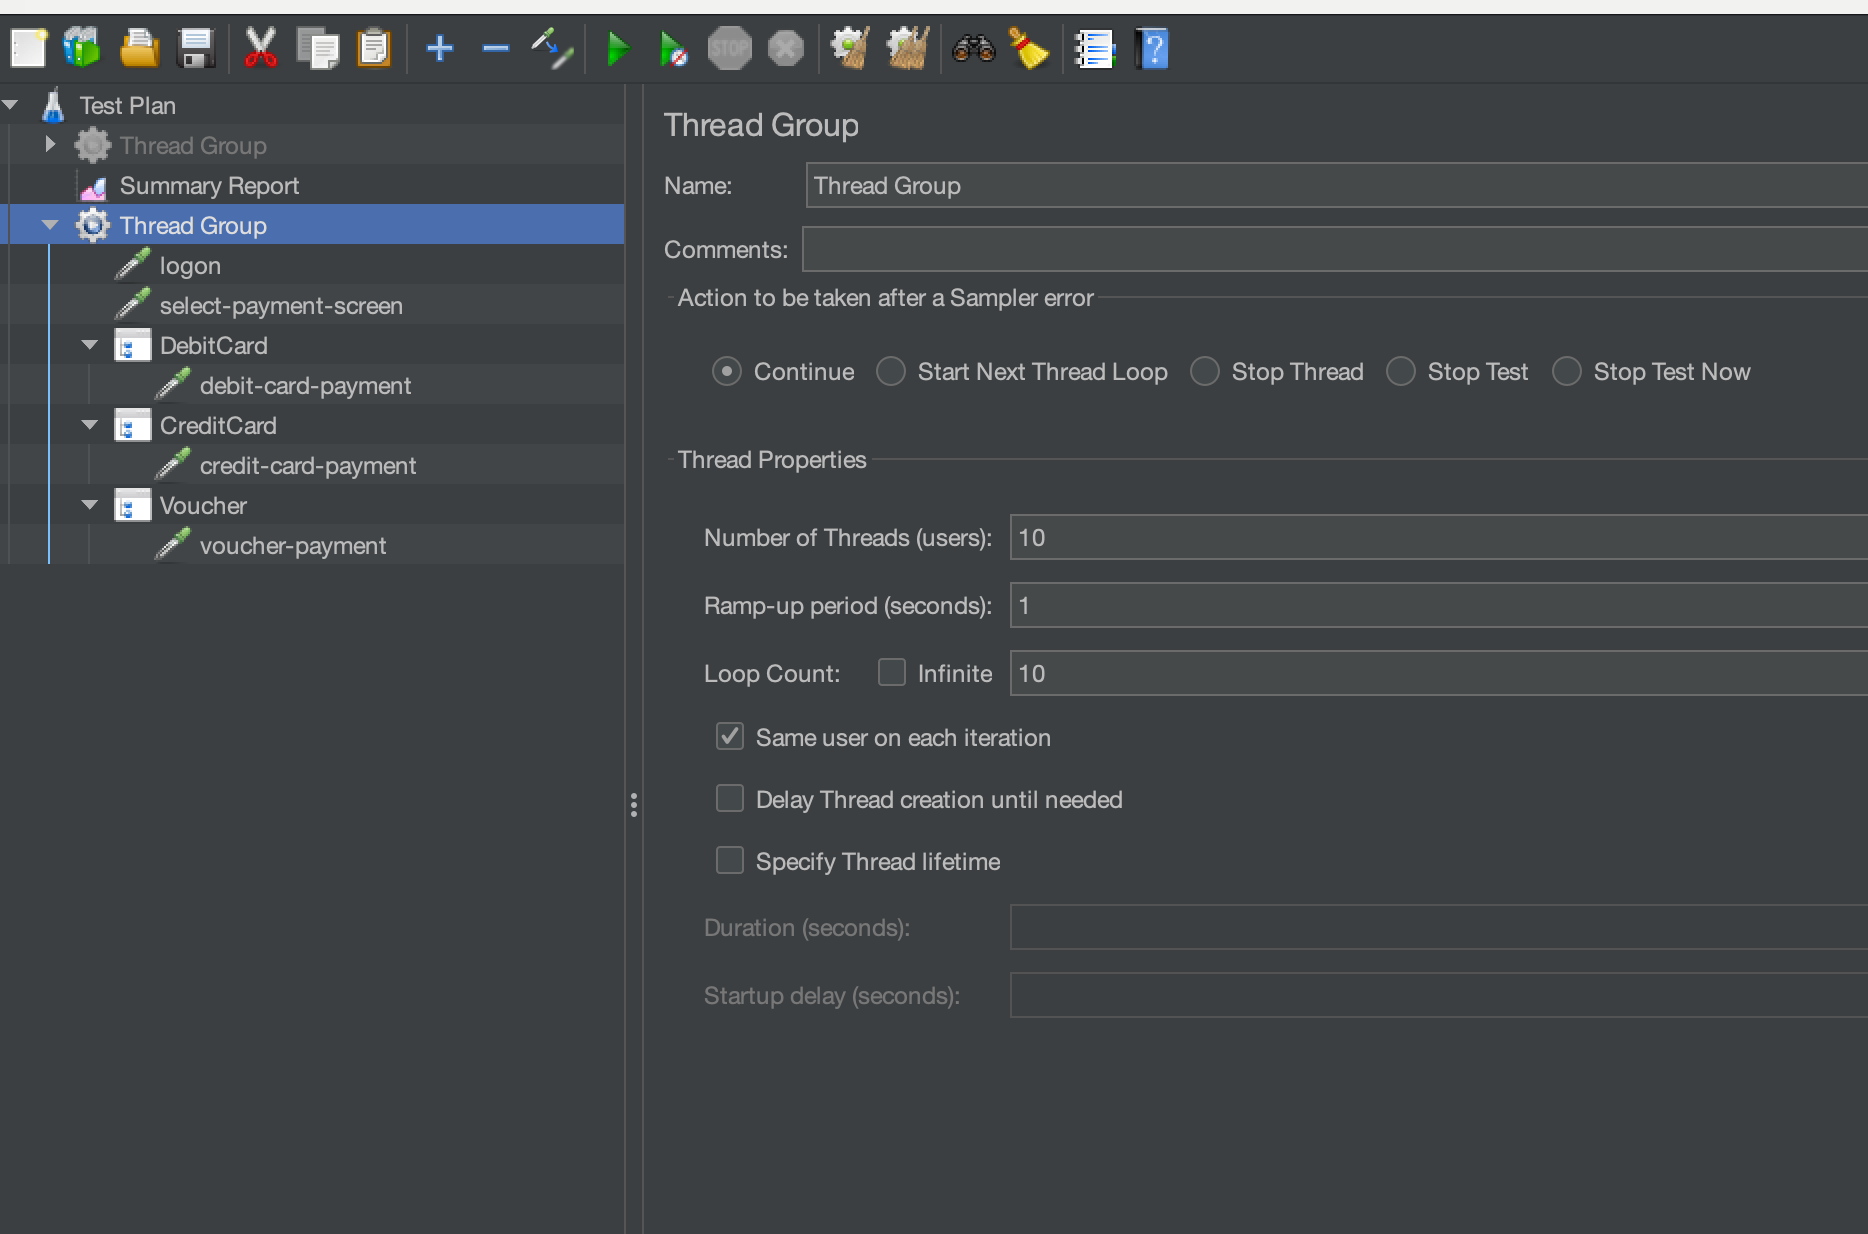
We can see that we have 5 Samplers which are named:
- logon
- select-payment-screen
- debit-card-payment
- credit-card-payment
- voucher-payment
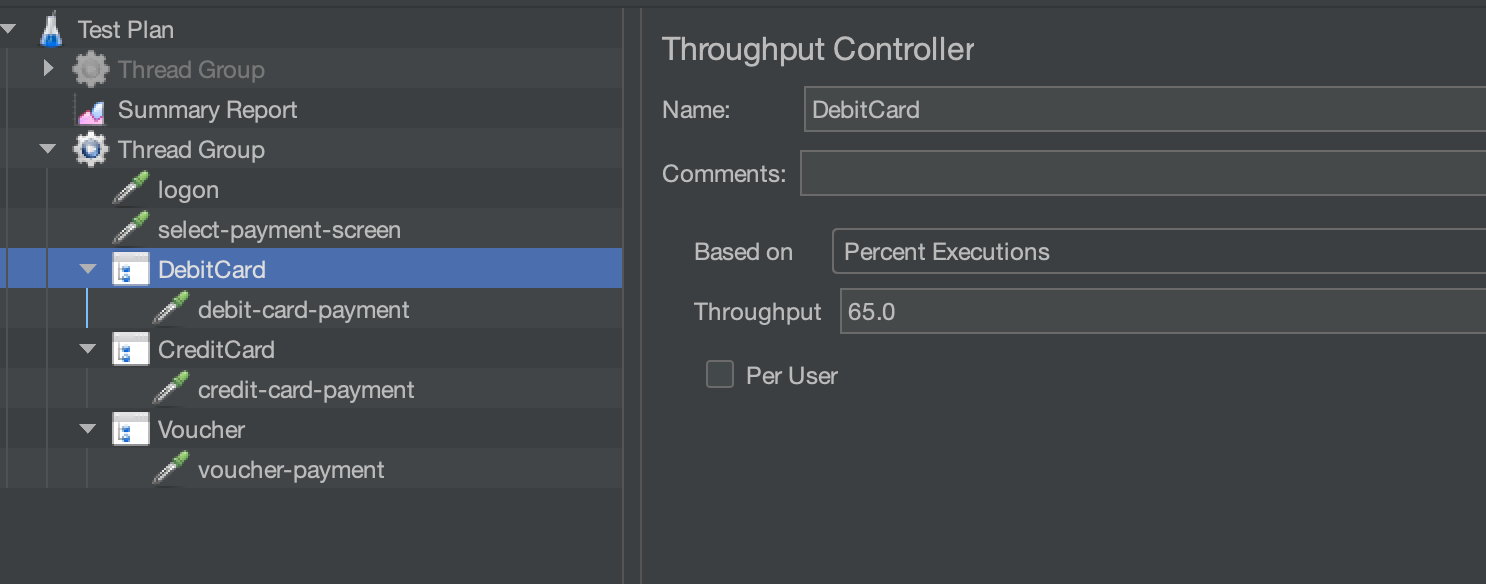
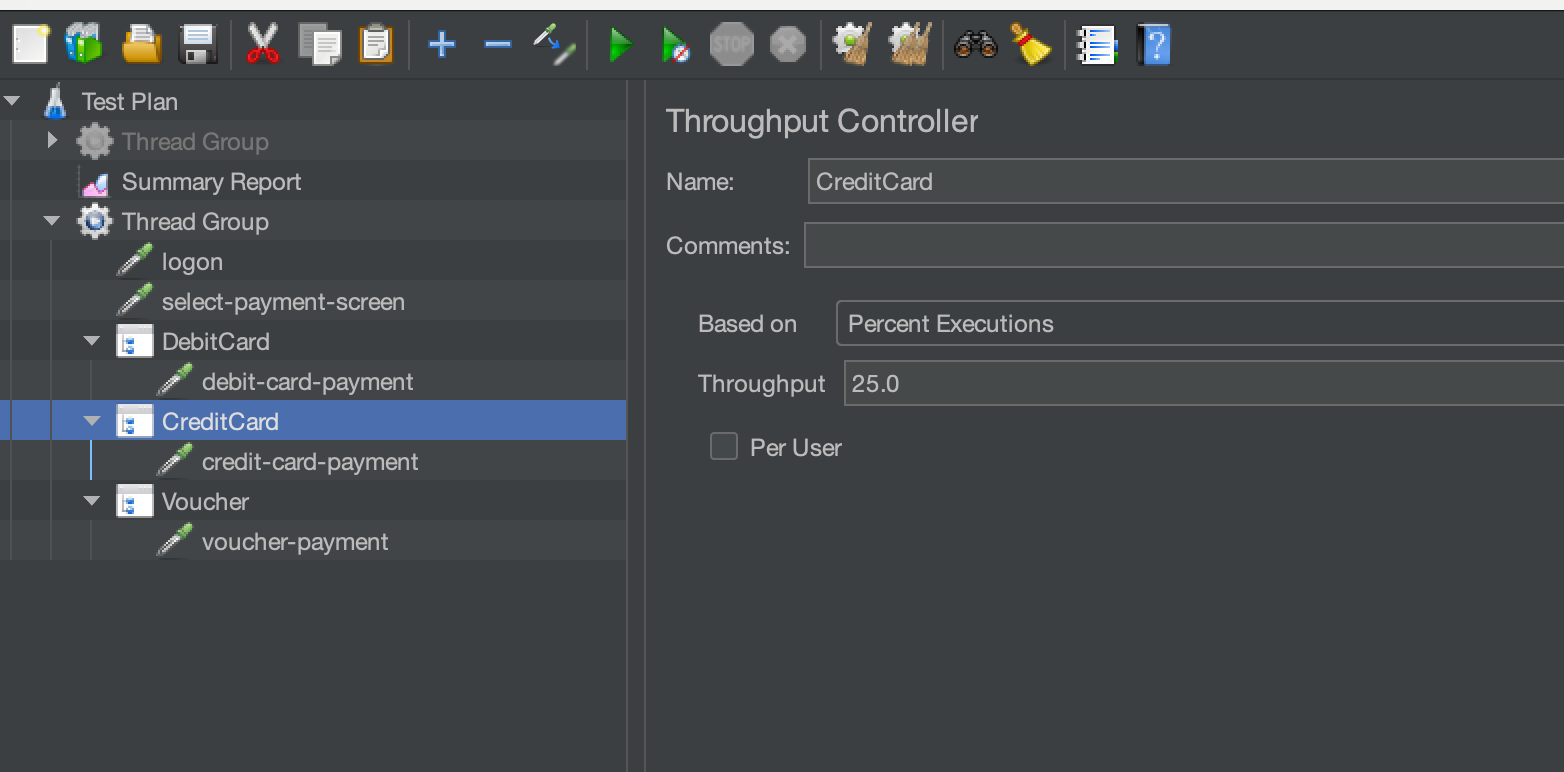
We have added 3 Throughput Controllers and each of the payment type samplers is a child of these.
For debit card payments we have a Throughput Controller that is configured like this:
For credit card payments we have a Throughput Controller that is configured like this:
For voucher payments we have a Throughput Controller that is configured like this:
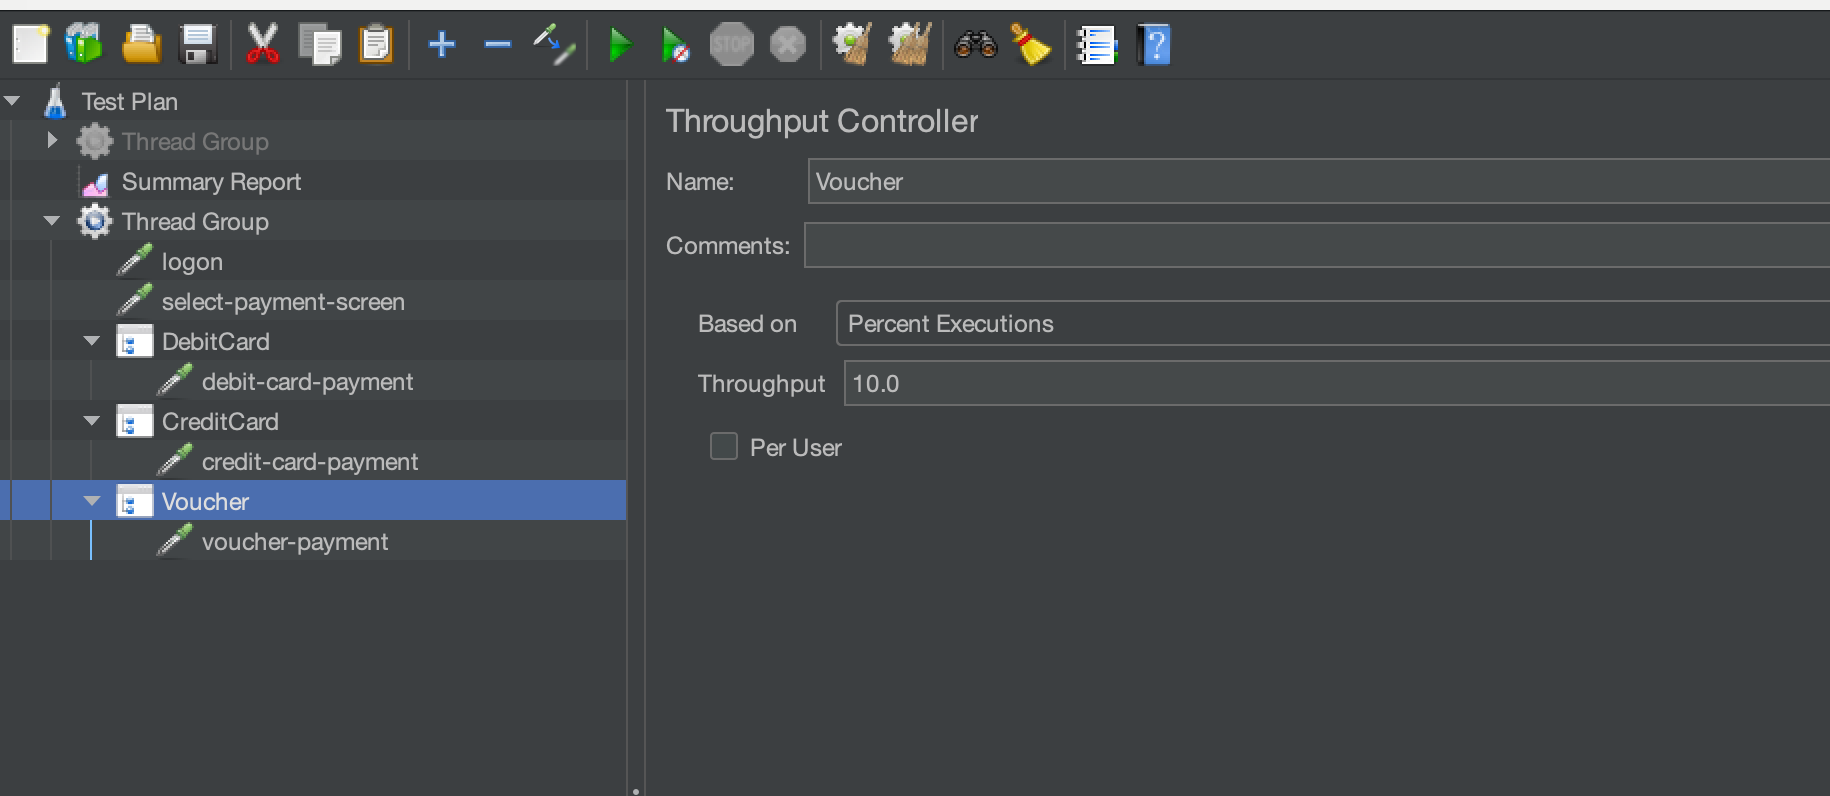
Essentially, we have 10 Threads executing the test for 10 iterations.
This will mean that logon and select-payment-screen will be executed 100 times with 65 debit-card-payments, 25 credit-card-payments and 10 voucher-payments.
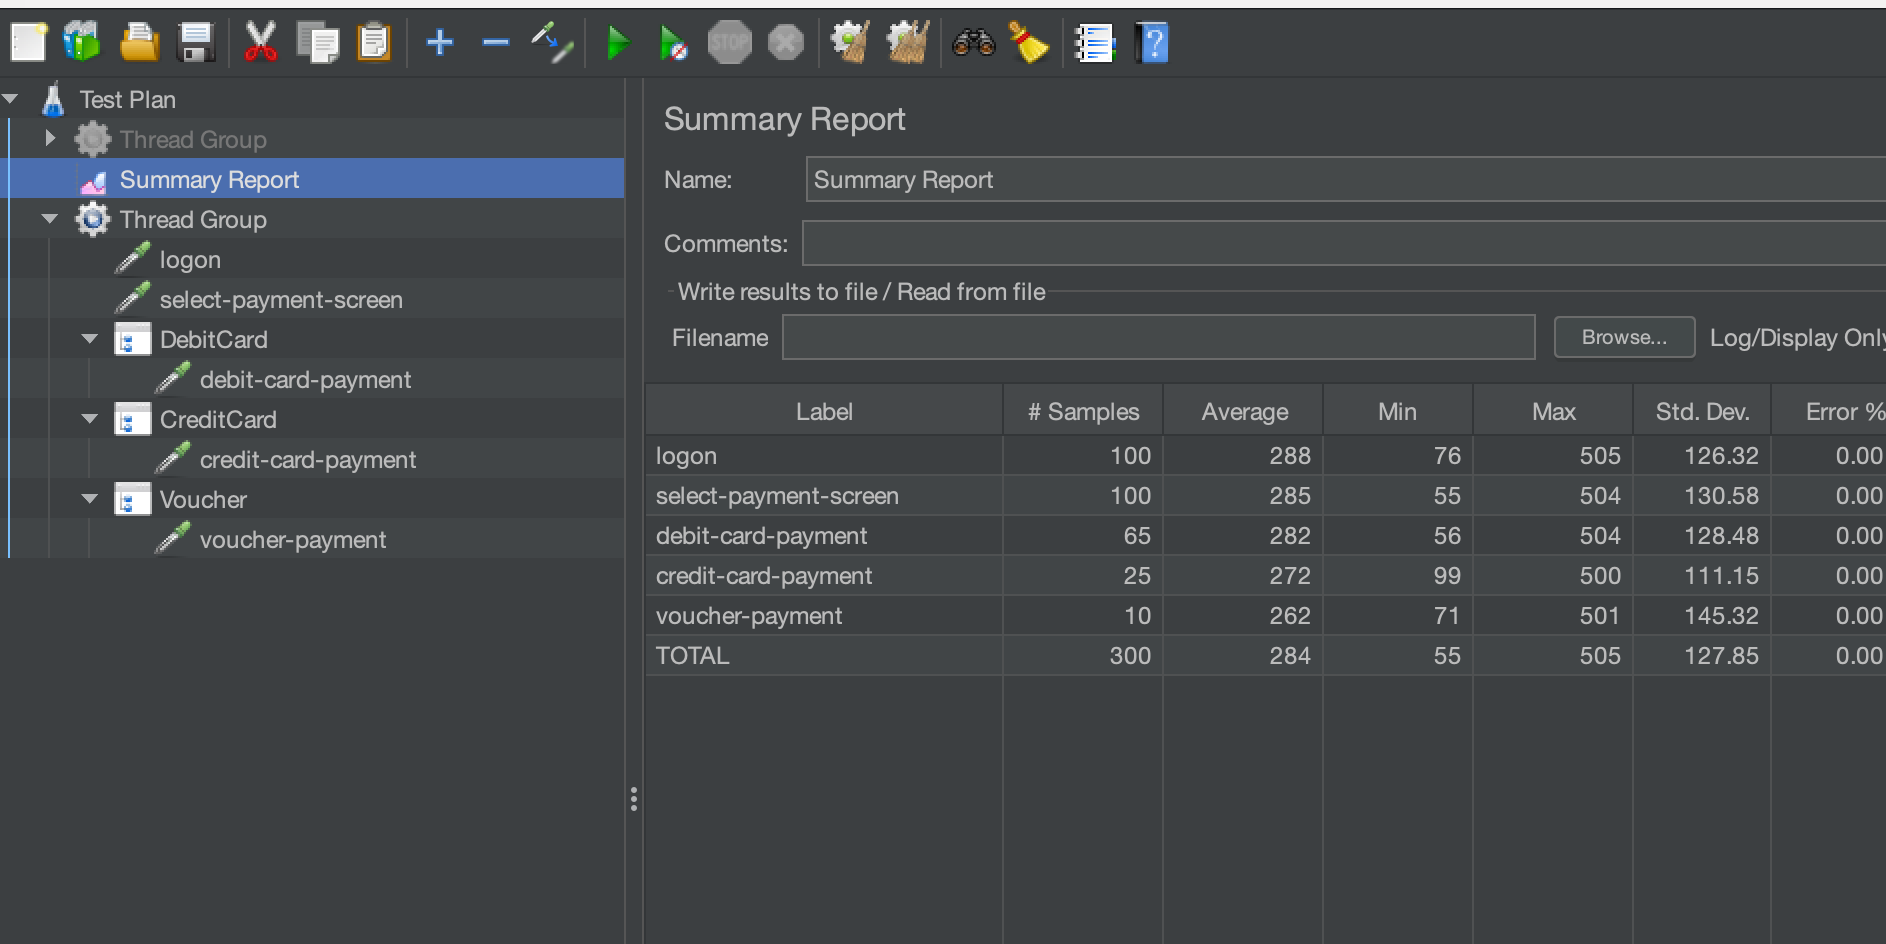
As we can see from the results summary this is exactly what the test did. You can use this technique to randomise the flow of your performance tests. We are going to now consider nesting Throughput Controllers to show you how this can again help you to create more realistic tests. Before we move on we are going to add our Throughput Controllers into a Simple Controller to help with the readability of our test. A Simple Controller offers no logic to your tests and is only used as a container for other elements.
This is our revised test:
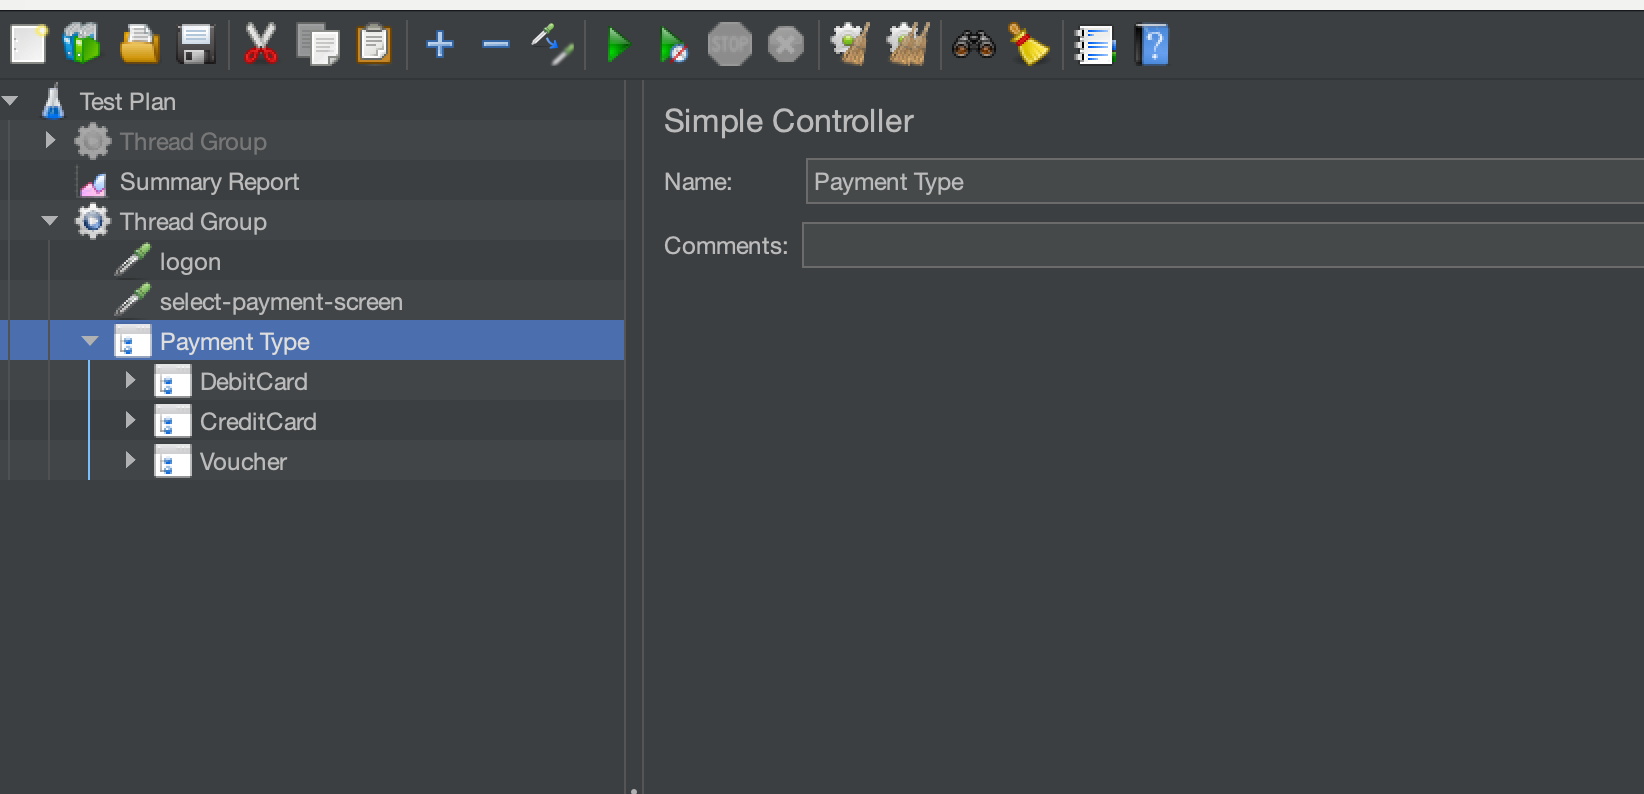
You can see that it just makes the test a bit easier to understand. Under the credit and debit card payment Throughput Controllers we will add additional Throughput Controllers to manage the entering of valid credentials and invalid credentials.
To see what I mean here is the test:
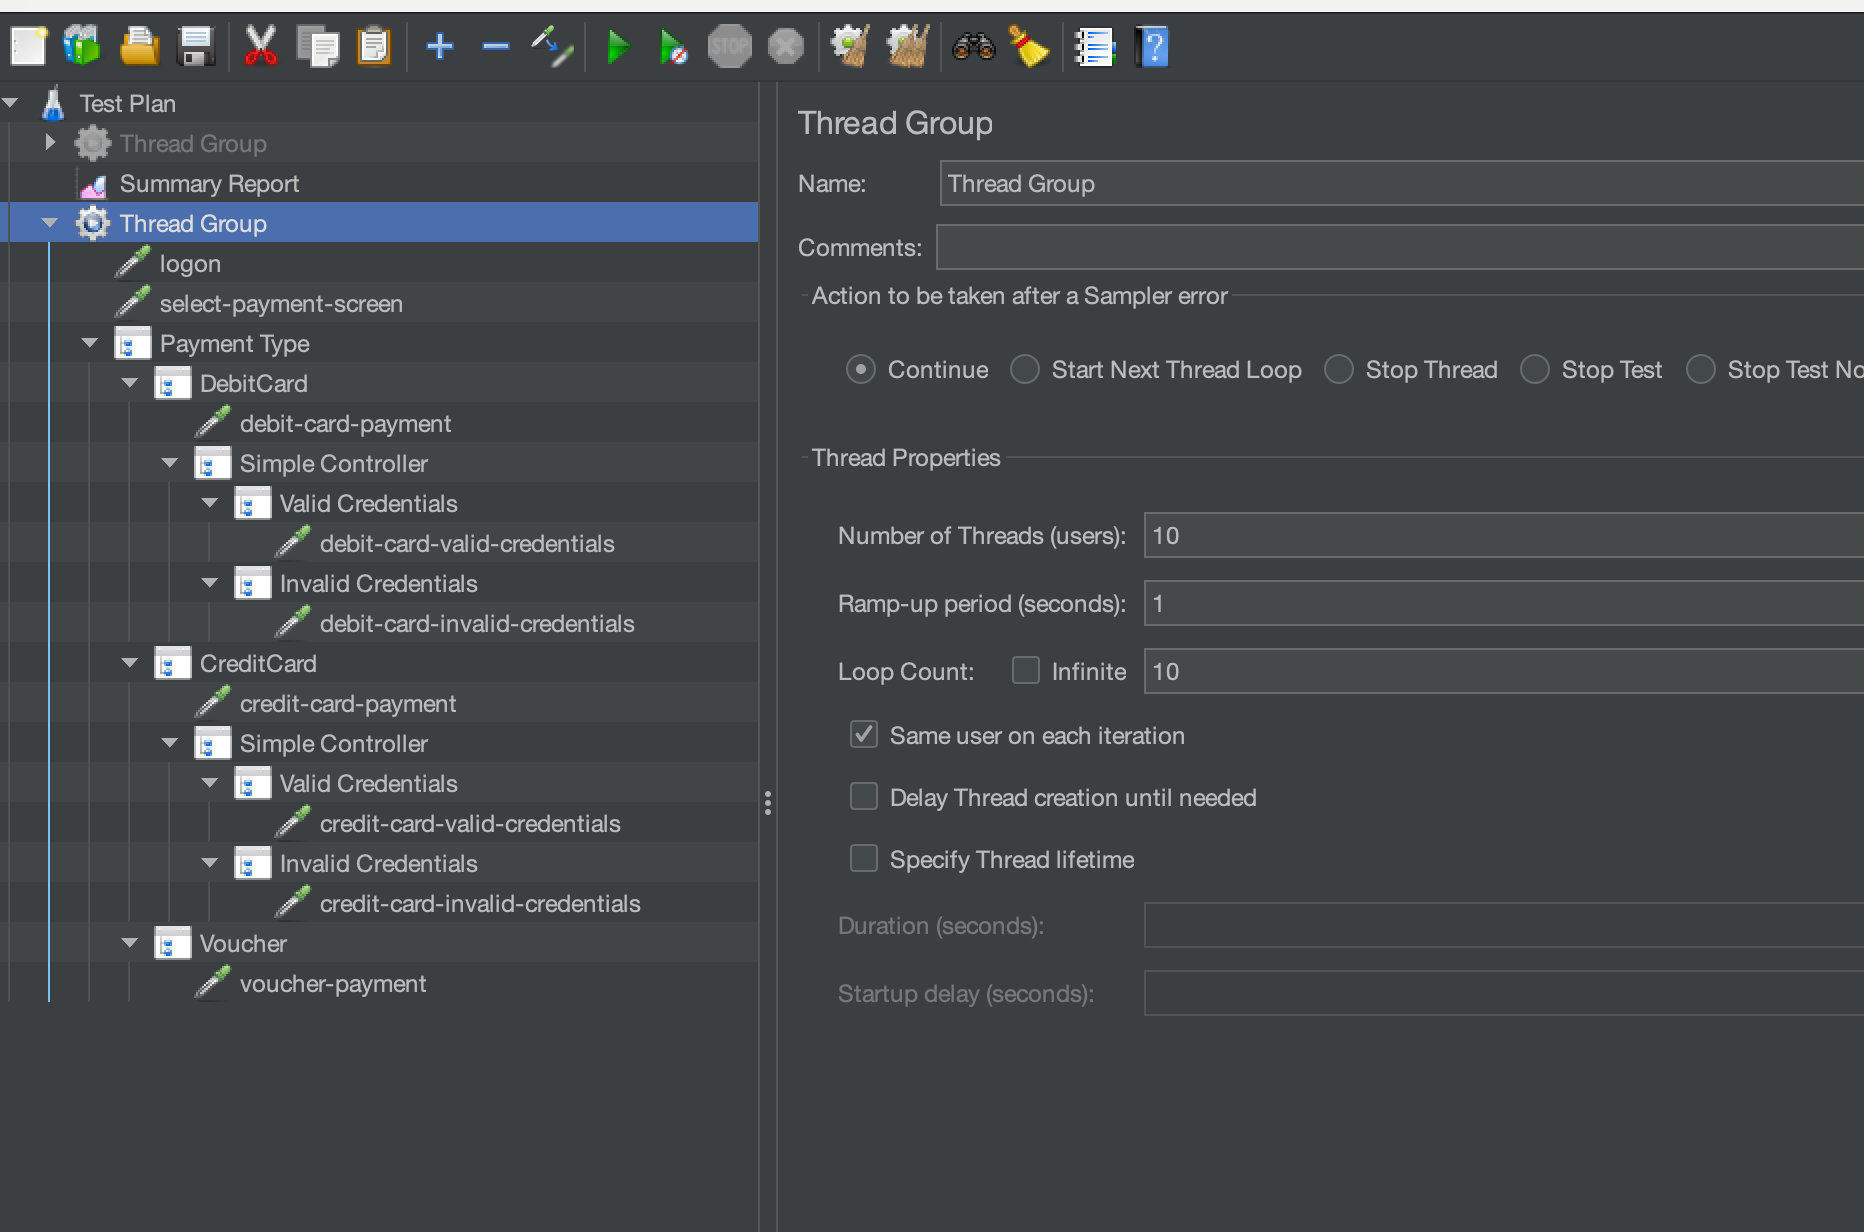
For both the debit card and credit card we have entered a Simple Controller that contains 2 Throughput Controllers one that contains valid credentials and one that contains invalid credentials.
The valid credentials Throughput Controller is configured like this:
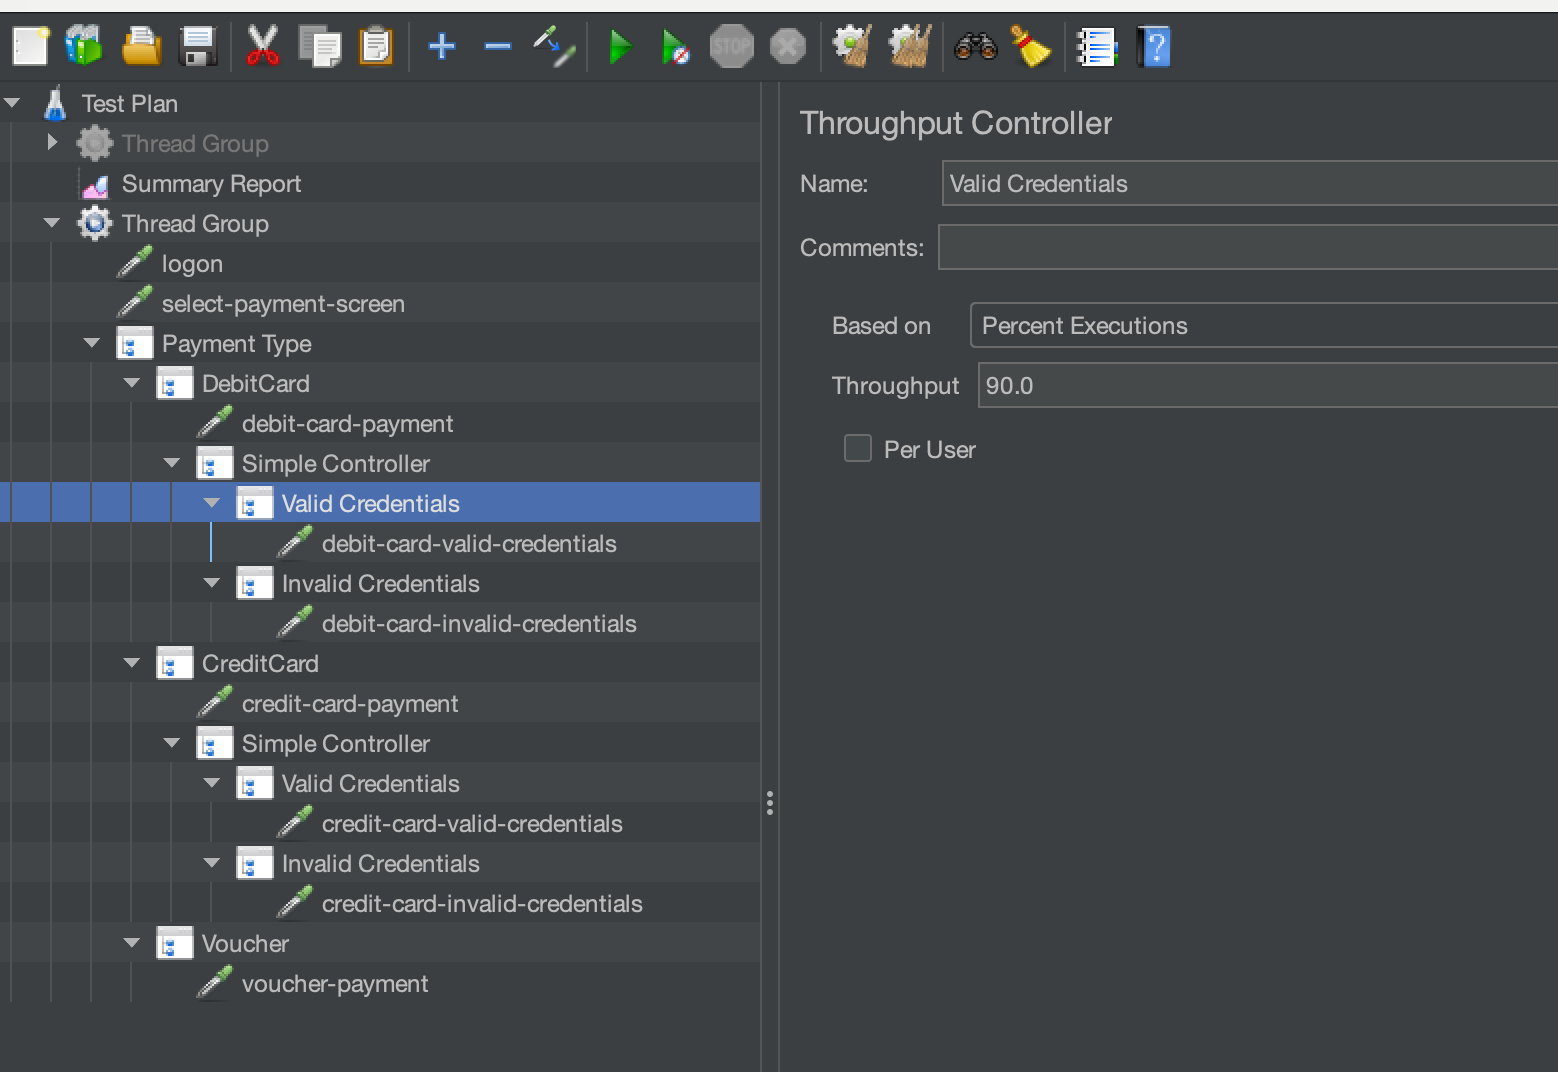
Where 90% of transactions will have valid credentials.
The invalid credentials Throughput Controller is configured like this:
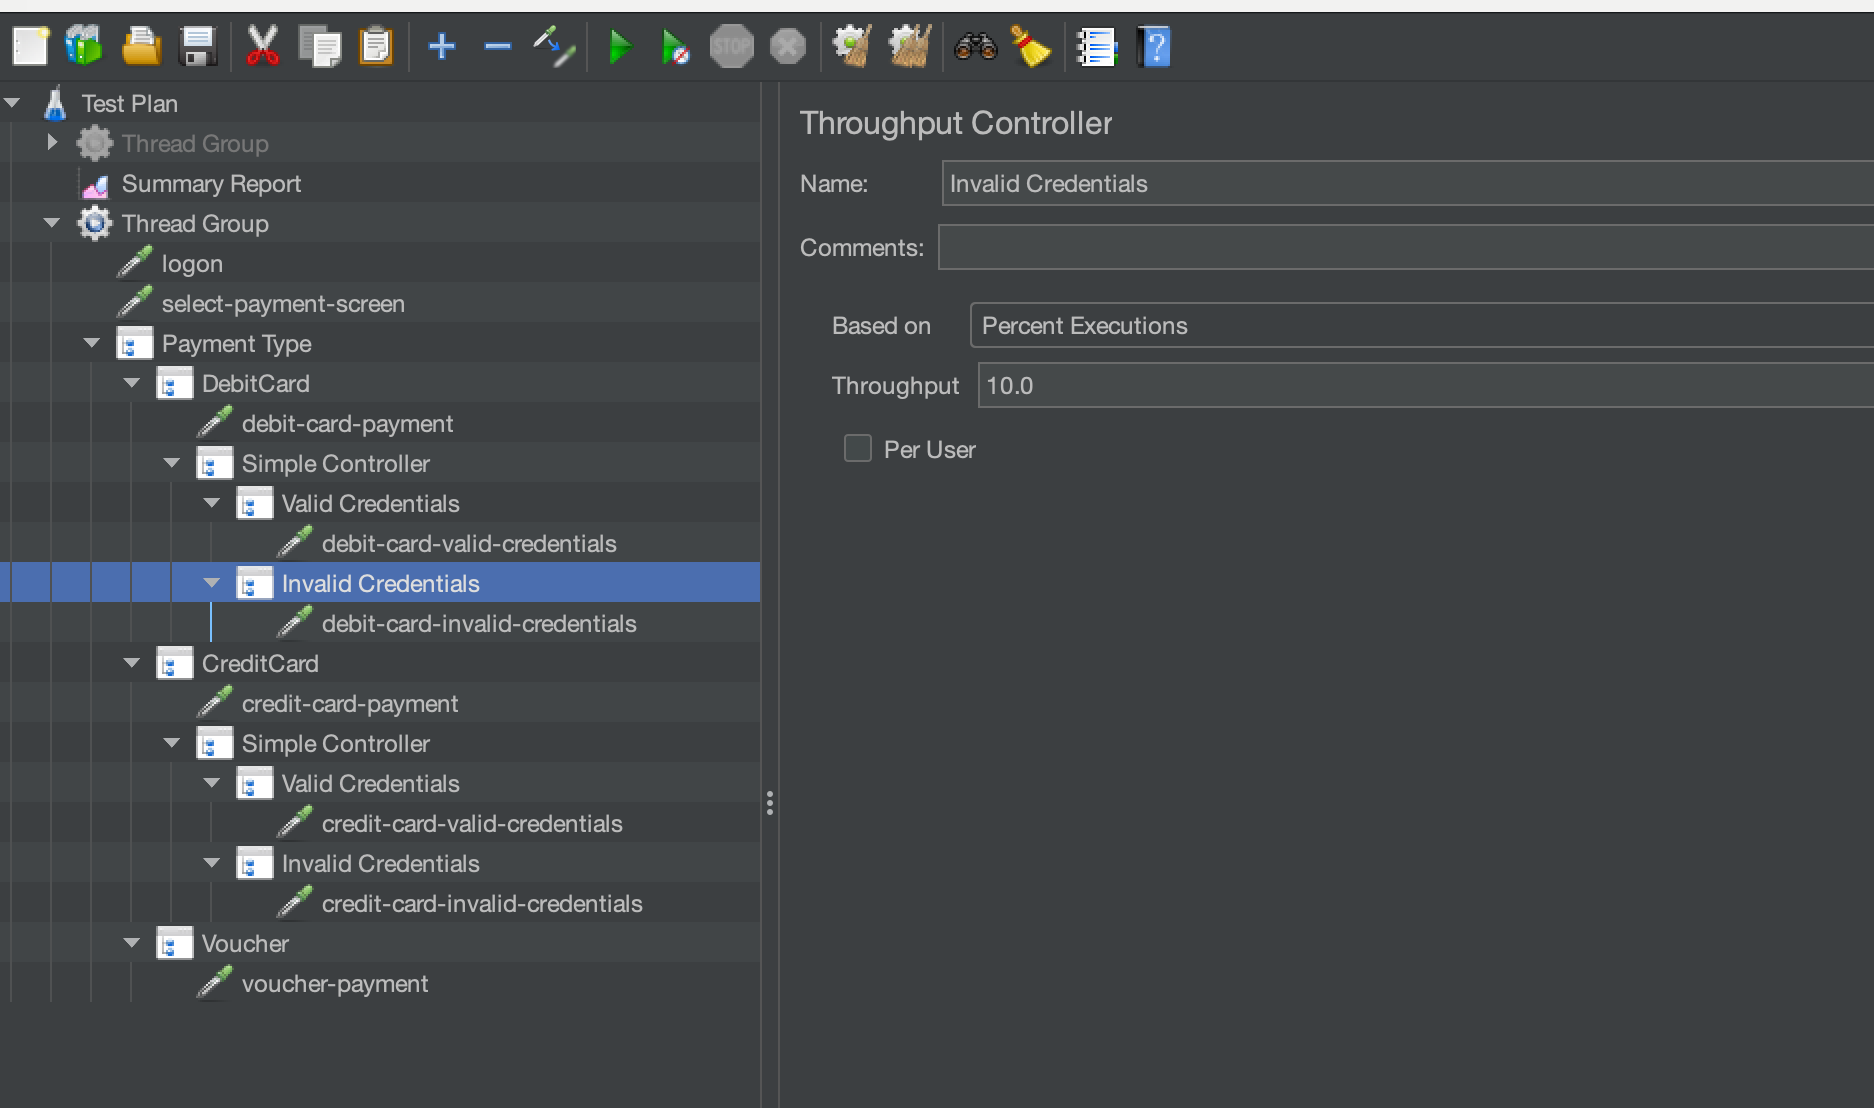
Where 10% if transactions will have invalid credentials. The Throughput Controllers for both the debit card and credit card flows are identical in that 90% will have valid credentials and 10% invalid credentials.
If we execute this test we can see in our Summary Report:
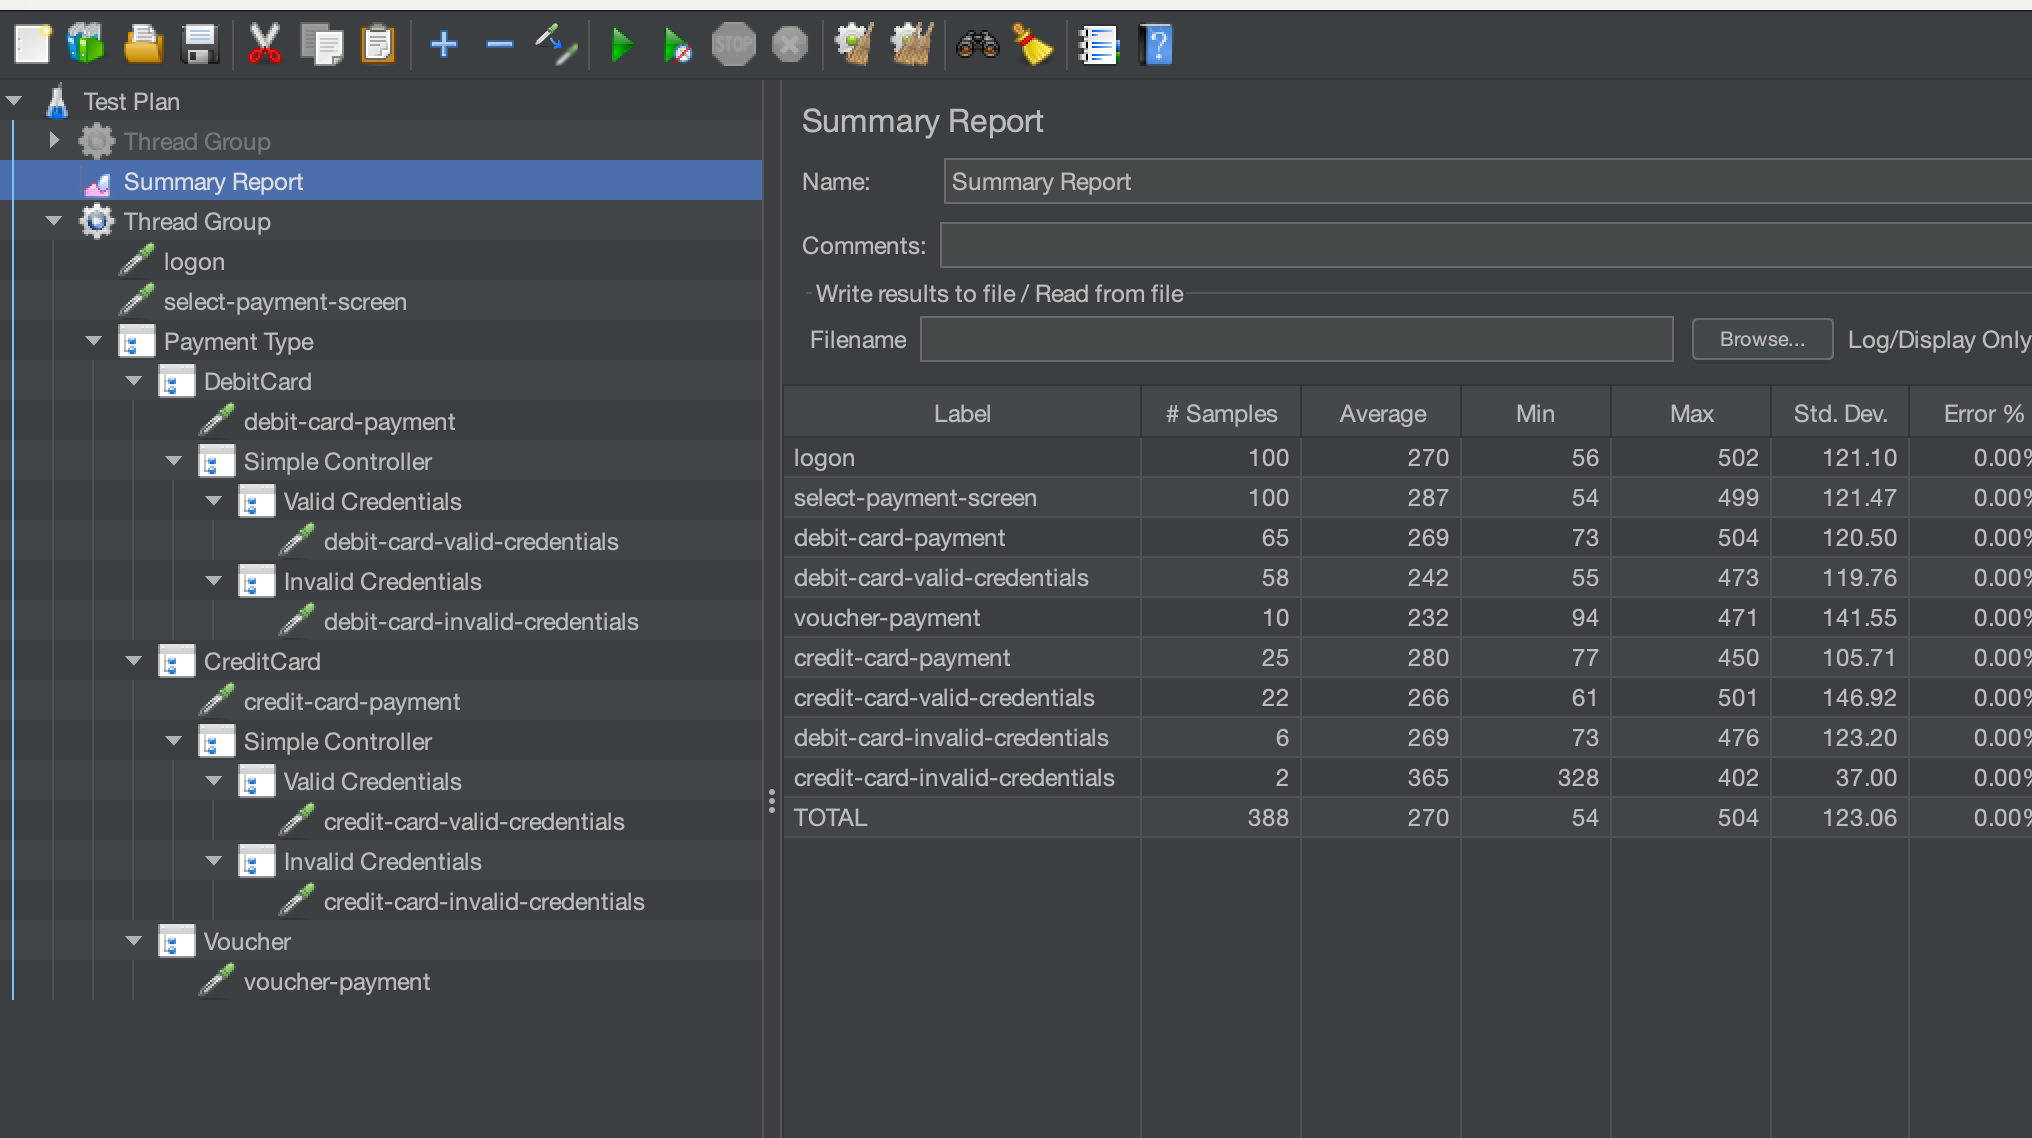
Where we still have our same ratios between credit card, debit card and voucher payments but we have added valid and invalid credentials to our card payments. You can see from this example that nesting Throughput Controllers can again add some diversity quite easily to your testing.
Adding further complexity
When building performance testing you may want to build something that is truly random and unique each time it is executed. If you consider your production system, the levels of randomness will be significant and using the techniques we will look at here you can replicate this. Under most conditions you will want your performance tests to be repeatable as you are looking to build something that targets specific component of your application under load with a known volume of transactions. There may however be a requirement to place a unique and non-repeatable load profile on your system as part of your planned performance scenarios and these techniques can help you achieve this. We will build upon the Test Plan we have already built. We will add an Interleave Controller to our test which will provide an additional level of randomness because this is is what we are looking to achieve. The object of this post is to discuss the Throughput Controller and not the Interleave Controller but there is a blog here that will give you a comprehensive overview of the way this works.
This is our revised test:
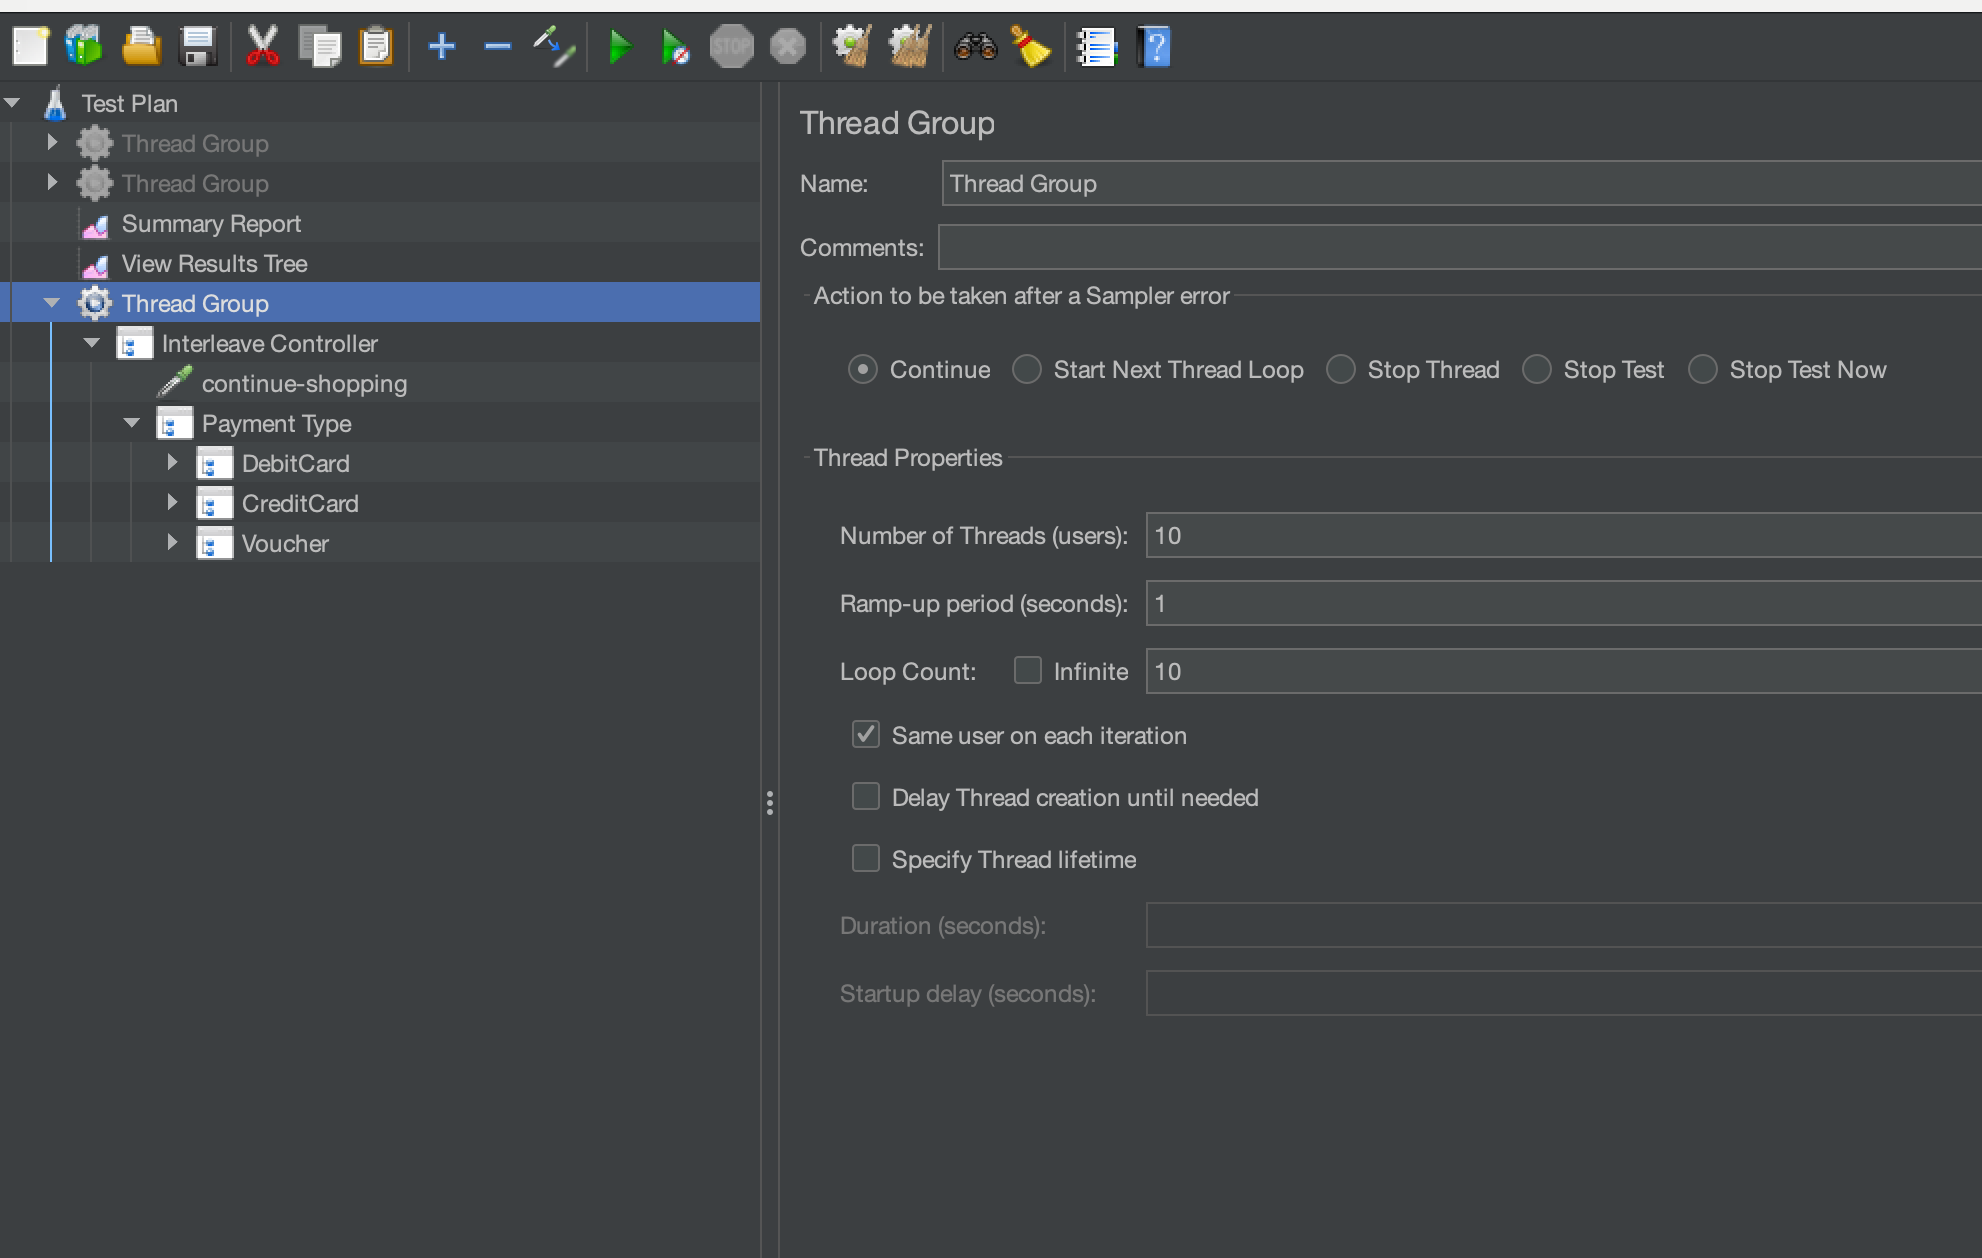
Essentially, we are going to alternate between a Dummy Sampler that continues shopping or entering the Simple Controller that holds the Throughput Controllers that manage the payment types and whether they have valid or invalid credentials.
If we execute this test we can see in our Summary Report:
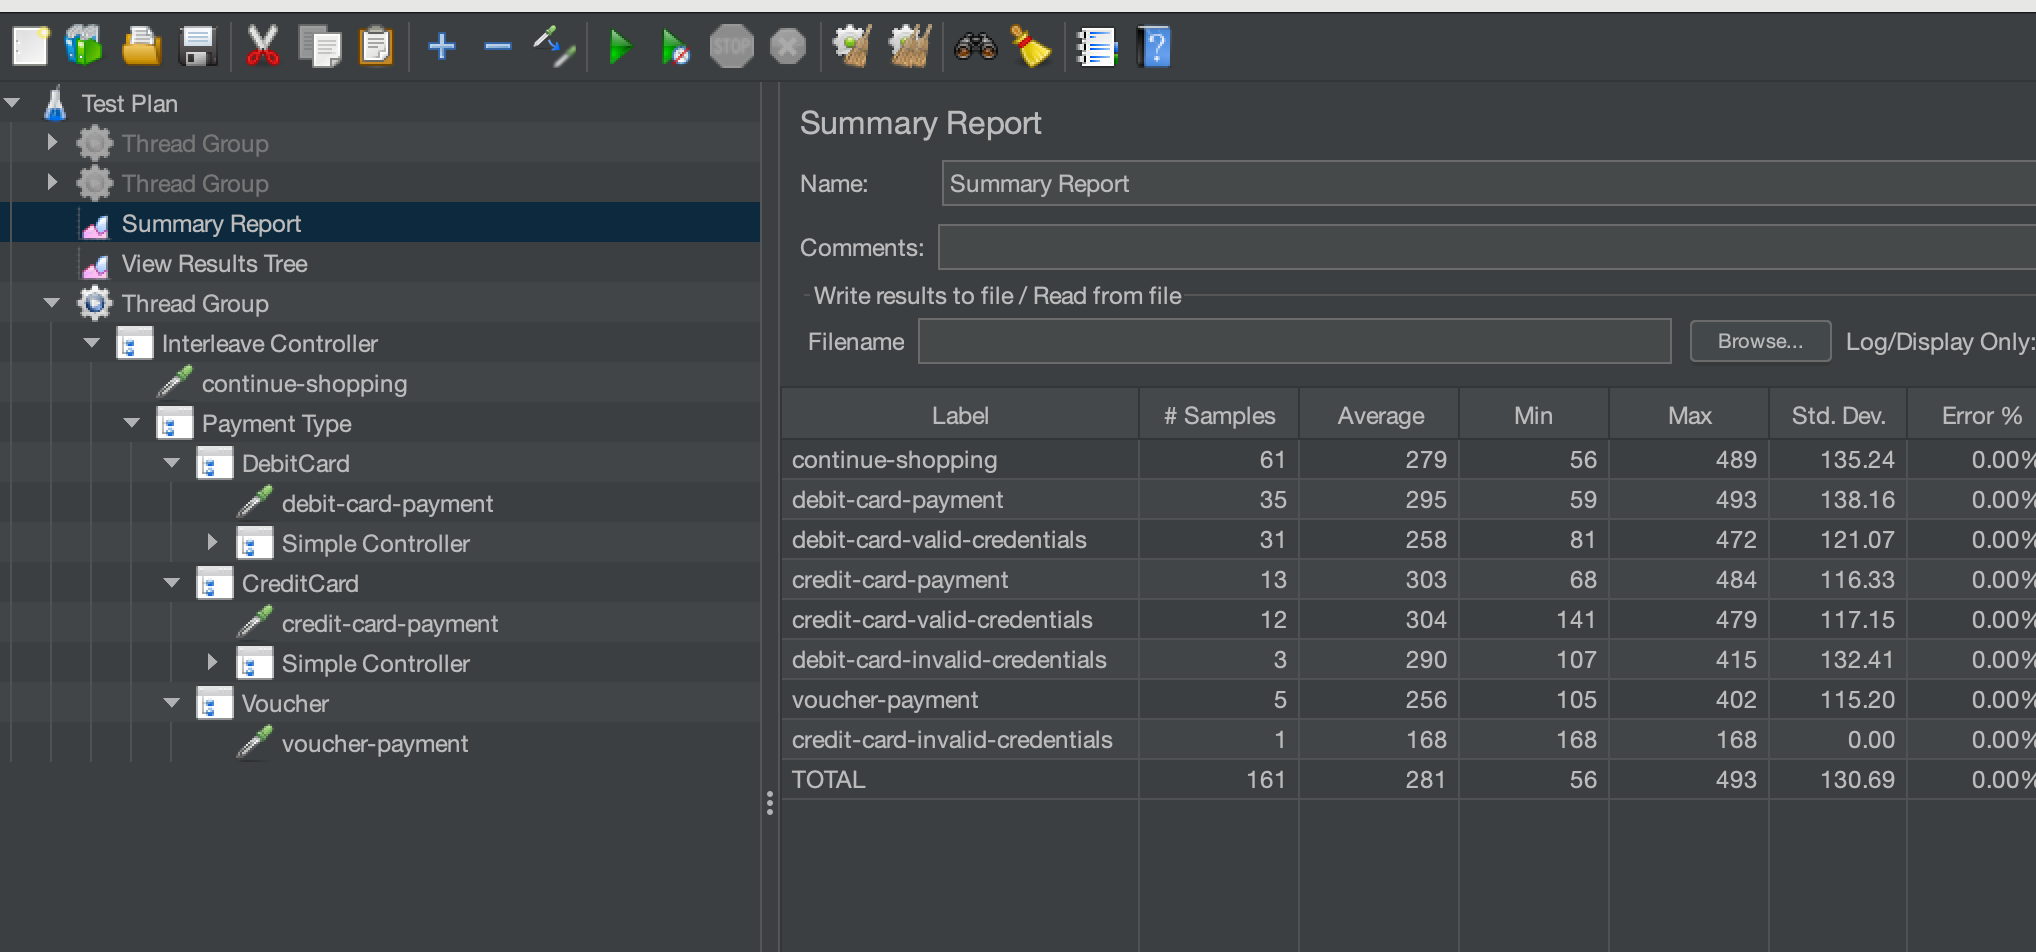
Conclusion
We have looked at how the Throughput Controller works in this blog post. We have used in to build both simple and complex scenarios and shown how it can be used in conjunction with an Interleaved Controller to add further complexity. The JMeter script used in this blog post can be downloaded here.
