
Rest API Testing with JMeter (Step by Step Guide)
I'm sure you're here because you need to load test a Json Rest API. It's not a surprise since Rest API are increasingly popular these days.
That's the purpose of this guide: help you load test a Json Rest API through a concrete example, OctoPerf's Json Rest API.
And this guide will completely get you through the following knowledge:
- Handle Rest API Login using an Http POST Request,
- Extract Variables from a Json Response and reuse it later in the script,
- And verify Json responses using JMeter Json Assertion (introduced in JMeter 4).
No theory here, only practice: everything is based on a realistic Rest API (not a dummy example). You can download the sample JMX while following the tutorial.
Ready to learn? Let's go!
Rest API Login
OctoPerf platform is based on a Json Rest API. We're going to see how you can simulate a login to our API using JMeter.
But how does the authentication works? How can we simulate a login with JMeter? Most Rest APIs work with the following login workflow:
- Login using an HTTP POST Request by providing
usernameandpassword, - Receive a temporary authentication token for later requests to identify yourself,
- Send the auth token within subsequent requests, typically via HTTP Headers like
Authorization: Bearer AUTH_TOKEN.
So does the OctoPerf API. That's pretty close to Oauth Authentication.
Login API Specs
First, let's see how we can login on OctoPerf Application. Thankfully, our API has a Swagger Specification: Swagger is a tool for providing a Rest API Documentation.

Good! Now let's examine the request we need to forge using JMeter:
- Http Method: must be a POST request, with some post parameters, (see GET vs POST)
- Http Scheme:
httpssince our Rest API is secured by SSL, - Hostname:
api.octoperf.com, - Path:
/public/users/login(Login endpoint path), -
Post Parameters:
-
username: the account username, if you don't have any you can easily signup here,
- password: the associated password.
We should then receive from the server a Json Response which should look like:
{
  "token": "xxxxxxxx-xxxx-xxxx-xxxx-xxxxxxxxxxxx"
}
See the token here? That's something we'll use later to identify ourselves on the Rest API. But, first let's take a look at the JMeter HTTP Request.
Executing Login
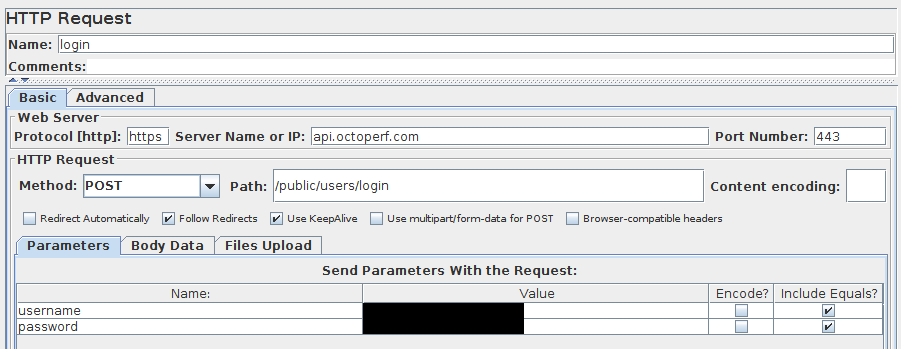
Here we have our Login Http Request ready to be sent to our servers. I've just hidden the sensitive information, but that's basically your account information here. In order to debug the login, we're going to use the View Results Tree Listener.
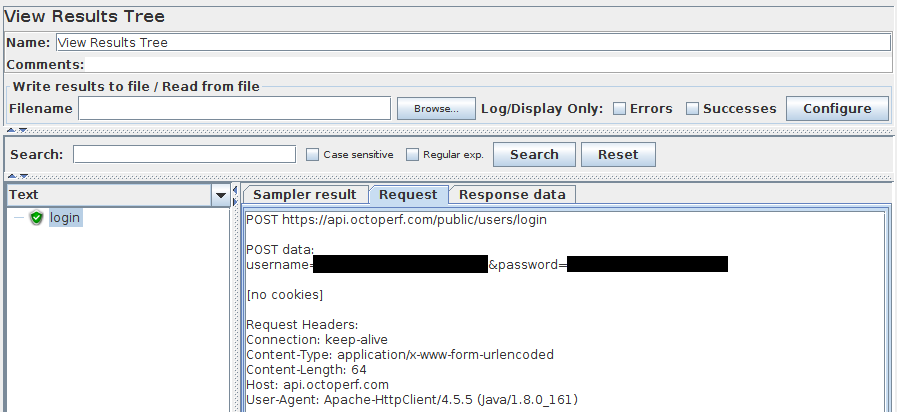
As we can see, the sent request is a POST form-urlencoded which contains our login and passwords. Nothing difficult here! Now, we're interested in the Json Response sent by the server.

Fine! Now we've received the Authentication Token, we can extract it to reuse it in subsequent requests.
Extracting Auth Token
Token Based Authentication is a simple mechanism where a token uniquely identifies a user session. We need to handle this dynamic parameter to properly simulate a user interacting with our Json API.
Using Json Extractor
To extract the authentication token from the server response, we're going to use JMeter JsonPath Extractor. The process of extracting a variable from a response works as follows:
- The server sends back a response to our login request,
- A post-processor, like the JsonPath Extractor is executed afterwards,
- the extractor extracts part of the server response and put it into a variable like
${token}.
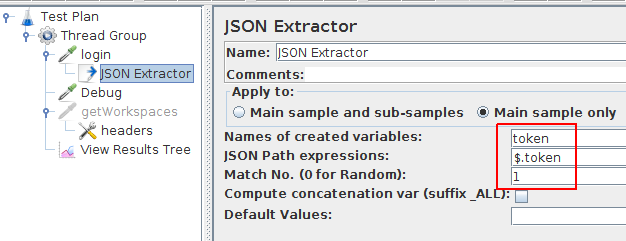
We have configured the JMeter Json Extractor with those settings:
- Name of created variables:
token, which will result in a reusable variable with the syntax${token}, - Json Path Expressions:
$.token, Refer to Example JsonPath Expressions for more info, - And Match Nr: simply
1, for the first occurence. But we could leave it blank.
See where I placed the extractor? Right under the login HTTP request. Let's also add a Debug Sampler to see if the variable is extracted correctly.
Enabling Debug
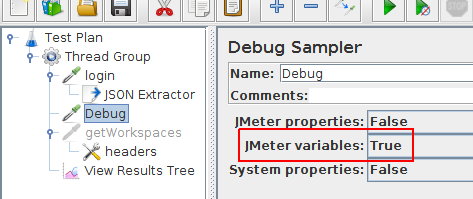
By setting JMeter Variables to true, we enable the sampler to output the variables during the test run.
Testing the Extraction

Great! The Json extractor is perfectly working. It extracts the value of the token field from the Json response. We can now use the ${token} expression in subsequent requests to perform authenticated requests.
Let's see how we reuse this token to tell our Rest API that we're a given user.
Reinjecting Auth Token
Our Rest API has many endpoints which require authentication. Those endpoints provide data like user workspaces, projects, virtual users and more. To access user-protected endpoints, one must:
- Login to get an authentication token (like we did previsouly),
- Send the auth token within an
Authorization: Bearer TOKENhttp request header, for each subsequent request.
That's exactly what we're going to do here.
Retrieving User Workspaces
We're now particularly interested in querying the workspaces of our user. This is part of the Workspaces API Endpoints.
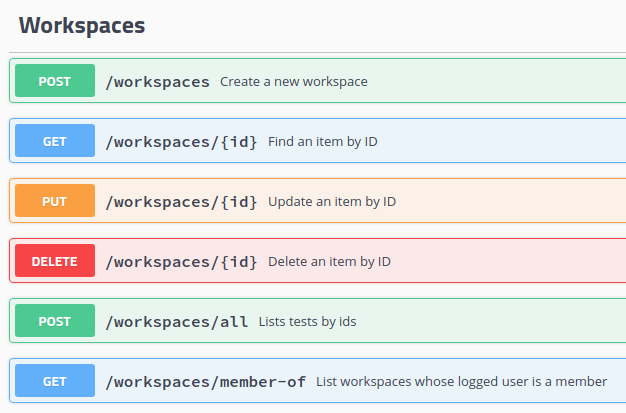
We're going to perform a GET request to the endpoint with path /workspaces/member-of. It should return a Json response containing the user workspaces. Here is an example response:
[
  {
    "created": "2018-04-23T12:40:00.133Z",
    "description": "This is my personal workspace.",
    "id": "workspaceId",
    "lastModified": "2018-04-23T12:40:00.133Z",
    "name": "Personal",
    "userId": "myUserId"
  }
]
Let's create an HTTP request within JMeter to query those. That's pretty simple like shown on the screenshot below.

Here we have setup an HTTP request to query the workspaces of the user:
- Http Method: must be a GET request, no parameters involved,
- Http Scheme:
httpssince our Rest API is secured by SSL, - Hostname:
api.octoperf.com, - Path:
/workspaces/member-of.
Is it finished? Not yet. For now, if we don't provide the authentication token, the server will reject our request.
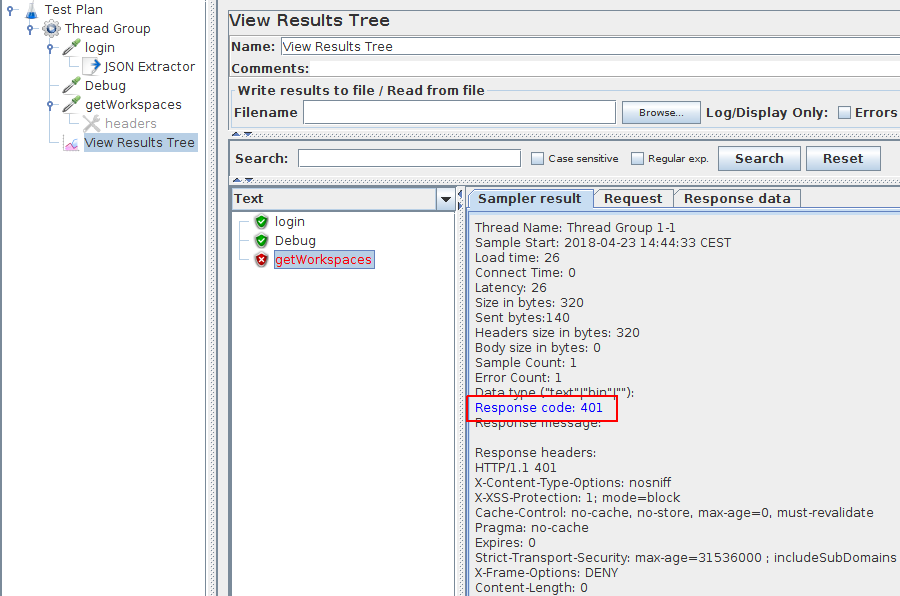
The server rejects the request with an Http 4xx error: 401 Unauthorized.
Similar to 403 Forbidden, but specifically for use when authentication is required and has failed or has not yet been provided.
We need to provide the authentication token by including an Authorization header within the request. How? By adding an HTTP Header manager to the request.
Adding Authorization Header

Remember: we have previously extracted the token from the /public/users/login endpoint server response. Now, it's time to reuse it to retrieve access protected resources:
- First, add an Http Header Manager under the getWorkspaces HTTP Request,
- Add the
Authorizationheader, with valueBearer ${token}.

Nice! It's working now! We've got all the workspaces which belong to the logged user.
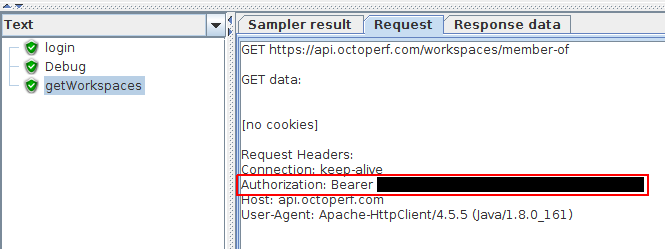
The authorization header has been successfully included within the request headers. But, one thing that's pretty annoying is: The Json is not formatted correctly. Why?
Most servers send json in compact format, skipping indentation. This is done for performance reason (reduces bandwidth usage and server CPU usage)
Format Json Response
To overcome this issue, the JSON Formatter PostProcessor does the job very well.

See our JMeter Plugins Installation Guide to learn how to install the Json Plugins. Another option is to format the Json yourself using a JSR223 Script.
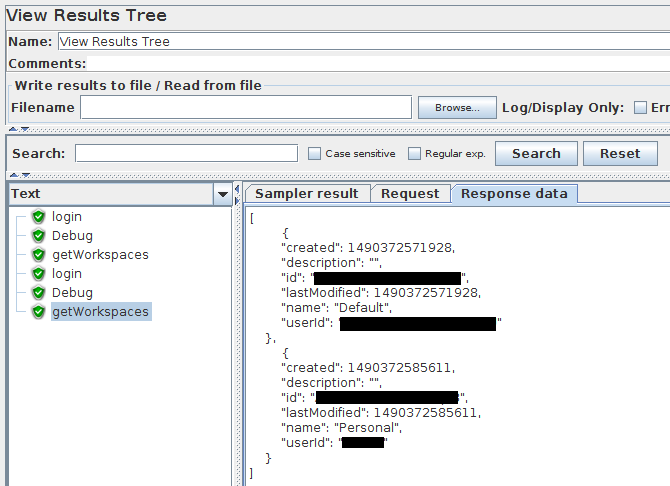
Now, we can leverage the power of the Json Assertion (introduced in JMeter 4.0) to check the server response.
Using Json Assertion
We're going to make sure the server response contains the Personal workspace. That's a job for the Json assertion. To add a Json assertion, right-click on the HTTP Request sampler, then select Add > Post Processor > Json Assertion.
Configuration
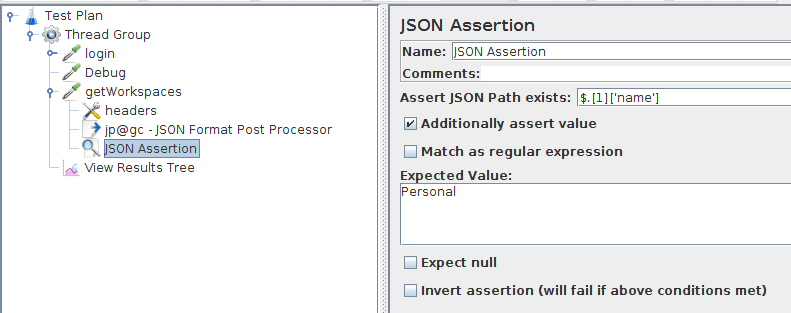
The Json assertion is configured as following:
- Assert Json Path Exists:
$.[1]['name']refers to the second workspace returned, and takes itsname, - Additionally Assert Value: Check to enable checking the value of the
namefield, - Expected Value: should be
Personal.
Execution
Suppose we assert the expected value is Other instead of Personal.

As expected, the assertion fails with the following message:
Assertion error: false
Assertion failure: true
Assertion failure message: Value expected to be 'Other', but found 'Personal'
Performance
Of course, you're not constrained to use only Json Assertion. you can also use The JMeter Response Assertion if you want to. It's even beneficial in terms of performance, because the Response Assertion consumes less CPU / memory resources than the Json assertion according to our Assertions Performance Comparison Table.
Simulating Dynamic Behavior
Now that we know how to login on a Json Rest API and send requests to access protected endpoints, let's see how we can simulate a dynamically behaving user with JMeter.
That's the final part of this tutorial:
- First, we're going to extract a random workspace ID, (will be
${workspaceId}) - Second, we're going to query the projects of that workspace using the endpoint
/projects/by-workspace/${workspaceId}/DESIGN.
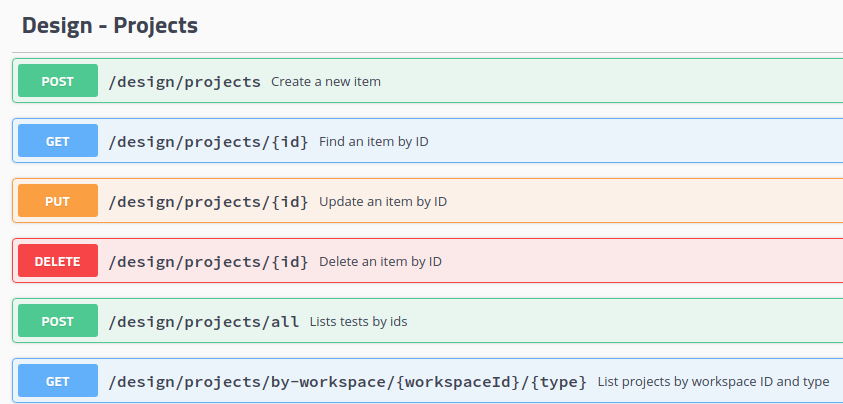
The last Rest API endpoint interests us. We're going to call it from JMeter, but first we need to extract a random workspaceId.
Extracting WorkspaceId
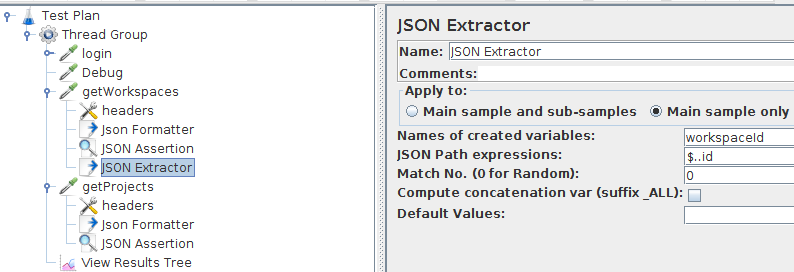
The extractor is configured as a post-processor of the getWorkspaces request with the settings:
- Name of created variables:
workspaceId, - Json Path Expressions:
$..id, - Match No:
0, which is random.
This extracts a random workspaceId, and puts it in the ${workspaceId} variable.
Querying Projects
Finally, we need to query the projects according to the previously extracted workspaceId. For this purpose, I have duplicated and modified the previous request to gain some time.
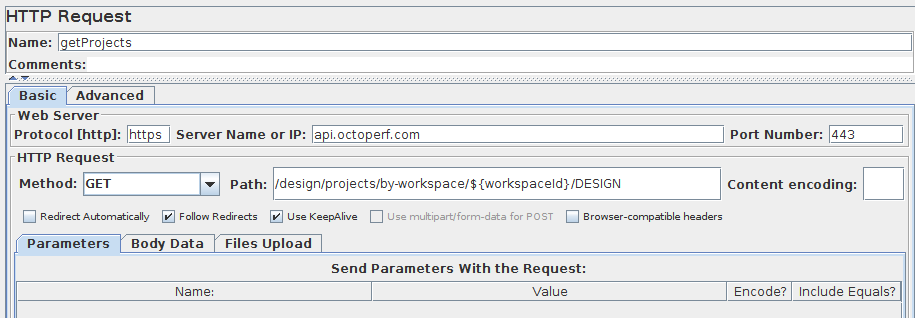
Here we have setup an HTTP request to query the projects of a workspace:
- Http Method: must be a GET request, no parameters involved,
- Http Scheme:
httpssince our Rest API is secured by SSL, - Hostname:
api.octoperf.com, - Path:
/design/projects/by-workspace/${workspaceId}/DESIGN.DESIGNstates for projects enclosed within a workspace. (and not within a result, which would beRESULT)
I guess we're ready to run a quick iteration to try this out!
Viewing Results
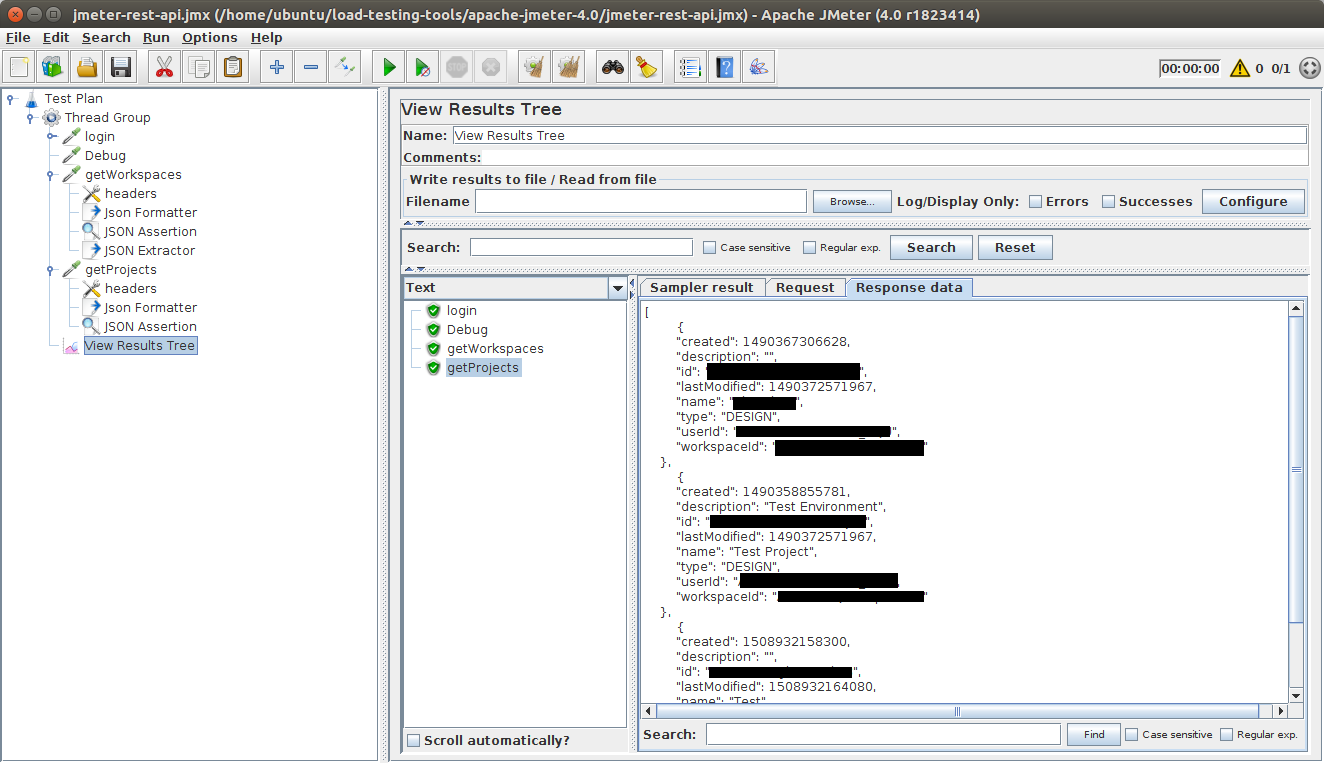
If we execute the user multiple times, we see that the response varies depending on the random workspaceId being extracted.
Final Words
JMeter is really well suited for Rest API Testing, especially those based on the Json Format. Testing Json APIs with JMeter is really easy.
Basically, if you master the JMeter components mentioned above, you're good to go!
If you want to dig further, I strongly suggest you to read our articles about:
- JMeter JsonPath Extractor: extract any content from a Json response, learn more about the JsonPath syntax,
- JMeter Json Assertion: specifically assert json responses,
- And JMeter Plugins like the Json Formatter may make your life a lot easier by formatting the output.
Feel free to share this guide if you found it useful!
