
Sharing variables between Virtual Users
Summary
Sharing dynamic values across Virtual Users is often required in realistic load-testing scenarios. AMQP provides a simple and reliable way to exchange data between scripts by pushing values into a queue and retrieving them later. The tutorial demonstrates how one Virtual User can publish generated IDs to RabbitMQ, while another consumes them on demand.
CloudAMQP is used as the example broker, but the method works with any AMQP-compatible system. OctoPerf integrates easily with these HTTP endpoints, allowing both insertion and retrieval of queued values. Combined with JSON extractors, this approach makes cross-VU coordination straightforward and scalable.
Table of Contents
Introduction
Variables, may they be constant or dynamic, are an essential part of load testing.
We already learned how to manipulate these values by extracting and re-injecting them inside one Virtual User.
But what if we need to share these values between several Virtual Users ?
In this blog post, I will show you just how to do that, using the MQ technology.
What is AMQP ?
Advanced Message Queuing Protocol (AMPQ) is an open standard protocol that allows messages exchanges between different systems.
In practice, it lets you store values in queues, values that can be retrieved later by simple calls.
Here are the basic terms used while using AMQP:
The queue
A queue stores messages/values, until they are consumed, in the manner of a buffer.
Queue message
The value that you want to store in the queue, in order to retrieve it at a later time
Exchanges
Several type of exchanges are available, they determine the way the message will be transferred to the queue(s)
Binding
A binding is a rule that links a type of exchange to your queue(s)
Sharing variables through MQ between Virtual Users
In this exemple, we are going to use CloudAMQP, a RabbitMQ powered SaaS.
Let's say we have 2 kinds of Virtual Users:
VirtualUser1 is creating customers in the application, which dynamically generates a contactID.
VirtualUser2 is updating customers informations, by using several contactID generated by VirtualUser1
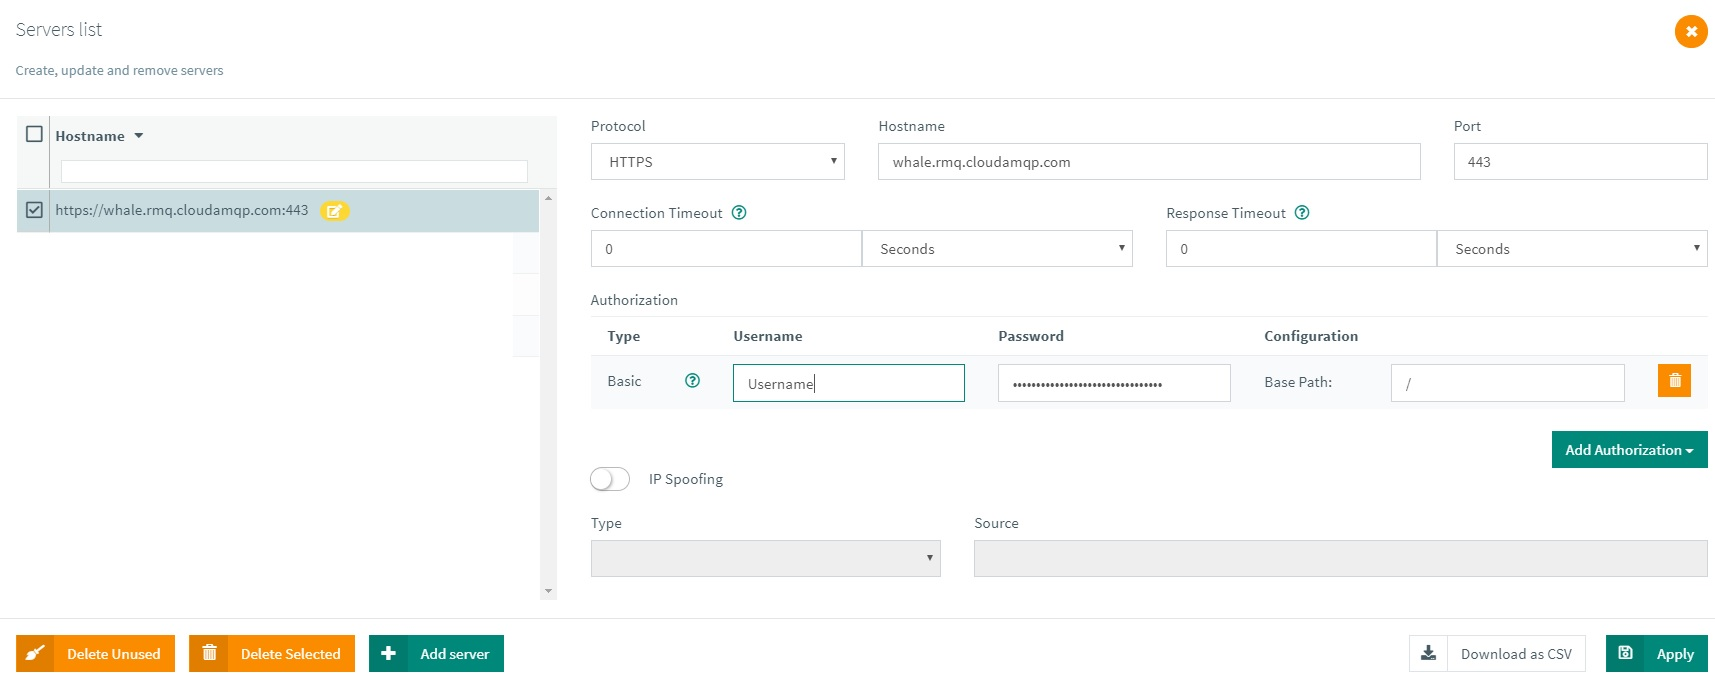
First, you will need to fill your CloudAMQP authentication information in Octoperf :
Then, VirtualUser1 you will need to insert a contactID everytime it is generated.
Insert Value
The call, using CURL, should look like this :
curl -XPOST -d'{"properties":{},"routing_key":"my_key","payload":"my body","payload_encoding":"string"}' https://username:password@hostname/api/exchanges/vhost/amq.default/publish
routing_key lets you use bindings if necessary, in our case we will put the name of our destination queue so that it will be sent directly to it. You will have to create that destination queue on your AMQP Admin Page. In the following exemple, the destination queue was named "MQ"
Payload should contain the value injected.
In Octoperf, the request will be translated as the following :

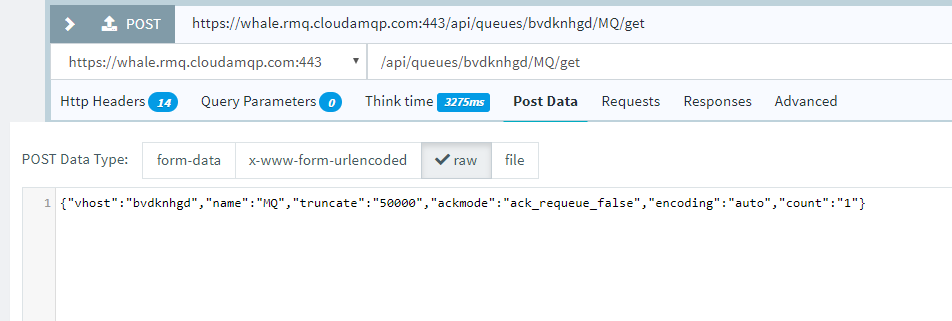
VirtualUser2 will have to get one of these contactID by querying the queue.
Query Value
The call, using CURL, should look like this :
curl -XPOST -d'{"vhost":"username","name":"your-queue","ackmode":"ack_requeue_false","encoding":"auto","count":"1"} https://username:password@hostname@whale.rmq.cloudamqp.com/api/queues/your_vhost/your_queue/get
ackmode:ack_requeue_false ensures that your value will be erased after being extracted.
count lets you decide how many values you need to extract
In Octoperf, the request will be translated as the following :
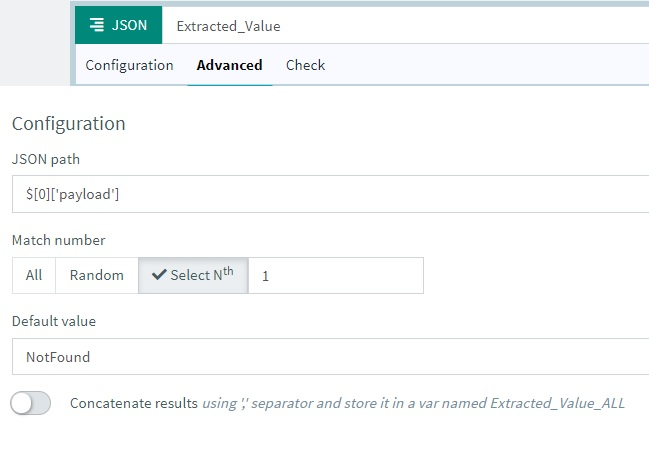
Finally, you can extract the contactID from the response of that call using, for example, the Octoperf JSON extractor :
Resources
If you would like to try it out yourself, you can use the following materials:
- Create a Free AMQP account,
- Producer virtual user,
- Consumer virtual user.
After importing, make sure to replace the credentials from the servers menu and you should be good to go.