Galera Cluster for Rancher
This blog post is the second part of a series of three tutorials dedicated to Rancher High-Availability. We previously installed a replicated Master-Master MySQL database. This time we will install a MariaDB Galera Cluster on three servers.
The trick is that we are going to use a first Rancher to install the database cluster for a second Rancher server (used in production). In the end we will have one Rancher server that manages its own database cluster!
This tutorial explains:
- How to install a standalone Rancher server,
- How to install a MariaDB Galera cluster,
- How to export the Rancher database into Galera,
- How to restart Rancher using the database cluster.
Prerequisites
You need at least three servers for the Galera database cluster and one for Rancher (can be the same as one of the database servers):
- Galera Server One available at IP address 1.1.1.1,
- Galera Server Two available at IP address 2.2.2.2,
- Galera Server Three available at IP address 3.3.3.3,
- Rancher available at IP address 4.4.4.4.
All servers must have Docker installed.
Installing Rancher
Rancher is a platform for running Docker containers. We use it at OctoPerf to dynamically start load injectors on AWS and Digital Ocean cloud providers.
Single node install
Connect to the server dedicated to Rancher using SSH. Then according to the Rancher documentation the installation can be done using a single shell command:
sudo docker run -d -p 8080:8080 rancher/server
Notes:
No need for the
--restart=unless-stoppedflag as this server is temporary.
When the install is done you may list the docker containers to ensure that Rancher has started: docker ps
CONTAINER ID        IMAGE               COMMAND                  CREATED             STATUS              PORTS                              NAMES
7749a2575d6b        rancher/server      "/usr/bin/s6-svscan /"   21 seconds ago      Up 19 seconds       3306/tcp, 0.0.0.0:8080->8080/tcp   hopeful_newton
As we can see in the container list, the rancher container exposes the port 8080 to everyone 0.0.0.0:8080->8080/tcp. In a web browser you can access Rancher at http://4.4.4.4:8080/
When we connect we are prompted to install at least one host:

Registering Hosts
We are going to install 3 hosts, one on each of our database server:
- Click on the Add Host button.
- Rancher asks you for the Host Registration URL. You can leave the default value which is the public IP address of your Rancher Server.
- Click on Save.
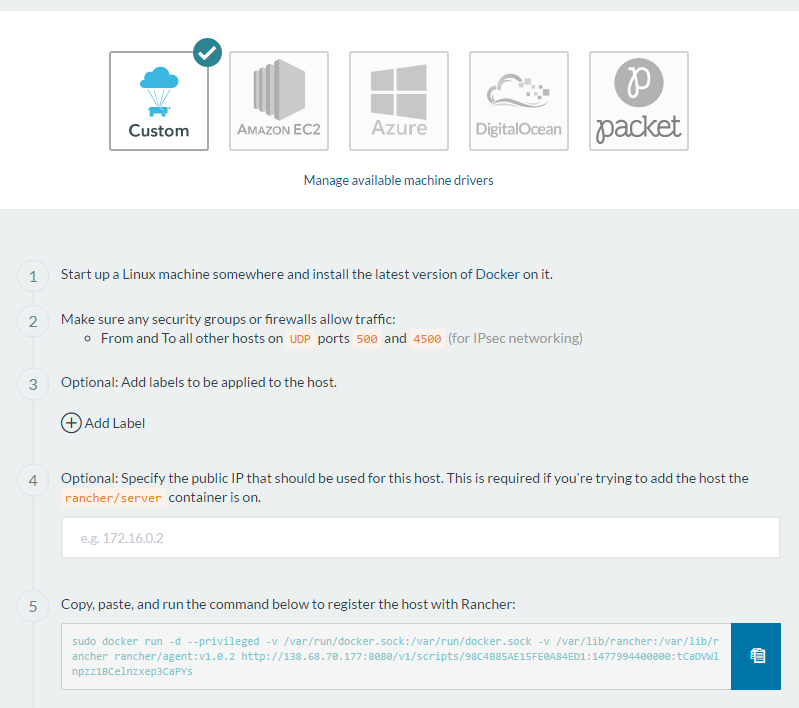
A 6 steps wizard appears :

Installing Rancher host is simple as copy/pasting the command given on Step 5 of the wizard into each database server.
Note:
If your Rancher is running on one of your database servers, the Host will be installed on the same machine as Rancher.
In this particular case you need to specify the server public IP address on Step 4 of the wizard before you copy/paste the command line.
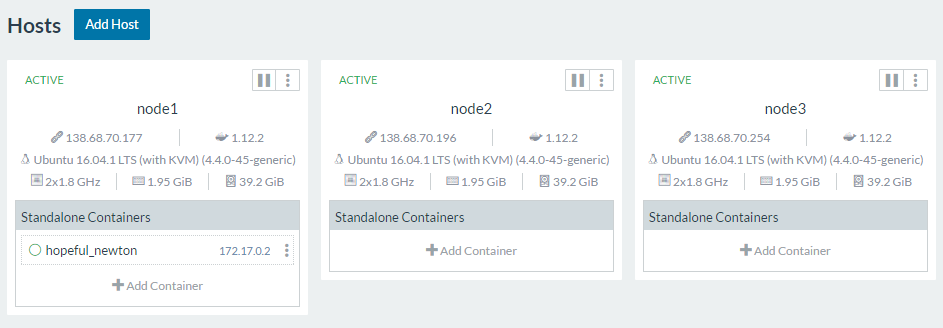
Go back to the hosts list when the installations are done. You should now see all 3 registered hosts:

You should have three hosts running. Check that all hosts have a public IP (not 172.17.0.1 which is the docker bridge). Refer the the Note above otherwise.
We will need to identify our main database server (here node1). To do so edit it (the 3 dots > Edit) and add a label main=true.
Installing Galera
Galera is a multi-master MySQL cluster. We are going to use it as an highly available database for our Rancher server.
The Rancher multi-nodes documentation states that we must use either a replicated MySQL database or a Galera cluster.
As Rancher comes with a pre-configured MariaDB Galera Cluster we'll go for that option this time.
To get started copy the rancher-compose.yml and docker-compose.yml files from https://github.com/rancher/catalog-dockerfiles/tree/master/galera/0.2.0 to your local disk.
The docker-compose file contains the password used for the MySQL root user and for the cattle database :
MYSQL_ROOT_PASSWORD: "password"
MYSQL_DATABASE: "cattle"
MYSQL_USER: "cattle"
MYSQL_PASSWORD: "cattle
In any case you need to edit the Galera load balancer configuration:
galera-lb:
  ports:
  - 3306:3307/tcp
  labels:
    io.rancher.scheduler.affinity:host_label: main=true
  tty: true
  image: rancher/load-balancer-service
  links:
  - galera:galera
  stdin_open: true
We removed the expose: - 3306:3307/tcp configuration and replaced it with a public mapping. By doing so our database cluster is public. You then need to secure it like we did for the MySQL database and restrict the connection to only your Rancher server.
We also added the Rancher scheduler configuration to force the LB to start on node1 (the host with the Label main set to true).
Note:
You may also keep the default value (
expose: - 3306:3307/tcp) and try to connect Rancher to the Galera LB using its private IP (10.42.x.x).But in my case that only worked if the Rancher server was running on the same server as the Galera load balancer.
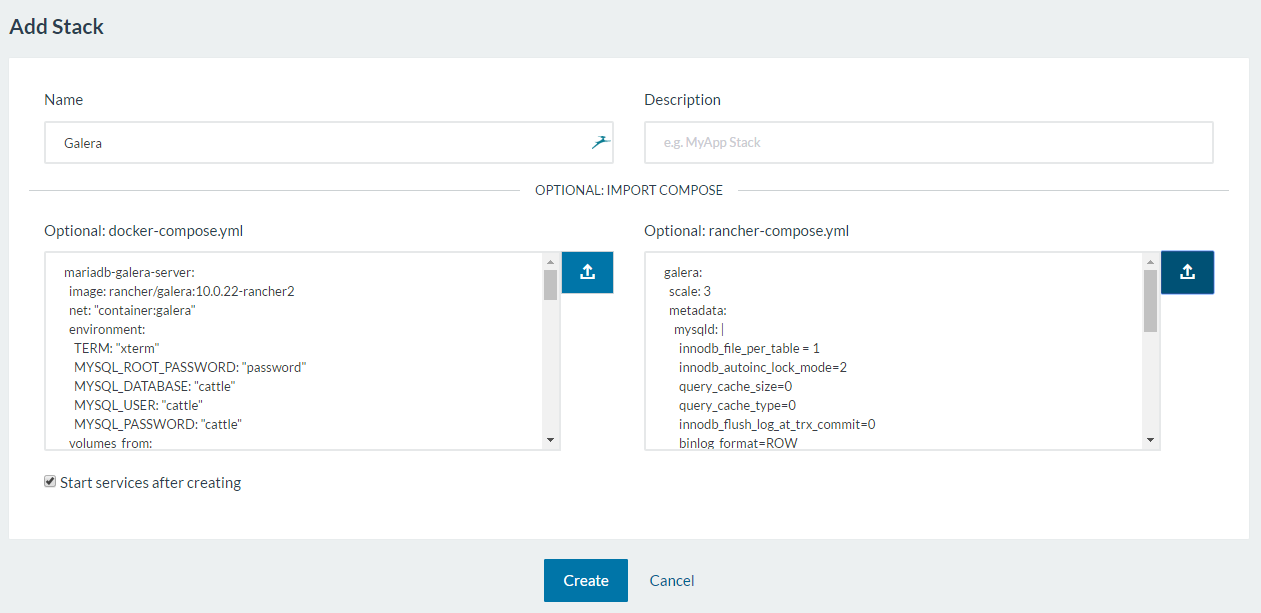
In the Rancher administration console, head to the Stack menu and click on the Add Stack button:

Type the name 'Galera' and select the two files you previously downloaded from the Rancher GitHub. Click on Create.
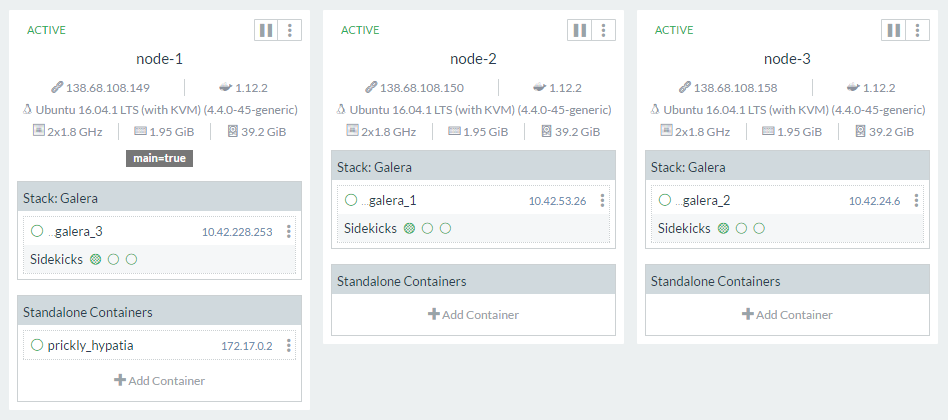
The whole stack may take a few minutes to start (as multiple Docker images must be downloaded). Then you should see it in the Rancher console:

You can see in the Host view that a Galera container is installed on each node:

Checking the connection
Let’s check that we can connect to our cluster! Open an SSH terminal on the Rancher server and install the MariaDB client:
sudo apt-get update
sudo apt-get install mariadb-client-core-10.0
You may also use a Docker container such as the MySQL one to check the connection.
Connect to the Galera cluster mysql -u cattle --password=cattle -h 1.1.1.1 cattle.
The connection should be successful:
root@node1:~#
Enter password:
Welcome to the MariaDB monitor.  Commands end with ; or \g.
Your MariaDB connection id is 9
Server version: 10.0.22-MariaDB-1~jessie-wsrep-log mariadb.org binary distribution, wsrep_25.11.r21a2415

Copyright (c) 2000, 2016, Oracle, MariaDB Corporation Ab and others.

Type 'help;' or '\h' for help. Type '\c' to clear the current input statement.

MariaDB [cattle]>
Exporting the database to Galera
Now you need to copy Rancher's internal database into the Galera Cluster you just created.
- Open the Rancher UI (http://4.4.4.4:8080) and go to the Admin > High-Availability page,
- Click on the Export Database button (Step 1),
- A SQL dump file is downloaded to your computer,
- Upload it to your Rancher server.
Note:
If your Rancher server is not secured you can also download it directly using wget:
wget http://4.4.4.4:8080/v1/haconfigs/haconfig/dbdump
To import the dumpfile, execute the following command from your Rancher server:
mysql -u cattle --password=cattle -h 1.1.1.1 cattle < rancher-mysql-dump.sql
You can then connect to the database and check that the Rancher tables are present:
MariaDB [cattle]> show tables;
+-----------------------------------------------+
| Tables_in_cattle                              |
+-----------------------------------------------+
| DATABASECHANGELOG                             |
| DATABASECHANGELOGLOCK                         |
| account                                       |
| agent                                         |
| agent_group                                   |
| audit_log                                     |
| auth_token                                    |
| backup                                        |
...
Restart rancher using Galera
List the Docker containers running on the Rancher server: docker ps.
Identify and stop Rancher: docker stop <containerId>.
Note:
You can also directly remove the old Rancher:
docker rm -f <containerId>.
Then you simply need to start a new Rancher server using the Galera cluster for its database:
docker run -d -p 8080:8080 \
--restart=unless-stopped \
-e CATTLE_DB_CATTLE_MYSQL_HOST=1.1.1.1 \
-e CATTLE_DB_CATTLE_MYSQL_PORT=3306 \
-e CATTLE_DB_CATTLE_MYSQL_NAME=cattle \
-e CATTLE_DB_CATTLE_USERNAME=cattle \
-e CATTLE_DB_CATTLE_PASSWORD=cattle \
-v /var/run/docker.sock:/var/run/docker.sock \
rancher/server
Conclusion
We now secured our Rancher database by using a Galera Cluster. But once again it's not really HA yet!
- The Galera load-balancer only runs on one server (the main database server). It's a Single Point Of Failure.
- We still have only one Rancher server. We need to install a multi-nodes Rancher.
