
Rancher 2: Getting Started
You may be in the situation like me: you have already extensively used Rancher v1.6.x but would like to migrate to Rancher v2.0.x. For those who don't know, Rancher is a Docker Orchestration tool.
While trying to setup a development machine with Rancher 2 installed, I came accross numerous different issues. I've spent hours figuring out how to fix them.
This tutorial is all about sharing the tips and tricks to avoid you waste time:
- The requirements to run Rancher 2 (based on Kubernetes)
- How to configure Rancher 2 to run on different ports (other than the default
80and443), - How to run Rancher 2 with an Ingress Controller on the same machine,
- How to link your Ingress to an external service (like Jenkins),
- Migrating existing services from Rancher
v1.6.xto Rancherv2.0.x, - And many other tips along the way!
Let's see how to setup and run Rancher 2.
Architecture
As it's our development and CI machine, we need to run the following services:
- Jenkins: Our Continuous Integration server. It must be accessible through https://jenkins.octoperf.com from the internet, and runs on my local area network machine on port
8082(but I don't want to expose this port to the internet), - Sonarqube: Our code analysis tool. It must be accessible through https://sonarqube.octoperf.com from the internet, and runs inside a Docker container,
- Elasticsearch: the database must be running locally for testing purpose. I use it when running our platform from our sources.
As we can see, I need to be able to root traffic from DNS hostnames (like jenkins.octoperf.com) to a very specific application on my machine.
As a first step, I have created a NAT Rule to root all traffic on port 443 to my local machine (with IP 192.168.0.xx on my local area network).
internet
    | Static Public IP
[ ADSL Router ]
    | NAT on port 443
[ 192.168.0.xx ]
    | Listening on port 443
[ Ingress ]
    |
[ ? ]
The schema above shows how it will operate. And here we have the following problematics:
- Both sub-domains
jenkins.octoperf.comandsonarqube.octoperf.compoint to the same public IP (my Broadband Router's one). How to direct traffic arriving on the same IP to different applications? - How to run Rancher and Ingress on the same computer? After all, both need to listen on port
443by default.
jenkins.octoperf.com   --|                 |-> 192.168.0.xx:8082
                         | xxx.xxx.xxx.xx  |
sonarqube.octoperf.com --|                 |-> sonarqube:9000
I'm going to answer to those questions below. Let's go!
Machine Setup
Introduction
I think it's worth to talk about the differences between Rancher v1.6.x vs v2.0.x.
Rancher v1.6.x was mostly written in Java. It's based on a proprietary system called Cattle to handle much of the fluff including networking (via IPSec Tunneling), DNS, health checks, clustering on multiple hosts and more. At that time, there was no clear winner between several clustering systems:
- Apache Mesos: Apache Mesos abstracts CPU, memory, storage, and other compute resources away from machines,
- Kubernetes: an open-source system for automating deployment, scaling, and management of containerized applications,
- And Cattle: Rancher's own system.
After a while, Kubernetes took the lead. It emerged as the standard for clustering apps with Docker on clusters of nodes. So naturally, instead of reinventing the wheel, Rancher was rewritten from the ground in GoLang to become an installation and management tool for Kubernetes clusters.
I must admit, I was quite dubitative we would ever need Kubernetes. It looked like a huge Steam Powered machine from the outside. We like when things are simple and maintainable. And we were happy with Rancher v1.6.x too.
But, as we decoupled our product from Rancher v1.6.x just a few weeks ago, we now have the possibility to upgrade our Rancher server with much less pain.
Prerequisites
I'm going to setup Rancher 2 on my development machine with the following configuration:
- CPU: 2x Intel Xeon E5 2670,
- RAM: 128GB,
- Disk: 480GB SSD Disk,
- Operating System: Ubuntu 16.04LTS.
The setup is based on Ubuntu Linux. As I haven't any machine running on Windows, I can't really help you in that case. And yes, I know the machine is pretty insane with 16 cpu cores and 128GB RAM. But I got it for about 1000€ several years ago, and I really think it's the perfect setup for a development machine.
Docker Setup
As specified in Provisioning a Linux Host, in Rancher's documentation, only a few Docker versions are compatible with Rancher 2:
1.12.6,1.13.1,- and
17.03.2.
Why? To make things simple: because Rancher 2 is a tool to setup and administer a Kubernetes Cluster.
I naïvely tried to install it on my machine with Docker 18.05-ce: needless to say it failed with an obscur error like:
Found state.json: 931882e24ff0ef67b0e8744dbf1f7e04fd68afe714a29a2522293312824f3c51
time="2018-05-06T06:09:15Z" level=info msg="Execing [/usr/bin/nsenter --mount=/proc/21787/ns/mnt -F -- /var/snap/docker/common/var-lib-docker/aufs/mnt/5d00bd40adec6662aaec8ea2a5f5ce6a332e9dbfad087a008c5c89b7cac4c22f/usr/bin/share-mnt --stage2 /var/lib/kubelet /var/lib/rancher -- norun]"
Error response from daemon: {"message":"No such container: kubelet"}
Error: failed to start containers: kubelet
I would recommend downgrading to Docker 17.03.2-ce:
- First remove any existing
docker-cepackage:sudo apt remove docker-ce --purge, - Then, download Rancher's 17.03.2.sh installation script,
- Open a terminal and run
chmod +x 17.03.2.sh && ./17.03.2.sh.
If you try to install this version today without this script on Ubuntu 16.04LTS, It will fail! The reason is the oldest available version on Docker's APT repository is 17.04-ce.
Now that we have the right Docker version, let's see how to run Rancher 2.
Rancher Container
As it's a development machine, i'm going to follow the Single Node Installation guide. As explained in this documentation, Rancher 2 requires both HTTP port 80 and HTTPS port 443 to be mapped.
| Protocol | Port | Source | Description |
|---|---|---|---|
| TCP | 80 | Load balancer/proxy that does external SSL termination | Rancher UI/API when external SSL termination is used |
| TCP | 443 | etcd nodes, controlplane nodes, worker nodes Hosted/Imported Kubernetes, any that needs to be able to use UI/API | rancher agent, Rancher UI/API, kubectl |
Also worth to mention: directly map /var/lib/rancher volume to your local disk. That way, you won't loose any configuration if you need to destroy and start Rancher's container again.
You're supposed to run the following command to run Rancher 2 as a container:
docker run -d --restart=unless-stopped \
  -p 80:80 -p 443:443 \
  -v /host/rancher:/var/lib/rancher \
  rancher/rancher:v2.0.2
Make sure to use rancher/rancher:v2.0.x, where v2.0.x must be replaced by the latest Rancher 2 version. Sadly latest cannot be used as v1.6.x releases also write to this tag.
But, I'm planning to run an Ingress controller:
internet
    |
[ Ingress ]
--|-----|--
[ Services ]
Typically, an Ingress is a load-balancer which exposes your services to the internet through a unique port. There are various possible strategies including the one i'm interested in, Name based virtual hosting:
jenkins.octoperf.com   --|                 |-> 192.168.0.xx:8082
                         | xxx.xxx.xxx.xx  |
sonarqube.octoperf.com --|                 |-> sonarqube:9000
But, the problem i'm facing:
- I want to use Ingress: because my machine is running both Sonarqube and Jenkins for our dev team,
- Ingress uses port
80and443, like Rancher 2 does. There is a port conflict, both cannot use the same, - Jenkins is not running within Kubernetes, but as a simple Tomcat on my own machine. But, it needs to be accessible from inside Kubernetes from the Ingress.
Let's see how to solve those issues.
Rancher Setup
Listening Ports
We're going to configure Rancher slightly differently than with the default setup:
- Port
80left closed: as it's only used when Rancher is behind a load-balancer that does SSL Termination, i'm not gonna use it. My Rancher is not accessible from internet, - Port
443: i'll use port8443instead.
Thus, to start Rancher, i'm going to use the following command:
docker run -d --restart=unless-stopped \
  -p 8443:443 \
  -v /host/rancher:/var/lib/rancher \
  rancher/rancher:v2.0.2
Great! Now we have Rancher 2 running on port 8443. But it's not finished yet:
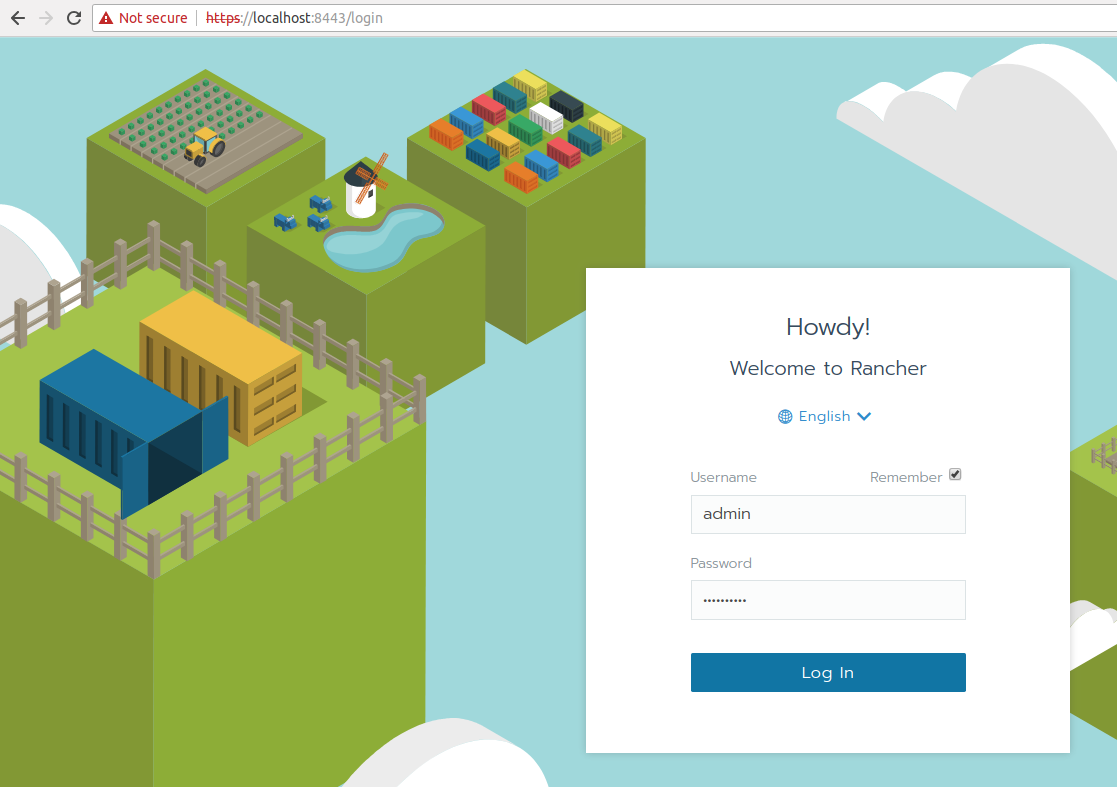
- Browse to
https://localhost:8443, - Setup the admin account and login,
- Click on
Globalin top left corner, - Then select menu
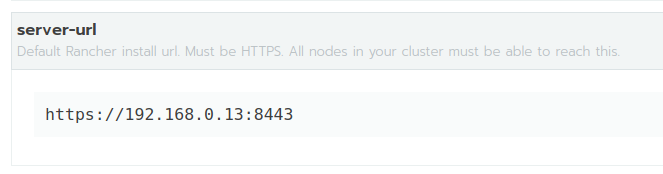
Settings, - Locate
server-urlsetting. It should be something likehttps://192.168.0.xx, (My LAN uses192.168.0.0/24CIDR) - Change this setting to
https://192.168.0.xx:8443.
IMPORTANT! Changing Rancher's
server-urlsetting must be done prior to installing nodes within a cluster. Otherwise agents won't be able to communicate with Rancher.
Great! Rancher is now properly configured, it's time to create a new cluster and add a node. We have solved upfront the following issue: Free the 443 port so that Ingress can use it.
Cluster Setup
To setup a new cluster:
- Click on
Clusters, - Then click on
Add Clusterbutton, - Select
Customflavor: when installing the node on your own machine, - Give the cluster a name and click on
Next, - In node roles, select all options (
etcd,controlplaneandworker): our single-node local setup has all the components in one place.
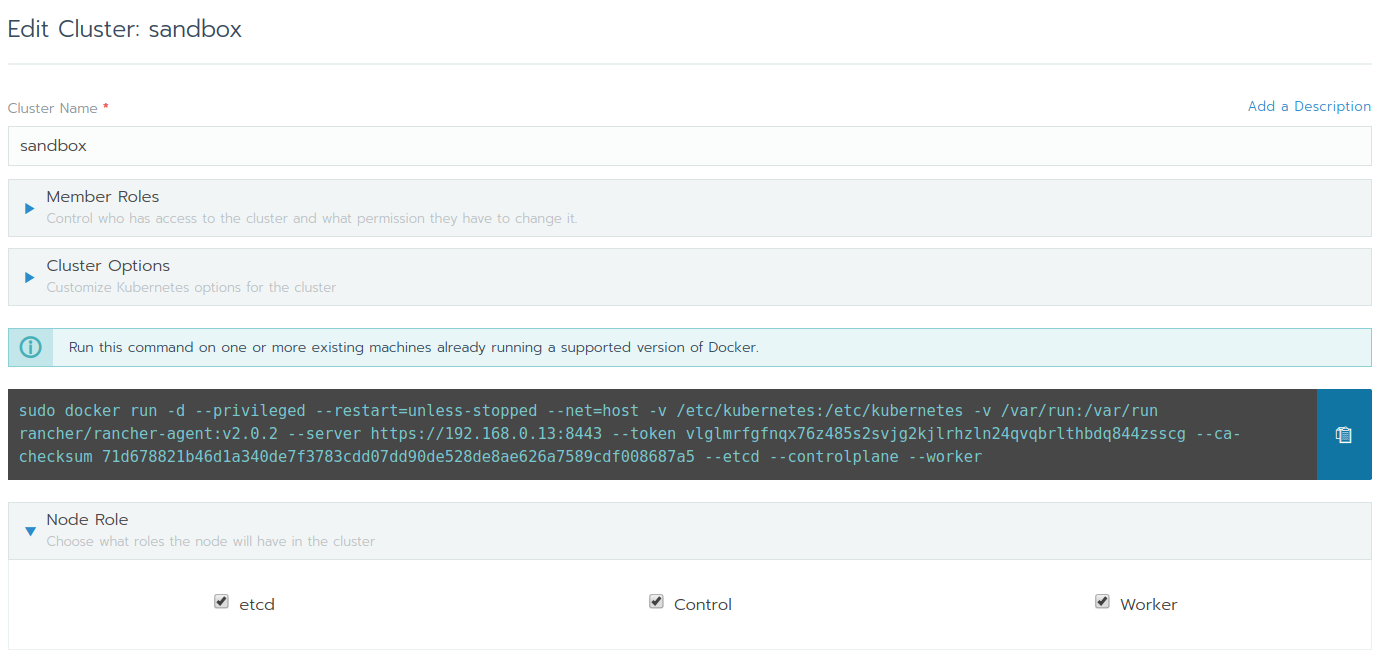
The command-line to launch an agent should look like:
sudo docker run -d --privileged \
--restart=unless-stopped --net=host \
-v /etc/kubernetes:/etc/kubernetes \
-v /var/run:/var/run rancher/rancher-agent:v2.0.2 \
--server https://192.168.0.xx:8443 \
--token xxxxx --ca-checksum xxxxxxx \
--etcd --controlplane --worker
Copy the command and run it on the same machine. After a few minutes, the node should be registered and initialized. It can take 10+ minutes because it downloads many Rancher Kubernete Engine (known as RKE) docker images.
Node Cleanup Script
Suppose you have forgotten to properly configure Rancher prior to launching the agent. Or for some odd reasons, the node is not working properly. The following script cleans:
- All the containers running on the machine: be careful, Rancher server container will be wiped too (except you should have mapped
/var/lib/ranchervolume to a local folder so that's not a problem), - And all volumes: yes all of them.
#!/bin/sh
docker rm -f $(docker ps -qa)
docker volume rm $(docker volume ls -q)
cleanupdirs="/var/lib/etcd /etc/kubernetes /etc/cni /opt/cni /var/lib/cni /var/run/calico"
for dir in $cleanupdirs; do
  echo "Removing $dir"
  sudo rm -rf $dir
done
Prior to finding this script, I tried to reinstall a node without cleaning the mess. Trust me, you can spend hours trying to figure out why it's not working. Simply clean the host, and launch an agent again (make make sure to check etcd, controlplane and worker roles othwerwise it won't work either).
That being said, you should now have:
- Rancher running on port
8443, - The local machine node registered within your cluster,
- And port
80and443free for use!
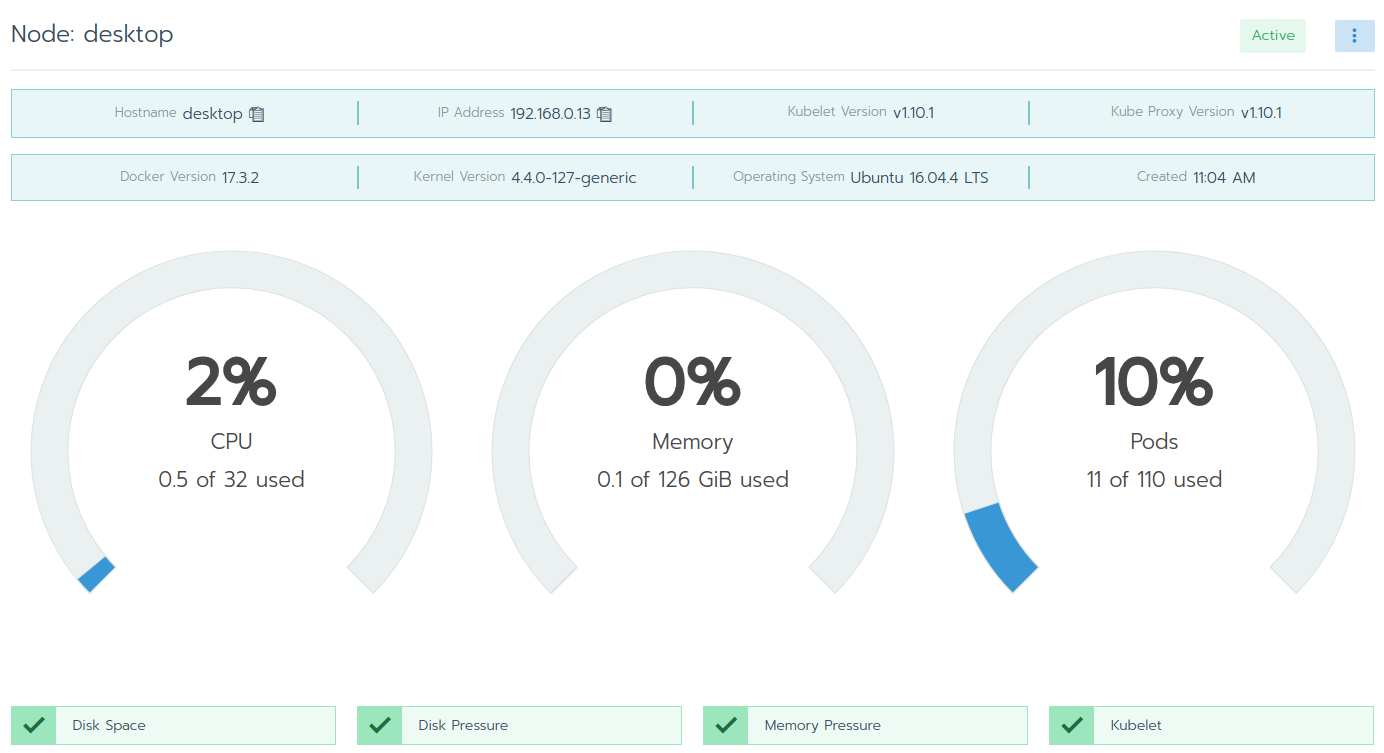
As you can see, everything should be marked as green. Let's now setup the dev environment!
Ingress Setup
What is an Ingress? It's a load balancer: it receives incoming HTTP and HTTPS traffic respectively on port 80 and 443 and redirects it to the appropriate service inside the Kubernetes cluster.
Why should I use an Ingress? It's much cleaner to have a single port open to the internet than multiple ones. Also, it offers advanced features like Hostname routing: routing traffic to a target service depending on the requested hostname.
Setup is going to be performed in Default project under default namespace. Namespaces are useful when cluster need to be shared accross multiple teams. In our case, we simply don't need to mess up with multiple namespaces.
SSL Certificate
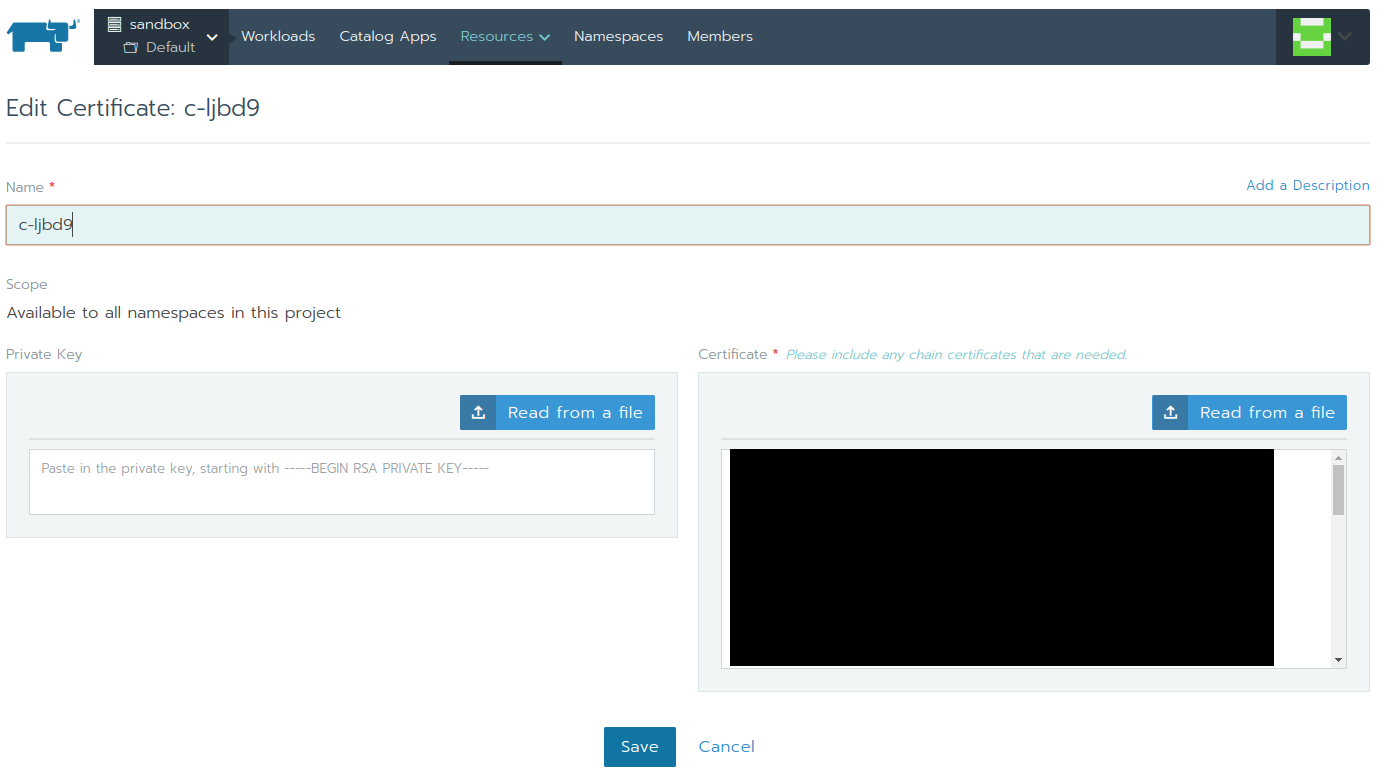
The first thing i'm going to setup is the SSL Certificate. It seems surprisingly easy to setup (and in fact, it is), but if you do anything wrong here the Ingress Controller won't start. We have a paid SSL Certificate provided by Namecheap:
- Domain:
*.octoperf.com, it's a wildcard domain which protects any sub-domain ofoctoperf.com(so it includeswww.octoperf.combut notoctoperf.comitself), - Expiration: in about a year.
We're going to use this SSL certificate when setting up the Ingress controller later. Why? Because I have opened port 443 to my machine and only want to serve Jenkins and Sonarqube through HTTPS:
- Click on
Defaultproject under your cluster in the top left corner, - Click on
Resources, thenCertificatesfrom the drop-down, - Click on
Add Certificatebutton. - Provide both the
Private Key(usually a.keyfile provided by the SSL Authority) and theCertificate(usually.crtfile).
I made the mistake to provide both Certificate Authority chain and certificate within the Certificate box. It causes the Ingress controller to fail to start. Don't make the same mistake!
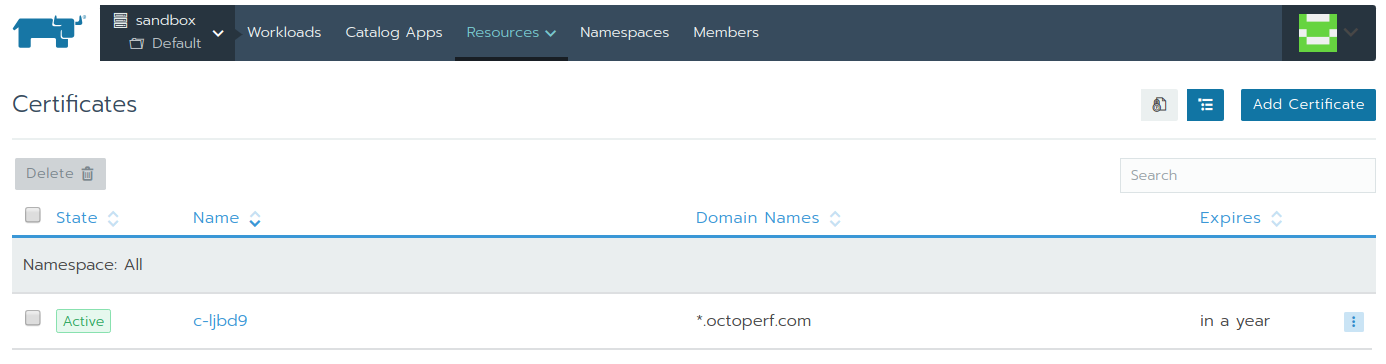
By clicking on the certificate, make sure all information have been read properly by Rancher. Rancher automatically installs this Certificate within Kubernetes and makes it available to Ingress Controllers.
In fact, when the SSL certificate was wrongly configured (i've put CA Authority chain in certificate), the ingress controller returned a blank web page containing:
default backend 404
And the served SSL certificate was named as Kubernetes Fake SSL Certificate. It took me some time to figure out the certificate was wrongly configured. Once i've put the content of the .crt file within the Certificate field, the ingress controller worked properly.
Jenkins External IP
As explained earlier, my Jenkins server is deployed within a Tomcat server running through a terminal directly on port 8082. Why? Because it needs Docker and few other things installed on my machine to run our CI tasks. I usually start it like this:
ubuntu@desktop:~/apache-tomcat-8.5.15$ ./bin/catalina.sh run
We could probably containerize it by building an image with appropriate tools and configuration. But, it's also interesting to see how to redirect traffic outside the Kubernetes cluster.
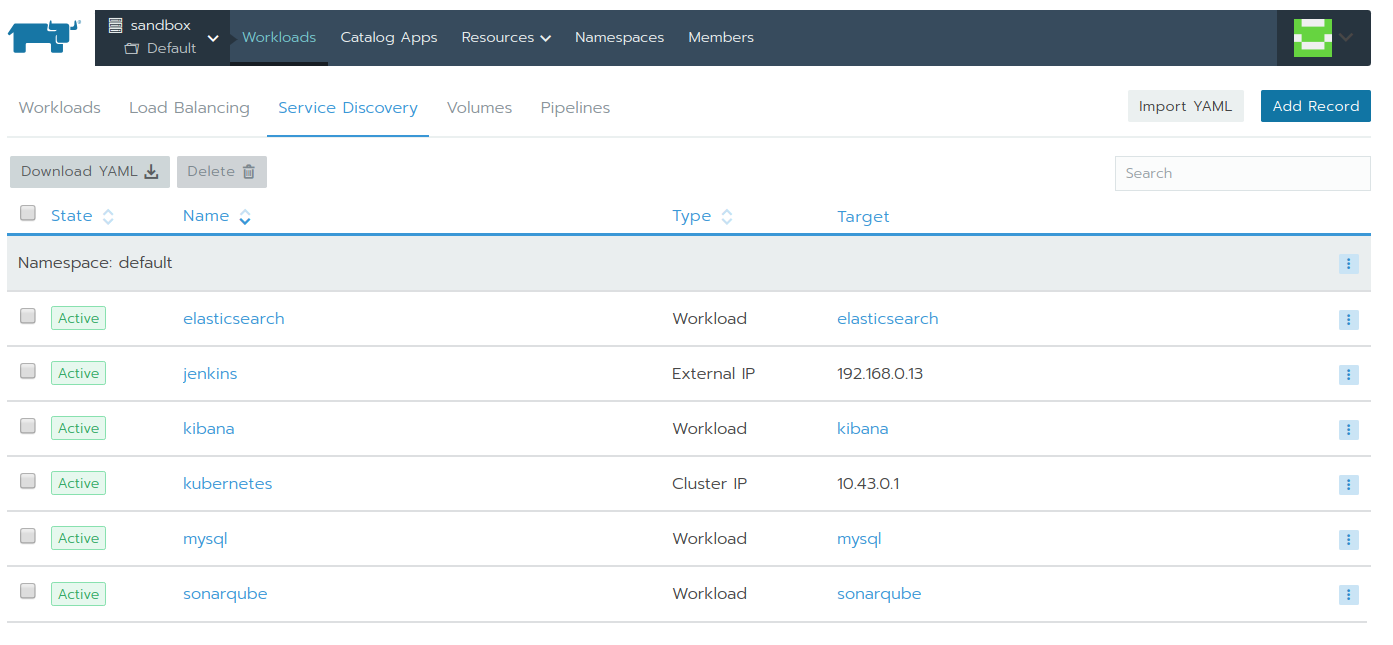
In order to do this, we need to create an External IP service:
- Click on
Defaultproject under your cluster in the top left corner, - Click on
Workloads, - Then click on
Service Discovery, - Click on
Add Record.
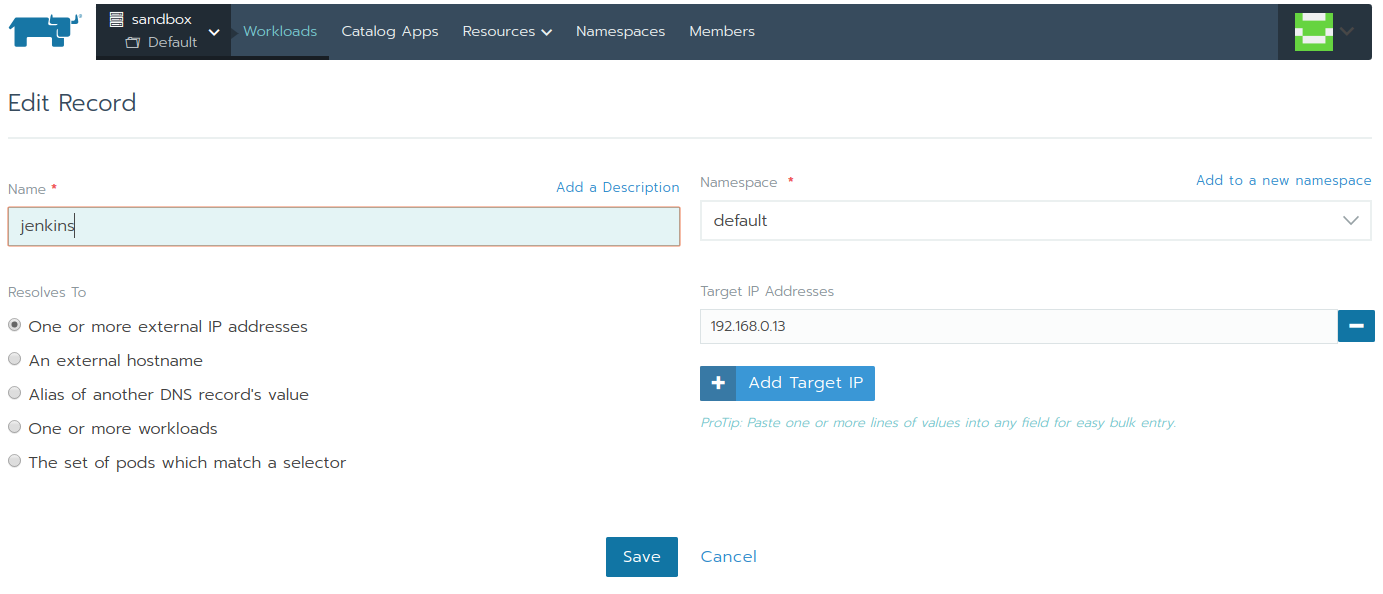
Then, it's time to create an External IP service:
- Name:
jenkins, - Resolves To: one or more external IP addresses,
- Namespace:
default, - Target IP Addresses:
192.168.0.13(my local IP).
Then click on Save. The problem is, the External IP service points to the TCP port 42 by default. Our Jenkins server is running on port 8082. It took me hours to figure this out!
I diagnosed the issue by running the kubectl command through Rancher:
- Select the cluster (
sandboxin my case) from top left corner, - Click on
Launch kubectlbutton, - Enter command
kubectl describe svc jenkins.
The result should look like the following:
# Run kubectl commands inside here
# e.g. kubectl get all
> kubectl describe svc jenkins
Name:              jenkins
Namespace:         default
Labels:            <none>
Annotations:       field.cattle.io/creatorId=user-g6tb7
                   field.cattle.io/ipAddresses=["192.168.0.13"]
                   field.cattle.io/targetDnsRecordIds=null
                   field.cattle.io/targetWorkloadIds=null
Selector:          <none>
Type:              ClusterIP
IP:                None
Port:              default  42/TCP
TargetPort:        42/TCP
Endpoints:         192.168.0.13:42
Session Affinity:  None
Events:            <none>
It appears that endpoint is 192.168.0.13:42. This is wrong because I want it to point to port 8082 (where my Jenkins server runs).
We need to edit the rule YAML configuration to change the default port 42 to 8082:
- Next to the
jenkinsrule, click onView/Edit YAML, - Find
targetPort: 42and replace bytargetPort: 8082(because8082is the port where my Jenkins server is running), - Click on
Save.
Now we have a working service pointing to my Jenkins server running on my local machine in a regular process.
Sonarqube Workload
As we also want a Sonarqube server (purposely for code defect analysis), let's create a workload which spins up a Pod running it. Basically, it's equivalent to launching a single container on my local machine, but through Kubernetes:
- Click on
Defaultproject under your cluster in the top left corner, - Click on
Workloads, - Click on
Deploy.
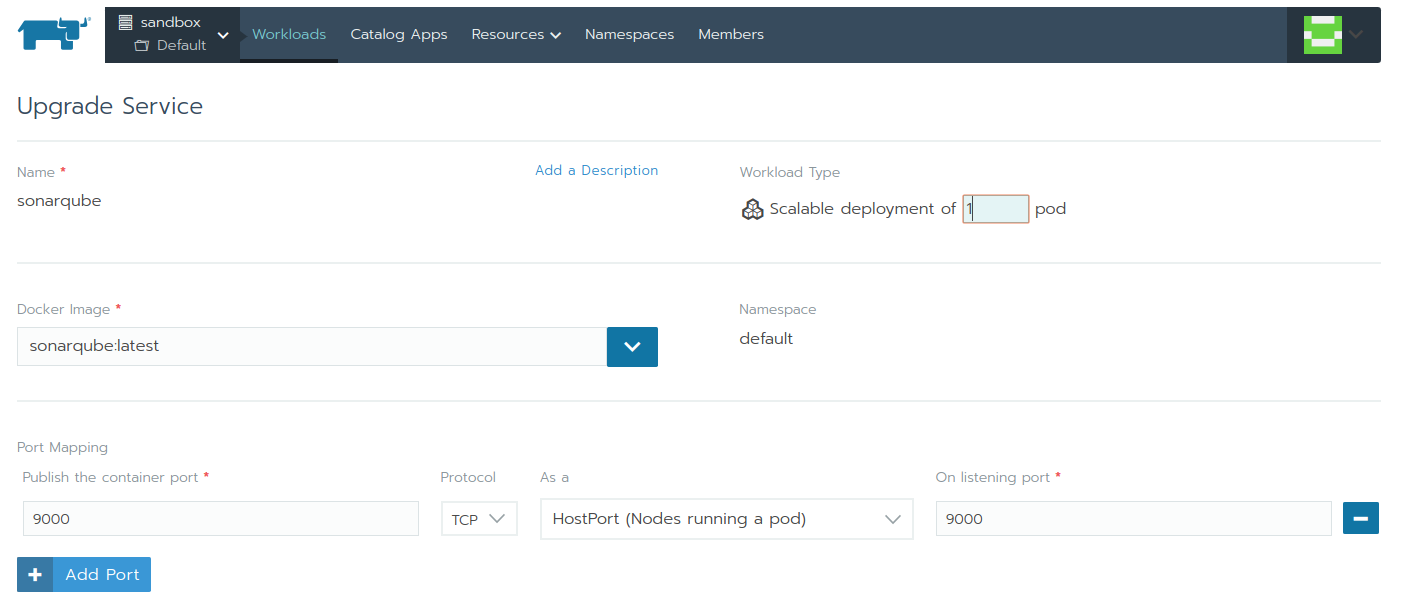
Sonarqube is going to run inside a workload (equivalent to a container):
- Name: i've put
sonarqube, - Workload type: Scalable deployment of 1 pod, (running only a single instance on my machine)
- Docker Image:
sonarqube:latest, - Port Mapping: publish the container TCP port
9000as AHostPorton listening port9000. (Jenkins needs to access it throughhttp://localhost:9000)
IMPORTANT Beware using
NodePortorHostPortin production. It can lead to port conflicts on shared clusters. Also,NodePortonly allows ports>= 30000to be selected. Should you enter an invalid value, and the pod will fail to start with an obscur error.
I have also a few other specific configuration like:
- Environment variables:
SONARQUBE_JDBC_URLpointing to my MySQL container with valuejdbc:mysql://mysql:3306/sonar, - Volumes: I have mapped both
/opt/sonarqube/dataand/opt/sonarqube/extensions/pluginsto my local disk usingBind-Mountvolume type.
Now that we have both Sonarqube and Jenkins running, we can setup the Ingress Controller with the appropriate rules.
Ingress Rules
Let's now create an ingress controller (equivalent to a load-balancer). It will redirect incoming traffic on port 443 on my machine to the relevant service:
- Click on
Defaultproject under your cluster in the top left corner, - Click on
Workloads, - Then click on
Load Balancing, - Finally, click on
Add Ingress.
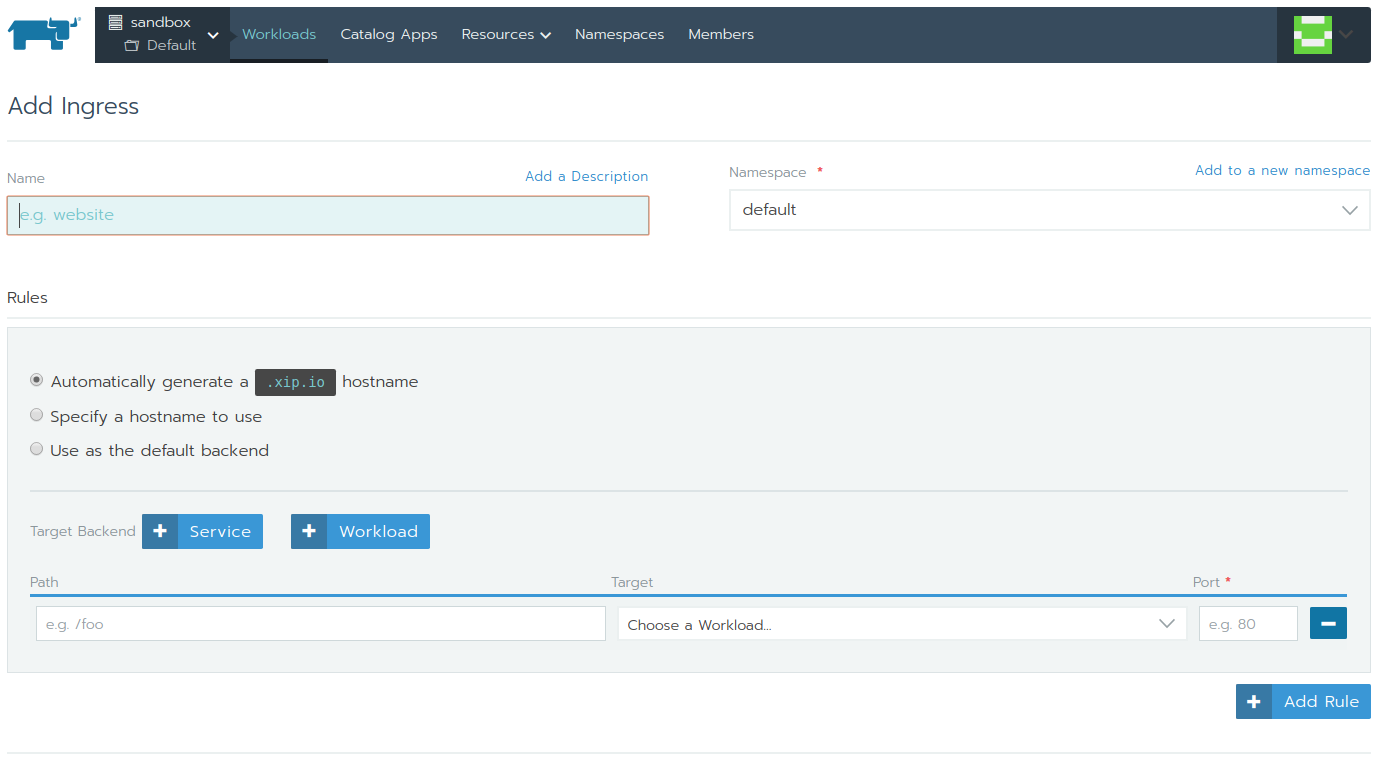
The ingress controller requires a bunch of settings:
- Name: name it the way you want. I named mine
ingress, - Namespace: the
Defaultproject is being located indefaultnamespace, - Rules: that's where the real configuration begins. Those rules tell the ingress how to direct incoming traffic to the right services.
Let's see the rules I have setup to map our 2 hostnames to the sonarqube workload and jenkins service.
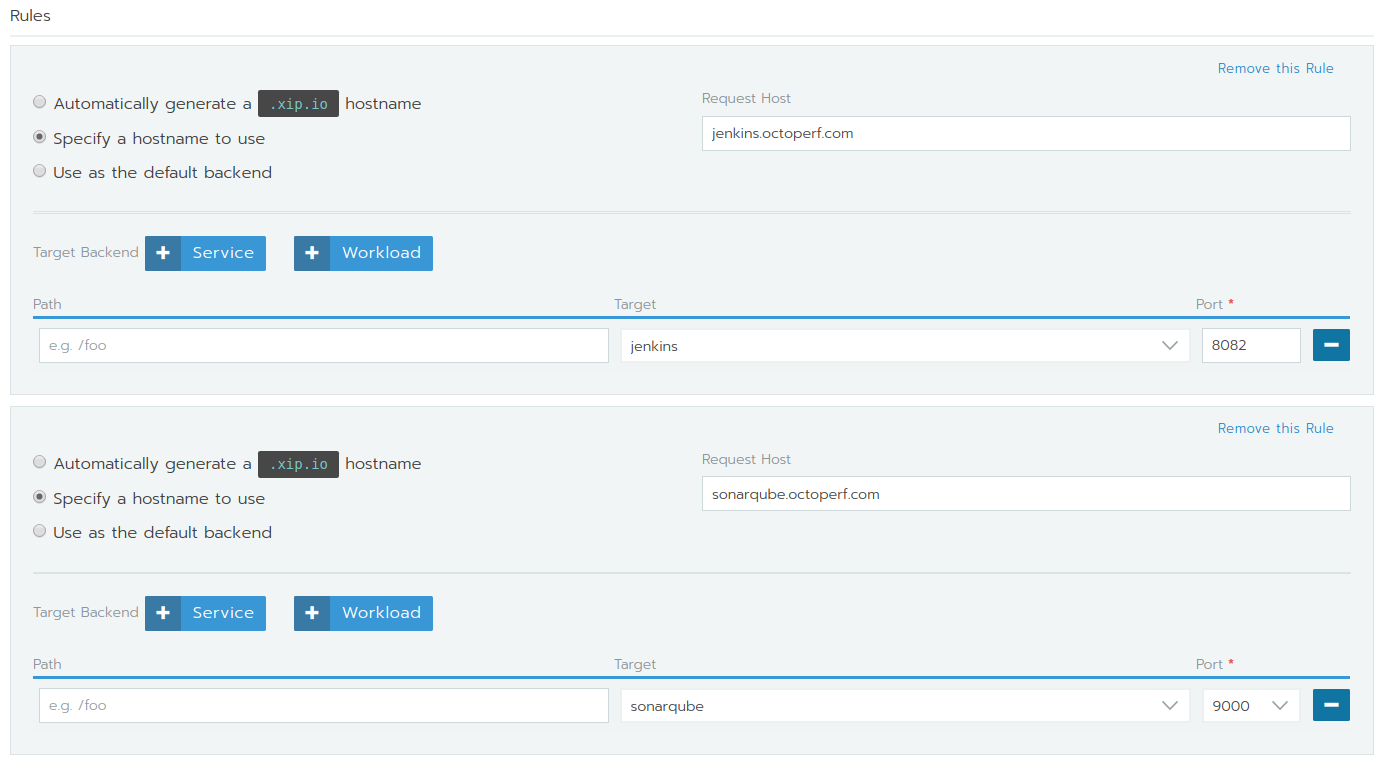
First we have the jenkins rule:
- Specify a hostname to use: with
Request Hostbeing set tojenkins.octoperf.com. That means all HTTPS traffic requesting access to this host is redirected to the selected service, - Path And Target: I've added the
jenkinsservice as target, on port8082.
Second, we have the sonarqube rule:
- Specify a hostname to use: with
Request Hostbeing set tosonarqube.octoperf.com. That means all HTTPS traffic requesting access to this host is redirected to the selected service, - Path And Target: I've added the
sonarqubeworkload as target, on port9000.
Ingress SSL Certificate
Then, we need to specify the SSL Certificate we have previously provided to Rancher.
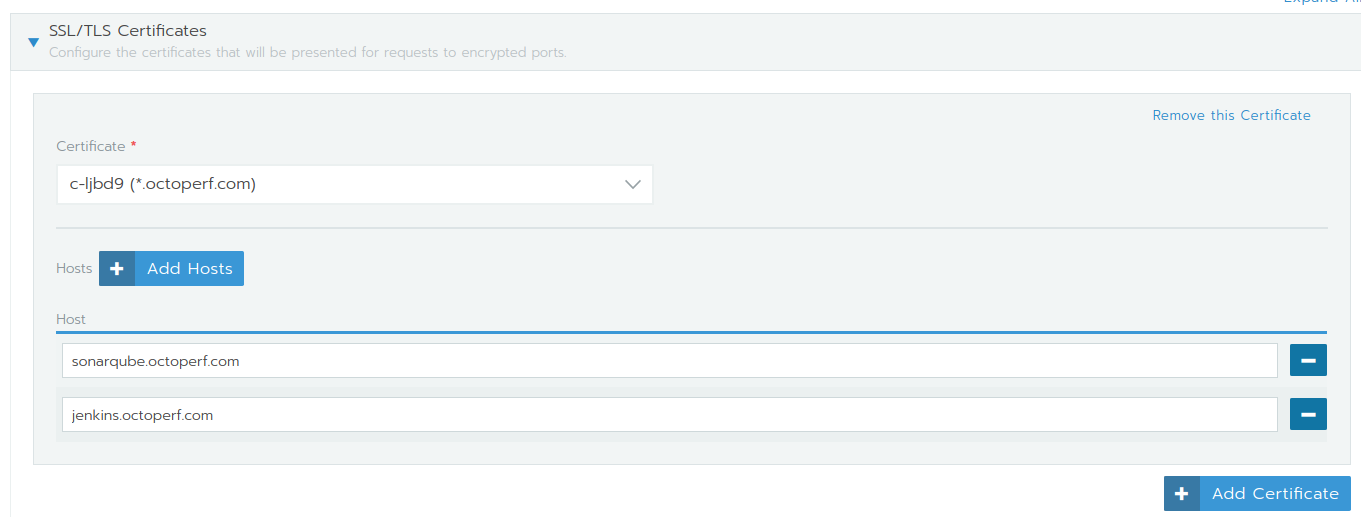
I have provided our paid wilcard SSL Certificate (but there are free alternatives like Let's encrypt) and specified the two hostnames it covers. Click on Save to save and create the Ingress controller.
Now we're able to browse to https://sonarqube.octoperf.com and see Sonarqube's web interface.
v1.6.x to 2.0.x
Migration
Rancher v2.1.x should provide a migration script to convert docker-compose.yml and rancher-compose.yml to Kubernetes YAML deployment configuration files. That being said, I don't think it's that difficult to migrate your services manually.
We have only about 5 services running on our production servers. And most of them only involve mapping volumes and connecting services to the load balancer. I plan to migrate our production services from Rancher v1.6.x to Rancher v2.0.x manually by:
- Downloading the whole
v1.6.xconfiguration as a ZIP, - Creating manually the services and workloads by analogy on Kubernetes.
In fact, v1.6.x services and v2.0.x workloads are highly similar: almost same image, port and volumes configuration wizards.
Which is Better?
Is Rancher 2.0.x better than Rancher 1.6.x? I was first sceptical. After all, Kubernetes seemed like a huge machinery to use it on our production servers just to run a dozen containers on 3 machines.
But, Kubernetes looks like a much more robust technology developed by Google compared to Cattle, the system created by Rancher. Comparing them is a bit like comparing Apples and Oranges too because Cattle does more things than Kubernetes (it takes care of inter-machine networking through IPSec too).
Having had Rancher v1.x in production for years (we started using Rancher at v0.42), I can confidently say we have sweated several times when upgrading Rancher. Cattle isn't working perfectly and sometimes messes our services. Service upgrades may fail unexpectedly and the reason will never be known.
But, that doesn't breach my faith in Rancher v2.0.x for the very simple reason: they dropped Cattle and adopted Kubernetes. And that's probably the single best decision (along with dropping MySQL, Thank you!) they have made to improve Rancher's stability.
Feel Free to share your own experience with Rancher!