
Uploading Images in JMeter
In this blog post we are going to look at simulating the process of uploading an image to a web-site in JMeter for load testing.
Image uploading is a relatively straightforward process to simulate in JMeter. There are a few different ways to approach this, which we will explore.
In order to follow along, you can download the sample JMX here.
Setup
Before we start to look at uploading images with JMeter, we are going to need a test site to use.
We will use an online image upload site for the purposes of this blog post as it makes the upload process easy to follow.
You may have an image upload site in your organization, or you may be reading this for understanding how to upload image to an application you are testing. In any case, the way JMeter handles uploading images is the same.
The image upload site we are using is imgbb.
We have created a free account for the purposes of this post, which we will sign-in to:

Once we signed in, we will create an Album to upload an image to.

We are now all set to simulate uploading an image using JMeter.
Designing our load test
It would not be representative of a real business scenario to just show you the part where an image gets uploaded. Naturally, it is always more complicated than that. Usually, you usually must follow a business process in your application to upload an image. For example:
- Logging on
- Navigating to the upload screen
- Selecting an upload location
- Uploading the image
- Viewing the image
- Logging off
This is a theoretical flow but is there to show you that just showing the upload request would not help you design your performance test for uploading an image. Therefore, we will include the entire flow in the script.
The way you will be uploading images to any application you are testing will be unique to your organization. For the purposes of this post, we will simulate this flow:
- Logon to imgbb
- Select the OctoPerfTest folder we created
- Upload a test image
- View the uploaded image
- Logoff
This will help you understand the image upload request. It will also help demonstrate that performance testing image uploads requires correlating requests.
For the purposes of this blog post we will only simulate a single user. The web site is a free to use image server and it would not be ethical or practical to run a load test against their infrastructure.
Recording our load test
For the purposes of this post, we will record our test using the JMeter Test Script Recorder
If you are using OctoPerf, you can import a HAR recording instead.
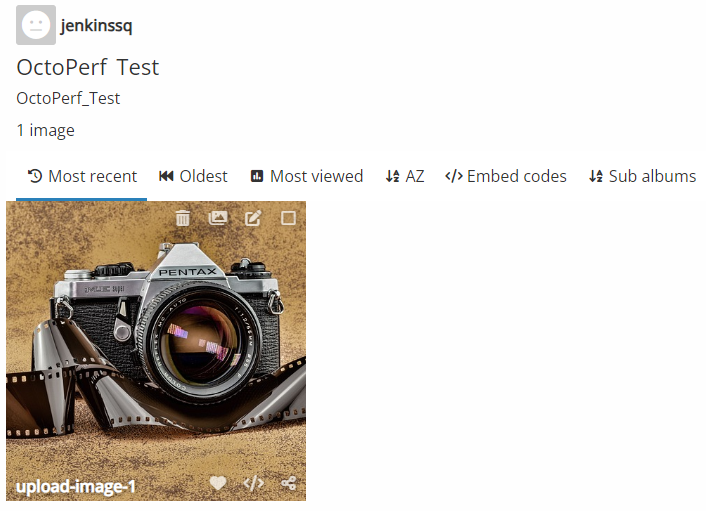
For the purposes of our first test, we will upload a single image, this one:

This is called upload_image_1.jpg.
Once we have finished recording, we have this script, I made sure to name the steps as I went along to match the steps defined in the previous section.

If we take a look at the album we created we can see the image.
We will tidy up our test and correlate the values that are generated dynamically so we can re-run the test.
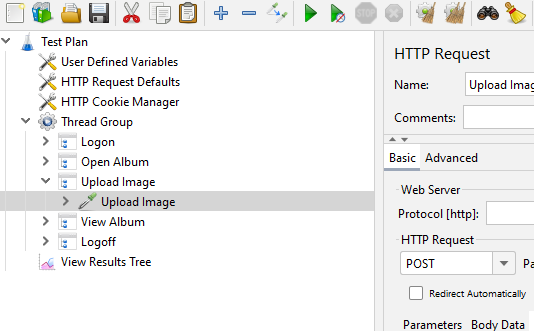
Image upload request
This is the part of the test that manages the image upload.
It is a POST request with several parameters, but this may change for your application.

And the location of the image to upload:

You can see that there are 3 columns:
- File Path that contains our image name,
- Parameter Name that contains the ‘name’ attribute in the page source,
- MIME Type ()‘Multipurpose Internet Mail Extensions’), which determines the type of file to be uploaded. This can be used for any type of Image as per the image file extension. We can use image/jpeg, image/png, etc.
The File Path should contain the full path to our image and can either be the physical location or the relative location.
Below is an example of the way we specify the location of images. It also has the ability to use the file separators based on the operating system, so you can develop on Windows and execute on Linux with no change to the way the path is specified.
This is done by adding a User Defined Variable to our test.

Then, we created a variable called imagePath and then assign the following value to it:
${__BeanShell(import org.apache.jmeter.services.FileServer; FileServer.getFileServer().getBaseDir();)}${__BeanShell(File.separator,)}Images${__BeanShell(File.separator,)}
If we break this down, we have a number of BeanShell statements in a single line:
${__BeanShell(import org.apache.jmeter.services.FileServer;
Now, we import the JMeter library to use. This provides access to the File System.
FileServer.getFileServer().getBaseDir();)}}
We then get the base directory of the location of the current test.
${__BeanShell(File.separator,)}
It's time to add a file separator based on your operating system.
Images${__BeanShell(File.separator,)}
We then have a hardcoded Images followed by another file separator.
So, if we assume that this is our file structure for our test we have built:

then our User Defined Variable, which we have called imagePath, will resolve to:
C:\ImageUploadTest\Images\
If we look in the Images folder, we have added another image.

Updating our test to use our image location variable and change the image to use `upload-image-2.png.

If we execute our test again and look at our test album we created we can see that both images are now there.

Uploading multiple images
We saw how we can make our image upload test as robust as possible by using a user Defined Variable to handle our file locations. Now, we will look at handling the upload of multiple images.
When running a performance test, you are going to want to upload more than one image. The best way to handle this in your JMeter test is to parameterize your file names as well.
A straightforward way is to define your image names in a flat file and then reference that file.
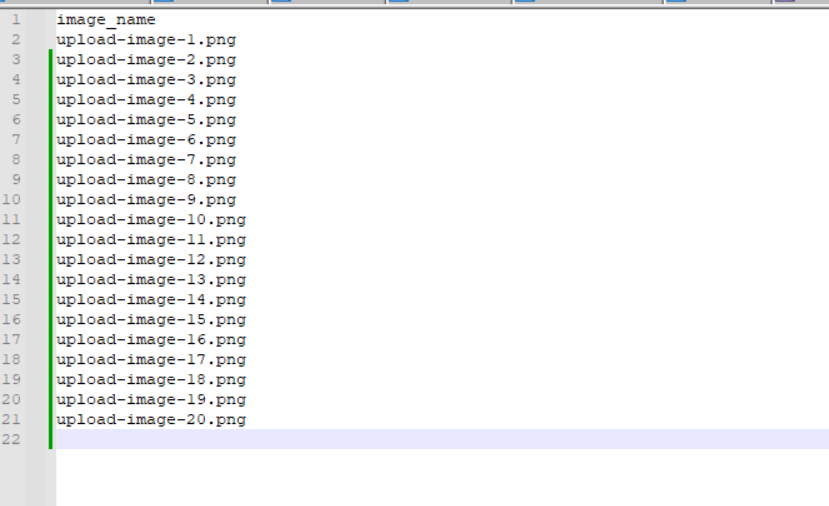
We will create a file called image_name.dat and add our 2 images to it.

We will save this file in the same location as our JMeter test.

We now add a CSV Data Set Config element to our JMeter test and configure it like this:

We set our Recycle on EOF to be False and Stop thread on EOF to be True.
We can then update our Thread Group to have a Loop Count set to Infinite, so when the CSV file reaches the end it will terminate the threads.

We then change our HTTP request to use a variable and not a hard-coded value for the image name.

Let's delete our uploaded images from our album so we can re-run our test.

After executing the test, both files have been added:

Performance Scenario
We already stated that we will not run a performance test against the upload site we have been using to develop our test and have already stated the reasons for not doing so.
However, we can still cover which subtle changes to our test will make it more suitable for a long running performance test.
This was our test if you recall.

We had a single thread and we had loop count set to Infinite as the CSV Data Set Config element managed stopping the threads once the end of the file was reached.
We also had our test set up to execute the whole image upload journey for each iteration, where you would probably want to log on once and open the album we created.
We would then upload images at a rate indicative of your performance throughput rates and then we would finish the journey by viewing the uploads and logging off.
This is a hypothetical scenario and yours may be different, but for the purposes of demonstrating how we can update this JMeter test we will use it.
What we are going to do is replace the calls to the upload image site with dummy calls using a JSR223 Sampler in place of the HTTP Samplers.
The JSR223 Samplers will just be used to output some log information and nothing else. The content of the JSR223 Samplers will be:
log.info("${__samplerName()} - " + ctx.getThreadNum());
where we output the Sampler Name and the Thread Number.
Let’s assume that we want to test the performance of:
- 10 concurrent users logging on
- All 10 users opening the same album
- Each user uploading 10 images
- All 10 users viewing the album
- 10 users logging off
And we want this to happen over a period of 60 seconds.
For the purposes of this scenario, we will hardcode most of the values. In a real performance test scenario, these values would be driven by variables or properties.
Let’s start by looking at the completed scenario now that we have made the updates. We’ll look at the changes we have made to turn our simple test into a test scenario for uploading images.

We have replaced each HTTP Sampler under each JSR223 Sampler with a JSR223 Sampler that outputs some information to the log.
The example below is for Logon, but this is identical to all the other Transaction Controllers except for Upload Image, which we will discuss next.

In Upload Image we have added a Loop Controller where we have hardcoded the number of loops to be 10, in line with the dummy scenario we outlined above.
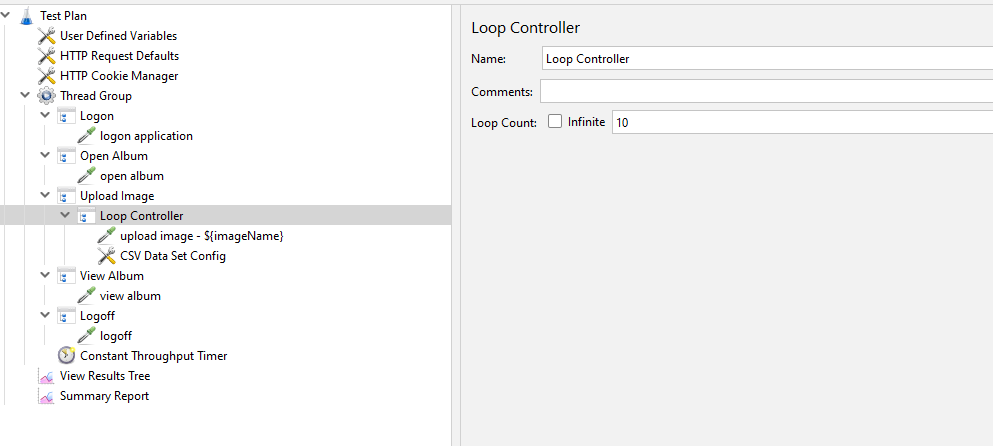
We added our CSV Data Set Config element into the Loop Controller as we want each user in each iteration to pick up a different image from the flat file.

You can see that we have changed the Recycle on EOF to be True and Stop thread on EOF to be False, so that reaching the end of the file does not force the test to stop and the threads cycle around the data file.
As this is a theoretical test, we have added a set of dummy images to the image.name.dat file to give more variety in image names.
We have added the ${imageName} variable to the sampler name that simulates the Image Upload, to demonstrate that a different image is being selected each time.

We have set our Thread Group to have 10 threads and to run for 60 seconds as per our artificial scenario requirements.

We will use a Constant Throughput Controller to control the throughput for our example scenario.
We want each thread to execute all the Samplers once, with the exception of Upload Image which we want each thread to upload 10 images.
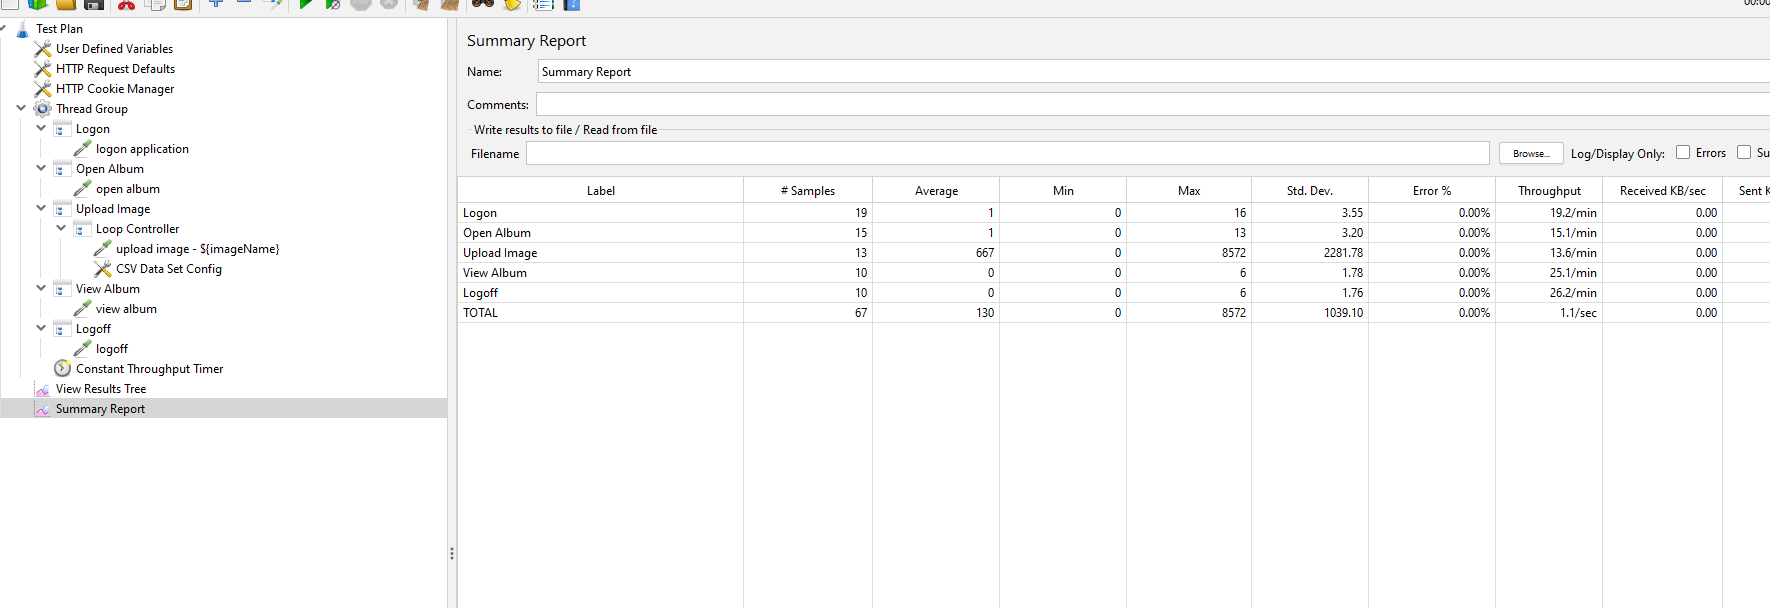
This means that each thread needs to perform 14 samplers in 60 seconds, which means we need our scenario to execute 140 samplers in 60 seconds, as we have 10 threads.

If we now execute our scenario we can see we have reached our throughput goal by checking the Summary Report.
Additional considerations
It is not that difficult to use Groovy as part of a JSR223 Sampler to upload images.
Groovy has a HTTPBuilder Class which allows you to upload multipart files to an endpoint.
If you want to explore this futher there is plenty of examples available online.
Conclusion
Hopefully this has given you some insight into upload images both in isolation and as part of a scenario using JMeter.
The script can be downloaded from here.
We strongly invite you to create a free OctoPerf account and upload it to our design UI if you want to try it quickly. Just make sure to upload the images inside the files menu and update imagePath to resources/ and you're good to go!
