
Base tools for bloggers
To follow up on my article about creating blog based on Jekyll, Bootstrap4, Grunt, Bower and hosted on GitHub pages, I'm adding ways of measuring and increasing the number of visitors.
This article is a quick tutorial to do the same, starting from the blog template:
- Get to know how many visitors are caught in your blog using Google Analytics,
- Generate a Sitemap.xml using Jekyll and feed it to Google,
- Embed Twitter buttons,
- And use Disqus to handle your articles comments.
Google analytics tracking ID
First, we must know how many visitors we get. Google analytics is the most known tool to track visitors.
- Connect to Google analytics using your Gmail account.
- Click on the Admin section,
- On the left column (Account), click on the dropdown menu and then on Create new account
- The following page should appear:
![]()
Fill in the required information. The Account and Website Name are only used for display in Google Analytics, but the Website URL must match your blog URL.
Regarding Data Sharing Options, I left then all activated. You may deselect them if your care about your data privacy. Click on the Get Tracking ID button when you're done.
The next page present us our tracking ID, mine being UA-67116800-1, and a script to include in our HTML pages:
This is your tracking code. Copy and paste it into the code of every page you want to track.
<script>
  (function(i,s,o,g,r,a,m){i['GoogleAnalyticsObject']=r;i[r]=i[r]||function(){
  (i[r].q=i[r].q||[]).push(arguments)},i[r].l=1*new Date();a=s.createElement(o),
  m=s.getElementsByTagName(o)[0];a.async=1;a.src=g;m.parentNode.insertBefore(a,m)
  })(window,document,'script','//www.google-analytics.com/analytics.js','ga');

  ga('create', 'UA-67116800-1', 'auto');
  ga('send', 'pageview');

</script>
That's exactly what we are going to do. With Jekyll it's really as simple as copy/pasting this script into '_includes/foot.html'.
Publish your blog, and you should start getting tracking data after a day or two. To visualize them, connect to Google Analytics and in Home click on All Web Site Data under the folder of your blog:

Adding a sitemap.xml
If you don't know what a sitemap.xml file is, here is the Wikipedia definition:
Google introduced Google Sitemaps so web developers can publish lists of links from across their sites. The basic premise is that some sites have a large number of dynamic pages that are only available through the use of forms and user entries. The Sitemap files contains URLs to these pages so that web crawlers can find them. Bing, Google, Yahoo and Ask now jointly support the Sitemaps protocol.
Since Bing, Yahoo, Ask, and Google use the same protocol, having a Sitemap lets the four biggest search engines have the updated page information. Sitemaps do not guarantee all links will be crawled, and being crawled does not guarantee indexing. However, a Sitemap is still the best insurance for getting a search engine to learn about your entire site. Google Webmaster Tools allow a website owner to upload a sitemap that Google will crawl, or they can accomplish the same thing with the robots.txt file.
XML Sitemaps have replaced the older method of "submitting to search engines" by filling out a form on the search engine's submission page. Now web developers submit a Sitemap directly, or wait for search engines to find it.
So if you want to speed up the crawling of your blog, this is a good option. A lot of visitors might come to your blog from a Google search. (Not that I can confirm it, it is also said that adding links to your blog on Google+ would help to be referenced by Google.)
We already added a sitemap for OctoPerf.com, our JMeter Saas website made using Jekyll. And also for our load testing documentation, made with MKdocs. So this step is an easy one for me. Especially because Jekyll, as usual, comes with the proper plugin for our needs: jekyll-sitemap.
To install it open a terminal and type the command sudo gem install jekyll-sitemap.
Then add the following lines to _config.yml
gems:
  - jekyll-sitemap
Restart jekyll (jekyll serve) and check the _site folder. A sitemap.xml file should be present.
For my blog it contains the following entries (each <url> tag contain an URL our website):
<?xml version="1.0" encoding="UTF-8"?>
<urlset xmlns:xsi="http://www.w3.org/2001/XMLSchema-instance" xsi:schemaLocation="http://www.sitemaps.org/schemas/sitemap/0.9 http://www.sitemaps.org/schemas/sitemap/0.9/sitemap.xsd" xmlns="http://www.sitemaps.org/schemas/sitemap/0.9">
  <url>
    <loc>http://blog.geraldpereira.com/jekyll/bower/grunt/2015/08/31/bootstrap4-blog-github-pages.html</loc>
    <lastmod>2015-08-31T14:00:00+02:00</lastmod>
  </url>
  <url>
    <loc>http://blog.geraldpereira.com/analytics/disqus/twitter/2015/08/31/google-analytics-sitemap-disqus.html</loc>
    <lastmod>2015-08-31T14:00:00+02:00</lastmod>
  </url>
  <url>
    <loc>http://blog.geraldpereira.com/about/</loc>
  </url>
  <url>
    <loc>http://blog.geraldpereira.com/</loc>
  </url>
</urlset>
Google Search Console
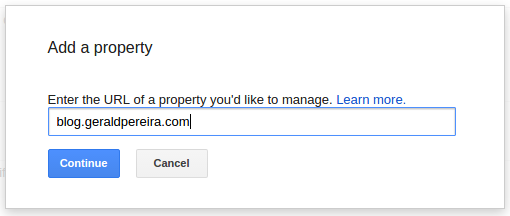
Well ... that's a nice XML we have here. But it's completely useless unless we tell Google about it! To do so connect to Google Webmasters Search Console and click on the ADD A PROPERTY button.
Type your blog URL in the popup and click on Continue:
The next step is to verify your ownership of the given URL. As I still don't like to mess up with DNS configuration, I prefer to use an alternate method. On the Alternate methods click on the HTML tag option:
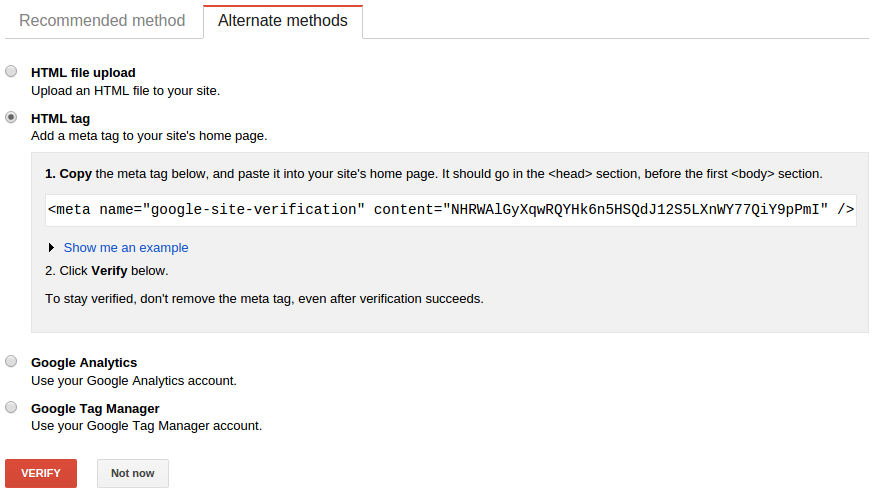
Copy/paste this tag in the '_includes/head.html' file.
Before you ensure Google that you own your blog, you need to build and publish it:
cd blog
grunt build:dist --force
cd ../blog-gh-pages
git add -A
git commit -m "Blog pusblish"
git push
Once this is done you may click on the VERIFY button.
In the dashboard of your blog, navigate to Crawl > Sitemaps:
- Click on the ADD/TEST SITEMAP button,
- Type
sitemap.xmlin the input field, - Click on the Submit Sitemap button.
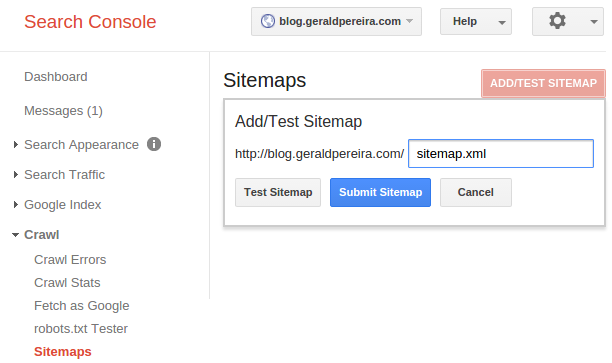
Congrats! Google now knows about your blog pages. You can also do the same for Bing if you think its worth the effort.
Twitter Integration
To bring more visitors to our blog and make them tweet about our post, it may be nice to see how we can integrate Twitter in it.
To be honest, I consider my Twitter integration a failure, thing didn't went as I expected. At first I wanted to use Twitter as a comment system. So I tried to include a Timeline with a search option on the current page URL at the end of each post. But this can't be done dynamically. I would have to create each widget by hand on the Twitter Website. No Way!
So instead I just add two buttons, one for tweeting, one for following. That's cheap. And the main difficulty is to find the information in the Twitter documentation. It's written like a marketing document, and important information is hidden among bullshit.
In short, first include twitter JS into your '_includes/foot.html' file:
<script>window.twttr = (function(d, s, id) {
    var js, fjs = d.getElementsByTagName(s)[0],
            t = window.twttr || {};
    if (d.getElementById(id)) return t;
    js = d.createElement(s);
    js.id = id;
    js.src = "https://platform.twitter.com/widgets.js";
    fjs.parentNode.insertBefore(js, fjs);

    t._e = [];
    t.ready = function(f) {
        t._e.push(f);
    };

    return t;
}(document, "script", "twitter-wjs"));</script>
Then you just need to add the two buttons at the end of your posts, after the content. In the '_layouts/post.html' template, add the following HTML code:
{{ content }}

<div class="pull-right">
    <a class="twitter-follow-button"
        href="https://twitter.com/gerald__pereira"
        data-size="large" data-show-count="false">
        Follow @gerald__pereira</a>
</div>

<a href="https://twitter.com/share"
    class="twitter-share-button"
    data-via="gerald__pereira"
    data-size="large"
    data-hashtags="{% for cat in page.categories %}{{ cat }},{% endfor %}{% for tag in page.tags %}{{ tag }},{% endfor %}"
    data-count="none">Tweet this</a>
Regarding the follow button, you may replace the href="https://twitter.com/gerald__pereira" by your twitter ID.
data-size="large" is used to display a bigger button and data-show-count="false" to hide the followers counter.
For the 'Tweet this' button, you also may replace the data-via="gerald__pereira" by your twitter ID.
The data-hashtags option is used to display a list of hashtags in the generated tweet. We inject the categories and tags of our article.
I would have liked to insert an image (the current post one) into the generated tweet. But just like using Twitter as a comment system, that does not seem to be possible at the moment.

Comments with Disqus
So we'll stick with Disqus for the comments. It is a Web service that handles discussions about articles with a centralized authentication. We can completely delegate the management of comments to it:
- Connect to Disqus,
- On the home page, click on the cogs icon (top right of the screen) and then on Add Disqus To Site:
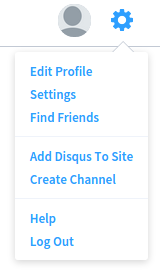
- On the next page select your Site name and Cateagory then click on Finish registration:
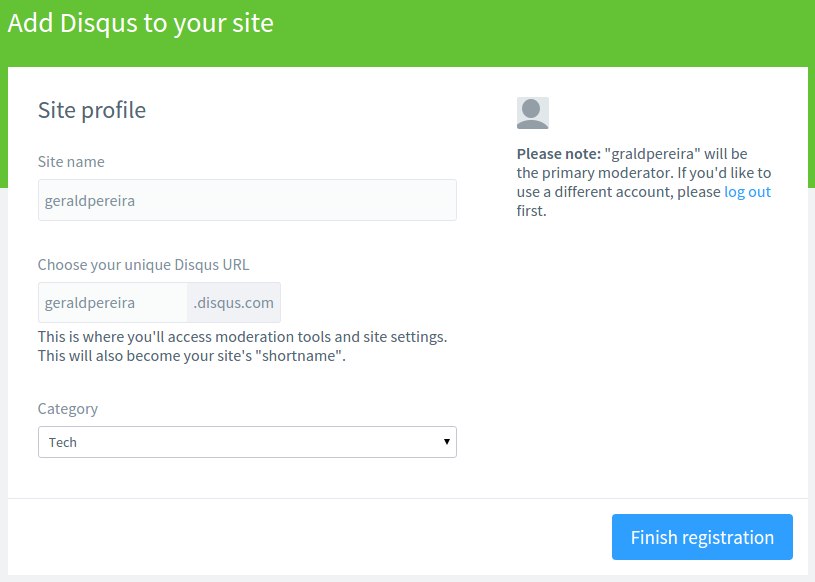
Once this is done you can add the following code snippet after the content of your blog posts
(after the {{ content }} tag into the '_layouts/post.html' file):
{% if site.disqus_shortname %}
<div id="disqus_thread"></div>
<script type="text/javascript">
    /* * * CONFIGURATION VARIABLES * * */
    var disqus_shortname = '{{ site.disqus_shortname }}';

    /* * * DON'T EDIT BELOW THIS LINE * * */
    (function () {
        var dsq = document.createElement('script');
        dsq.type = 'text/javascript';
        dsq.async = true;
        dsq.src = '//' + disqus_shortname + '.disqus.com/embed.js';
        (document.getElementsByTagName('head')[0] || document.getElementsByTagName('body')[0]).appendChild(dsq);
    })();
</script>
<noscript>Please enable JavaScript to view the <a href="https://disqus.com/?ref_noscript"
                                                  rel="nofollow">comments powered by Disqus.</a>
</noscript>
Finally add the line disqus_shortname: the-name-you-chose-at-step-3 into your Jekyll configuration (_config.yml).
These are ways amongst many others to improve the visibility of our blog. A little in-page SEO work can also be a good idea: it's important to polish titles and descriptions of our articles. We could also improve our pages response times by reducing their images sizes.
