
JMeter: test as code solutions
The rise of the CI/CD methodologies and frameworks have shaped the daily work of application developers and testers. It allowed for the creation of the DevOps model. DevOps culture demanding "everything as code", modern infrastructure tooling has grown to drive the management and configuration of infrastructure components "as code" alike.
From a load testing point of view, we already detailed how to Shift left with JMeter in this blog: Moving the JMeter testing to an earlier stage in the project lifecycle can be done by running load tests saved in a GIT repository from Jenkins. At OctoPerf we think that JMeter is one of the best tools to implement an Agile and Push to Production strategy. We explained how this approach can be useful how in a Load Test Driven Development process.
To sum up, JMeter load testing can efficiently be executed on automation servers but:
- The JMX format is not VCS friendly, making it hard to work on as a team,
- Using an external graphical application might be a barrier for programmers.
Application developers know that code and associated configuration files can easily be shared, versioned and reused. It's about time we **take "testing as code" seriously and bridge the gaps between development and load testing activities and teams.
The aim of this blog post is to do an overview of available solutions to do "Jmeter as code" using an existing JMX File.
Let's start with JMeter Java DSL.
Notes:
This blog post assumes you are using a linux distribution and commands are given for this OS.
The reporting aspect of load testing is as important as the virtual user design. Solutions studied here are running JMeter load tests, please check this blog post on how to analyze JMeter results.
JMeter Java DSL
JMeter Java DSL is a Java library that provides a Domain Specific Language to configure test plans developed by Abstracta.
Jointly with Junits and Maven it can run load tests from the command line and takes advantage of IDEs autocompletion and inline documentation.
Test plans being written in Java they can easily be saved and versioned on Git.
Getting started
Pre-requisites:
- Install a Git client,
- Install a Java JDK:
sudo apt-get install openjdk-18 openjdk-18-source, - Install Maven:
sudo apt install maven.
A sample project containing a simple test is provided on GitHub.
Go to the sample project page https://github.com/abstracta/jmeter-java-dsl-sample and copy the GIT SSH URL :
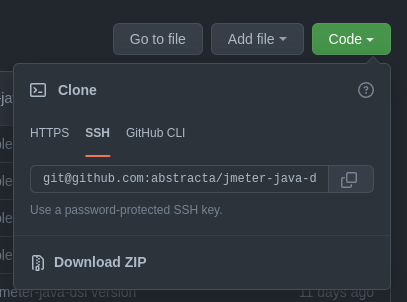
Clone the repository locally by typing the following command in a terminal:
$ git clone git@github.com:abstracta/jmeter-java-dsl-sample.git
Cloning into 'jmeter-java-dsl-sample'...
remote: Enumerating objects: 47, done.
remote: Counting objects: 100% (47/47), done.
remote: Compressing objects: 100% (29/29), done.
remote: Total 47 (delta 20), reused 37 (delta 10), pack-reused 0
Receiving objects: 100% (47/47), 10.98 KiB | 10.98 MiB/s, done.
Resolving deltas: 100% (20/20), done.
It contains a simple test plan written using the DSL :
public class PerformanceTest {

  @Test
  public void testPerformance() throws IOException {
    TestPlanStats stats = testPlan(
        threadGroup(1, 1,
            httpSampler("https://myservice")
        )
    ).run();
    assertThat(stats.overall().sampleTimePercentile99()).isLessThan(Duration.ofSeconds(5));
  }

}
Open the project folder: cd jmeter-java-dsl-sample/.
And run the load test:
$ mvn test
[INFO] Scanning for projects...
[INFO]
[INFO] -------------< us.abstracta.jmeter:jmeter-java-dsl-sample >-------------
[INFO] Building jmeter-java-dsl-sample 0.1-SNAPSHOT
[INFO] --------------------------------[ jar ]---------------------------------
[...]
-------------------------------------------------------
 T E S T S
-------------------------------------------------------
Running us.abstracta.jmeter.javadsl.sample.PerformanceTest
 =      1 in 00:00:00 =   20.4/s Avg:     7 Min:     7 Max:     7 Err:     1 (100.00%)
Tests run: 1, Failures: 0, Errors: 0, Skipped: 0, Time elapsed: 0.419 sec

Results :

Tests run: 1, Failures: 0, Errors: 0, Skipped: 0

[INFO] ------------------------------------------------------------------------
[INFO] BUILD SUCCESS
[INFO] ------------------------------------------------------------------------
[INFO] Total time:  1.178 s
[INFO] Finished at: 2022-06-13T14:37:26+02:00
[INFO] ------------------------------------------------------------------------
Doing such a simple test is quite straightforward.
JMX to DSL
Let's try to do something more meaningful by importing an existing JMX and convert it to Java DSL.
At OctoPerf we use a PetStore application to do demonstrations of the load testing capabilities of our platform. We will use a sample Virtual User that mimics the behavior of a buyer profile on our fake e-commerce website (buyer.jmx):
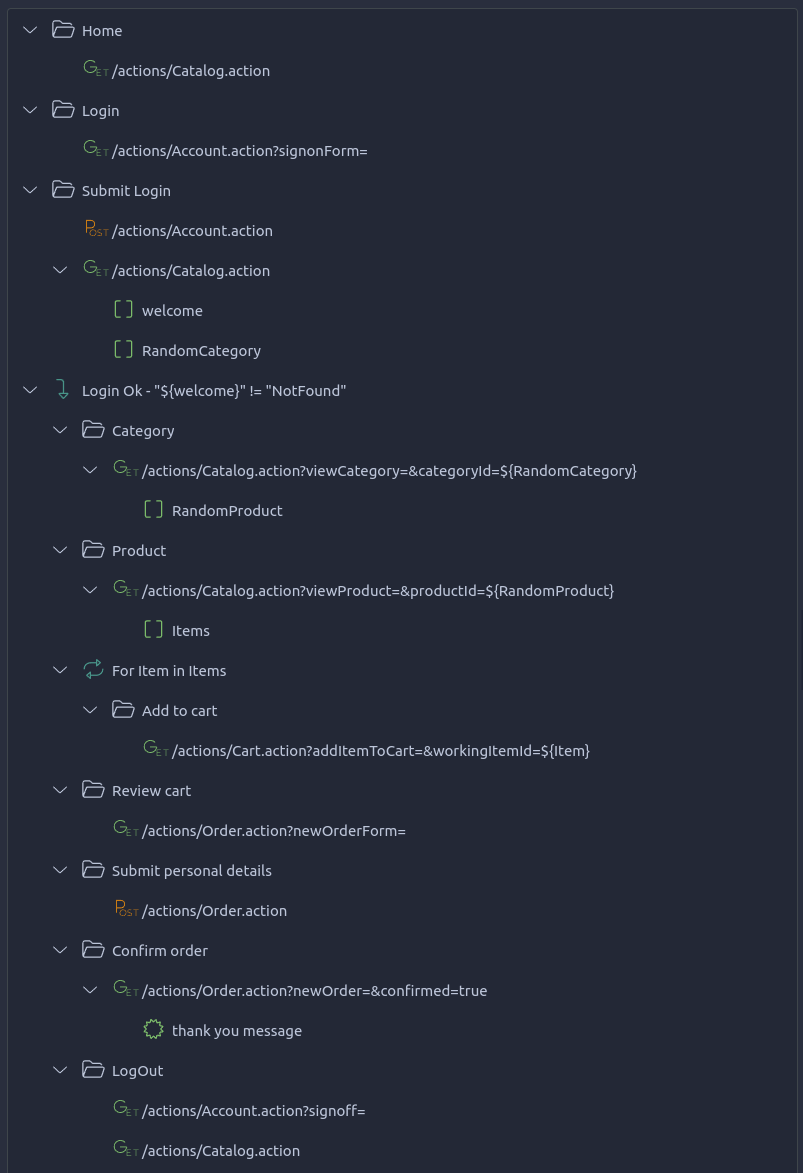
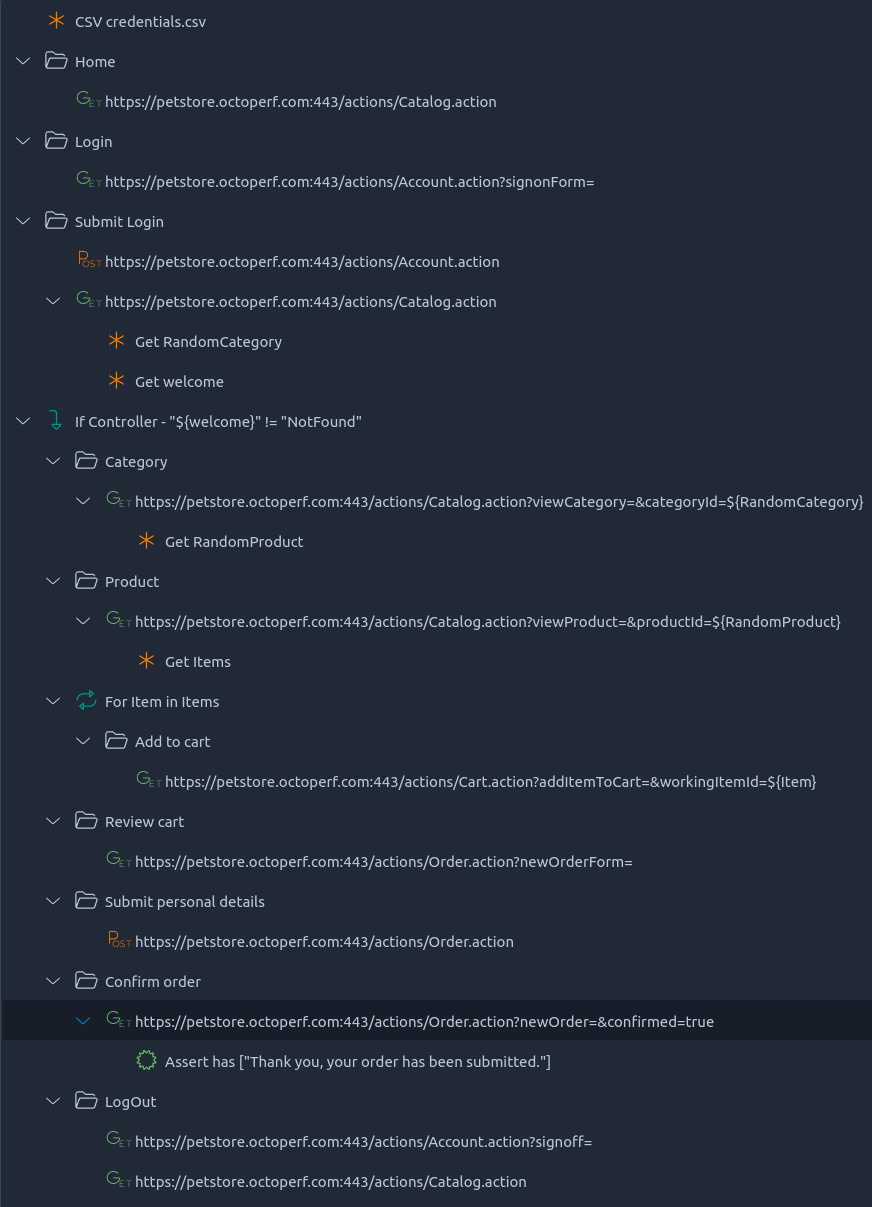
This user logins to the store, browses categories and items, adds some items to his cart, and proceeds to checkout. In addition to usual transactions and HTTP request actions, this involves Regexp extractors, response assertions and For loops.
JMeter Java DSL comes with a utility Jar that converts a given JMX file into DSL code.
The JAR file is available at https://github.com/abstracta/jmeter-java-dsl/releases. Download it manually or via command line :
wget https://github.com/abstracta/jmeter-java-dsl/releases/download/v0.61/jmx2dsl.jar
Note: The Java DSL tool is constantly evolving, so you might want to get the latest version of
jmx2dsljar.
It can be executed by running :
java -jar jmx2dsl.jar buyer.jmx
$ java -jar jmx2dsl.jar buyer.jmx
 testPlan(
  testElement(new DNSCachePanel()),
  testElement(new AuthPanel())
    .prop("AuthManager.clearEachIteration", true),
  testElement("credentials", new CSVDataSet())
    .prop("delimiter", ",")
    .prop("fileEncoding", "UTF-8")
    .prop("filename", "resources/credentials.csv")
    .prop("quotedData", true)
    .prop("shareMode", "shareMode.all")
    .prop("variableNames", "login,password"),
  threadGroup("Buyer", 1, 1,
    transaction("Home",
      httpSampler("https://petstore.octoperf.com:443/actions/Catalog.action", "https://petstore.octoperf.com:443/actions/Catalog.action")
        .header("Host", "petstore.octoperf.com")
        .header("Connection", "keep-alive")
        .header("Cache-Control", "max-age=0")
        .header("Accept", "text/html,application/xhtml+xml,application/xml;q=0.9,image/webp,*/*;q=0.8")
        .header("Upgrade-Insecure-Requests", "1")
        .header("User-Agent", "Mozilla/5.0 (Windows NT 6.3; WOW64) AppleWebKit/537.36 (KHTML, like Gecko) Chrome/48.0.2564.103 Safari/537.36")
        .header("Accept-Encoding", "gzip, deflate, sdch")
        .header("Accept-Language", "fr-FR,fr;q=0.8,en-US;q=0.6,en;q=0.4")
        .header("Cookie", "JSESSIONID=9CF369AE008E53B5E8F6CE45988718FA")
        .encoding(StandardCharsets.UTF_8)
        .followRedirects(false)
        .downloadEmbeddedResources()
        .children(
          testElement("thinktime", new ConstantTimerGui())
            .prop("ConstantTimer.delay", "0")
        )
    ),
    [...]
 ).tearDownOnlyAfterMainThreadsDone()
Most test elements are directly converted in the DSL, transactions and HTTP requests but also:
- For loops and If controllers,
- Regular expression extractors,
- etc.
Other elements are imported using the generic DSL keyword testElement.
IMHO it's a good way to support any JMX even if the generated script might be more verbose than with test element natively supported by the DSL
(That's also how we do it at OctoPerf with JMeter Generic actions).
For example, response assertions are imported as:
testElement("thank you message", new AssertionGui())
  .prop("Asserion.test_strings", Collections.singletonList("Thank you, your order has been submitted."))
  .prop("Assertion.test_type", 2)
The generated code is displayed on the terminal, so you must copy it in a .java file by hand.
You must also add imports for StandardCharsets, HTTPConstants, ContentType, etc.
In case you have generic testElement keywords you will also need to add the following dependency in your pom.xml file:
<dependency>
  <groupId>us.abstracta.jmeter</groupId>
  <artifactId>jmeter-java-dsl-wrapper</artifactId>
  <version>0.61</version>
  <scope>test</scope>
</dependency>
And add the following import in your script (the full The resulting test file can be downloaded here (PerformanceTest.java):
import static us.abstracta.jmeter.javadsl.wrapper.WrapperJmeterDsl.*;
Jmx2dsl being currently a work in progress and in its early versions, more test elements are probably natively supported as you read this blog post.
Since it generates testElement code almost any JMX can be converted in a functional DSL code!
Anyway, a more straightforward option is to directly run a JMX file if you have existing test plans:
final DslTestPlan buyerJMX = DslTestPlan.fromJmx("buyer.jmx");
final TestPlanStats stats = buyerJMX.run();
assertThat(stats.overall().sampleTimePercentile99()).isLessThan(Duration.ofSeconds(5));
The file buyer.jmx must be placed at the root of your maven project (next to the pom.xml file).
Resource files path root is also this same folder.
For example the file credentials.csv is configured in my JMX with a CSV Dataset using <stringProp name="filename">resources/credentials.csv</stringProp> so it must be saved as jmeter-java-dsl-sample/resources/credentials.csv or you'll get the following exception when running mvn test.
$ mvn test
[INFO] -------------< us.abstracta.jmeter:jmeter-java-dsl-sample >-------------
[INFO] Building jmeter-java-dsl-sample 0.1-SNAPSHOT
[INFO] --------------------------------[ jar ]---------------------------------
[...]
22:29:52.315 [Buyer 1-1] ERROR org.apache.jmeter.threads.JMeterThread - Test failed!
java.lang.IllegalArgumentException: File credentials.csv must exist and be readable
    at org.apache.jmeter.services.FileServer.createBufferedReader(FileServer.java:424) ~[ApacheJMeter_core-5.4.3.jar:5.4.3]
    at org.apache.jmeter.services.FileServer.getReader(FileServer.java:390) ~[ApacheJMeter_core-5.4.3.jar:5.4.3]
    at org.apache.jmeter.services.FileServer.getParsedLine(FileServer.java:372) ~[ApacheJMeter_core-5.4.3.jar:5.4.3]
    at org.apache.jmeter.config.CSVDataSet.iterationStart(CSVDataSet.java:179) ~[ApacheJMeter_components-5.4.3.jar:5.4.3]
    at org.apache.jmeter.control.GenericController.fireIterationStart(GenericController.java:399) ~[ApacheJMeter_core-5.4.3.jar:5.4.3]
    at org.apache.jmeter.control.GenericController.fireIterEvents(GenericController.java:391) ~[ApacheJMeter_core-5.4.3.jar:5.4.3]
    at org.apache.jmeter.control.GenericController.next(GenericController.java:160) ~[ApacheJMeter_core-5.4.3.jar:5.4.3]
    at org.apache.jmeter.control.LoopController.next(LoopController.java:134) ~[ApacheJMeter_core-5.4.3.jar:5.4.3]
    at org.apache.jmeter.threads.AbstractThreadGroup.next(AbstractThreadGroup.java:91) ~[ApacheJMeter_core-5.4.3.jar:5.4.3]
    at org.apache.jmeter.threads.JMeterThread.run(JMeterThread.java:254) [ApacheJMeter_core-5.4.3.jar:5.4.3]
    at java.lang.Thread.run(Thread.java:833) [?:?]
DSL to JMX
In any case you are not locked in with the solution as it is possible to save DSL code as a JMX file:
final DslTestPlan buyer = testPlan([...]);
buyer.saveAsJmx("dslAsJmx.jmx");
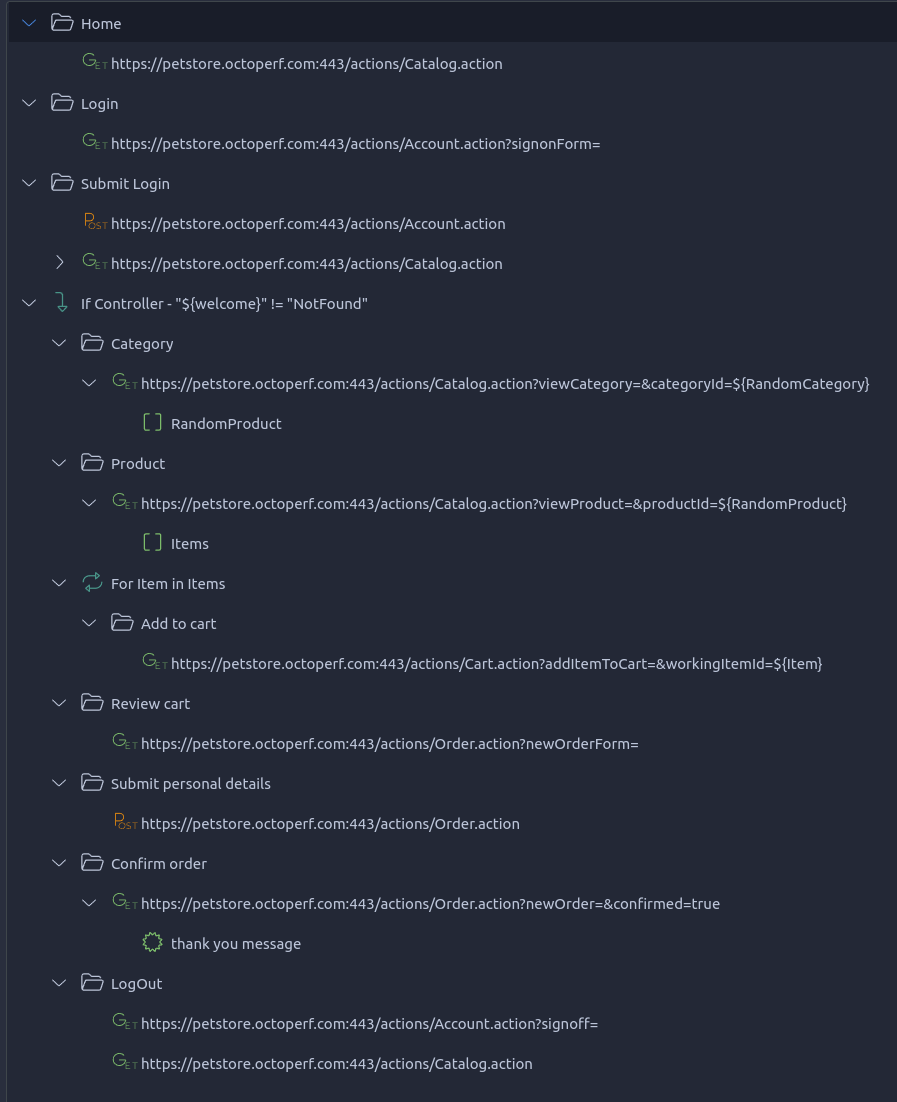
For our imported Buyer test plan, we can see the exported JMX matches the imported version:
Cloud Execution
JMeter Java DSL uses two maven modules for its JMX cloud test execution:
- jmeter-java-dsl-blazemeter for BlazeMeter,
- jmeter-java-dsl-octoperf for OctoPerf.
The module must be added to your maven pom.xml file:
<dependency>
  <groupId>us.abstracta.jmeter</groupId>
  <artifactId>jmeter-java-dsl-octoperf</artifactId>
  <version>0.58</version>
  <scope>test</scope>
</dependency>
Then you can execute the test directly from the Java DSL by using a token or API key to authenticate towards the cloud load testing provider:
testPlan(...).runIn(new OctoPerfEngine(System.getenv("OCTOPERF_API_KEY"))
        .projectName("DSL test")
        .totalUsers(500)
        .rampUp(Duration.ofMinutes(1))
        .holdFor(Duration.ofMinutes(10))
        .testTimeout(Duration.ofMinutes(20)));
More information
To conclude with JMeter Java DSL, I strongly encourage you to check this very promising project and give it a start on GitHub if you like it. There is more to it than the overview made in this blog post in their documentation.
For example, in case you have homemade JMeter plugins you can implement unsupported test elements in the DSL. It is preferable to request unsupported JMeter test elements or features here or even contribute to the DSL so the entire community can benefit from it. But in some cases, you might have made your own private test element that is not relevant for the community and can easily include its support in the DSL.
Taurus
Another solution to do test as code with JMeter is Taurus.
We already briefly reviewed it in our blog post about Open Source Load Testing tools. This time we will go more in depth to check how we can use it to run JMeter tests using YML and command line.
Taurus is an abstraction layer on top of load testing tools, not a load testing tool itself. It supports many load testing solutions including JMeter. Taurus scripts are in Yaml format and Taurus itself is a Python package.
Getting Started
- Install Python 3.7+ and its package installer pip and Java:
sudo apt-get install python3 default-jre-headless python3-tk python3-pip python3-dev libxml2-dev libxslt-dev zlib1g-dev net-tools, - Install Taurus:
sudo python3 -m pip install bzt.
Create or download a simple test simple-petstore.yaml :
execution:
  - concurrency: 100
    ramp-up: 1m
    hold-for: 5m
    scenario: petstore

scenarios:
  petstore:
    requests:
      - https://petstore.octoperf.com/
Run it with the following command:
$ bzt simple-petstore.yaml
16:11:52 INFO: Taurus CLI Tool v1.16.7
16:11:52 INFO: Starting with configs: ['/home/ubuntu/.bzt-rc', 'simple-petstore.yaml']
16:11:52 INFO: Configuring...
16:11:52 INFO: Artifacts dir: /home/ubuntu/Dev/workspaces/taurus/2022-06-14_16-11-52.244306
16:11:52 INFO: Preparing...
16:11:52 INFO: Will install JMeter into /home/ubuntu/.bzt/jmeter-taurus/5.4.3
[...]
16:15:54 INFO: Starting...
16:15:54 INFO: Waiting for results...
16:15:54 INFO: Waiting for finish...
16:16:01 INFO: Changed data analysis delay to 3s
[...]
16:21:44 INFO: Changed data analysis delay to 35s
16:21:58 WARNING: Please wait for graceful shutdown...
16:21:58 INFO: Shutting down...
16:21:58 INFO: Post-processing...
16:21:59 INFO: Test duration: 0:06:04
16:21:59 INFO: Samples count: 5783, 0.00% failures
16:21:59 INFO: Average times: total 5.681, latency 4.025, connect 2.055
16:21:59 INFO: Percentiles:
+---------------+---------------+
| Percentile, % | Resp. Time, s |
+---------------+---------------+
|           0.0 |         0.793 |
|          50.0 |         3.504 |
|          90.0 |        13.992 |
|          95.0 |        16.864 |
|          99.0 |        27.184 |
|          99.9 |        30.512 |
|         100.0 |        30.752 |
+---------------+---------------+
16:21:59 INFO: Request label stats:
+--------------------------------+--------+---------+--------+-------+
| label                          | status |    succ | avg_rt | error |
+--------------------------------+--------+---------+--------+-------+
| https://petstore.octoperf.com/ |   OK   | 100.00% |  5.681 |       |
+--------------------------------+--------+---------+--------+-------+
16:21:59 INFO: Artifacts dir: /home/ubuntu/Dev/workspaces/taurus/2022-06-14_16-11-52.244306
16:21:59 INFO: Done performing with code: 0
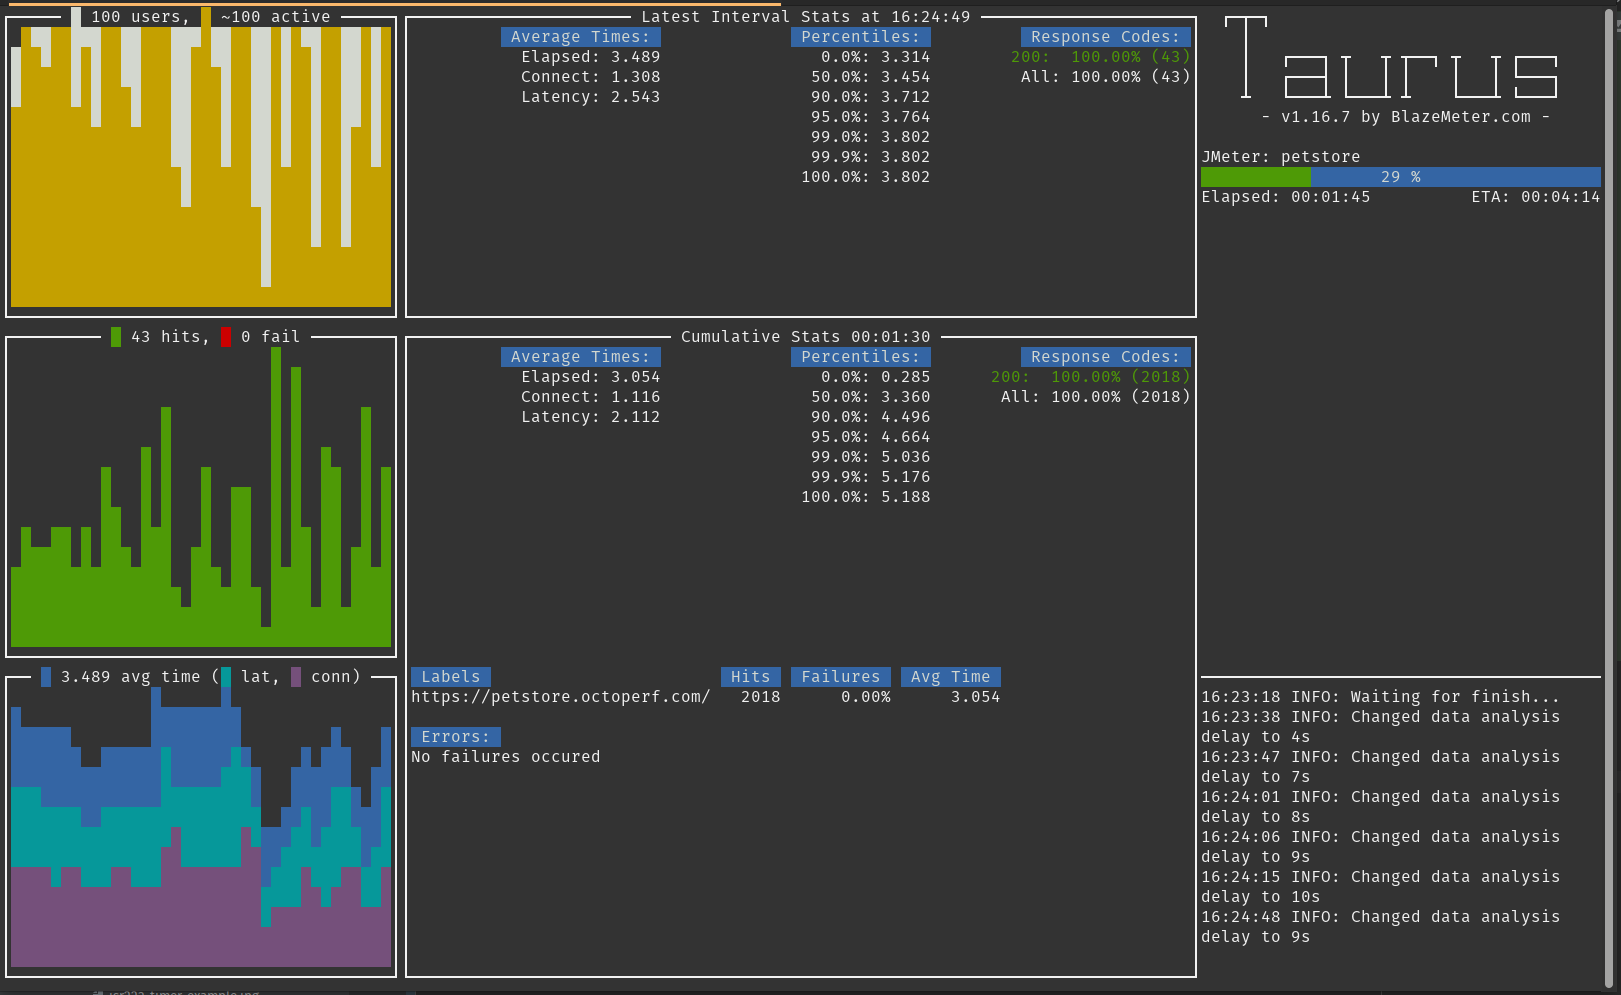
Graphs with the active users, hits, errors and response times are displayed in the shell console as the test is running :
JMX to YML
Once again let's try to import an existing JMX and convert it to Taurus Yaml format.
We will use the same sample Virtual User as for the Java DSL: it mimics the behavior of a buyer profile on our fake e-commerce website (buyer.jmx):
A command-line tool named jmx2yaml is used to convert simple JMX scripts into Taurus configuration files. It comes with Taurus so there is nothing more to install.
Run it using the following command :
$ jmx2yaml buyer.jmx
16:38:39 INFO: Loading jmx file buyer.jmx
16:38:39 WARNING: Removing unknown element: UniformRandomTimer (thinktime)
16:38:39 WARNING: Removing unknown element: UniformRandomTimer (thinktime)
16:38:39 WARNING: No match number found in RegexExtractor, using default: 0
16:38:39 INFO: Done processing, result saved in /home/ubuntu/Dev/workspaces/taurus/buyer.jmx.yaml
Almost all test elements are supported, only the UniformRandomTimer is removed. The tool generates a buyer.jmx.yaml file directly:
 - if: '"${welcome}" != "NotFound"'
     then:
       - do:
  [ ... ]
 - content-encoding: UTF-8
   extract-regexp:
     RandomCategory:
       default: NotFound
       match-no: 0
       regexp: categoryId=(.+?)"><img src="../images/sm
       template: $1$
     welcome:
       default: NotFound
       match-no: 1
       regexp: '  Welcome (.+?)!'
       template: $1$
There is no placeholder left where the unsupported test element was removed. So it might be hard to find out where you need to replace it by another one.
Alternatively, you can run a JMX file directly by specifying it in the YAML :
execution:
  - iterations: 50
    concurrency: 10
    scenario: buyer

scenarios:
  buyer:
    script: buyer.jmx
YML to JMX
The creation of a JMX file is automatic when you run Taurus on JMeter. It generates the following folder:
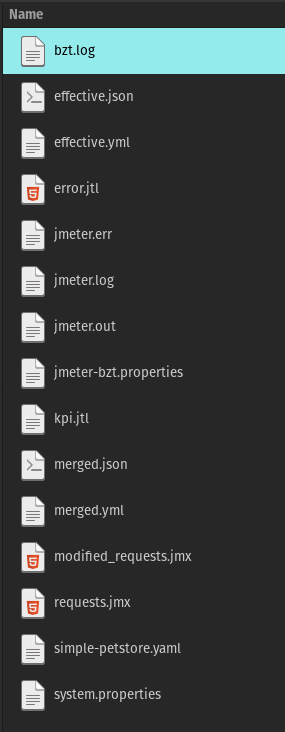
The file requests.jmx can be used in JMeter. After importing it in OctoPerf we can see that it's close to the original file :
Cloud Execution
Taurus scripts can only be executed in the Cloud using Blazemeter, preventing you from comparing cloud load testing solution prices and features.
It is done by setting the provisioning to cloud:
provisioning: cloud
And configuring the token:
modules:
  cloud:
    token: '******:**************'  # API id and API secret divided by :
Other solutions
There are two other solutions out there to do JMeter as code:
- JMeter as Code is more confidential library than JMeter Java Dsl with fewer stars and maintainers on GitHub,
- Groovy JMeter is a Groovy-based DSL for building and running JMeter test plans from command line.
They are worth mentioning to get the whole spectrum but are not tested in this blog post.
Pros and cons
Let's make a review of advantages and disadvantages of Java DSL and Taurus :
- Both solutions are VCS friendly: a Java or a Yaml file can be equally versioned on Git.
- Both tools support importing JMX files and can execute an existing JMX file for maximum compatibility.
- +1 for Java DSL compatibility in our test and for importing unsupported test elements as generic DSL keywords instead of simply removing them like Taurus does.
- +1 for Taurus generating a ready-to-run
.ymlfile where Java DSL requires you to copy the script from the console to a Java file (might be fixed soon though). - Taurus requires you to install both Java and Python environments while Java DSL only needs Java.
- Taurus supports many load testing engines where Java DSL is focused on JMeter.
- Java DSL benefits from your favorite IDE autocompletion and inline documentation.
- Java DSL can run load tests in the Cloud both on Blazemeter and OctoPerf.
In the end it's up to whether you would rather focus on JMeter and go with a newer tool like JMeter Java DSL or need support for other load testing engines and go with Taurus.
